Threat Response - Integration with Cisco ASA
This document covers all aspects of Threat Response integration with Cisco ASA firewalls. The Proofpoint Threat Response platform can integrate with the ASA line in the following ways:
- As an Enforcement Device
Cisco ASA can be used to prevent network-based access to malicious hosts, or to restrict access to certain areas of the network for infected users. Threat Response can place suspicious hosts reported in security alerts into a Threat Response block list, which is then pushed up to the ASA as an object-group to be used when building policies.
Learn more about Cisco ASA here: Cisco NG Firewalls.
The steps below detail the process for configuring Threat Response to map a local block list to an object-group in a Cisco ASA device. With the mapping in place, policies can be created on the ASA that reference the object-group managed by Threat Response.
1. Create a Host List in Threat Response
The first step in enabling synchronization with Cisco ASA is to create a Host List in Threat Response to map to an object-group on the ASA. Follow the steps below to create the Host List in Threat Response.
- Log in to Threat Response.
- Navigate to the Lists page.
- Click on the Host Lists sub-tab to manage your Host Lists.
- Click the blue Add (+) button next to Lists to bring up the New List panel.
- Set the following fields:
- Name:
<list_name> - Description:
<list_description>(Optional) - Publish:
<checked_or_unchecked>(Optional)
- Name:
Savechanges.
Note
List Publishing enables remote polling of a list in Threat Response via HTTP/s. It is not required for a Cisco ASA configuration.
2. Create a Cisco ASA Device
In order to map a Threat Response list to your Cisco ASA device, you must first tell Threat Response how to communicate with that device.
- Log in to Threat Response
- Navigate to the
Devicespage - Click on the
Network Devicessub-tab - Click the blue
Add (+)button next to Network Devices to bring up the New Network Device panel
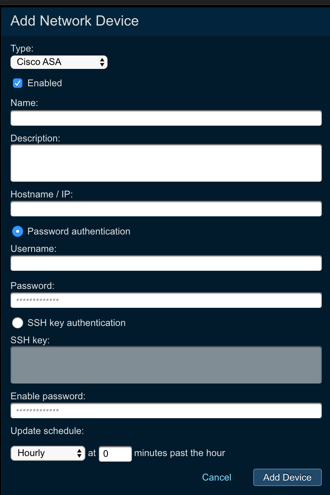
- Set the following fields:
- Enabled: enable the device after the configuration is saved
- Name: provide device name
- Description: provide device description
- Hostname / IP: provide IP or hostname of the device
- Authentication: you can choose between password authentication, where you need to provide username and password, or SSH key authentication, where you need to upload the SSH key to Threat Response
- Enable password: provide the # enable password for Cisco ASA
- Update this device: Define the update schedule by choosing the appropriate option from the drop down menu
Savechanges.
3. Map a List to the Cisco ASA Device
Once your Cisco ASA device has been created in Threat Response, you can begin mapping lists to it. These will appear as object-groups in the ASA.
Note
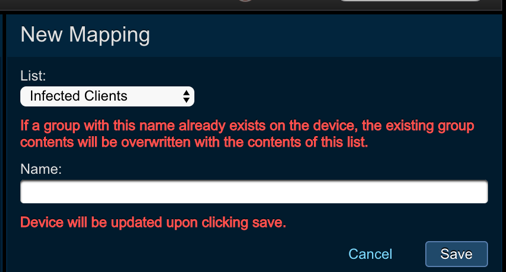
Once saved, Threat Response will automatically connect to the ASA, and attempt to create the group on the device. If the group already exists, it will be overwritten with the items in the Threat Response list.
To map a list to a Cisco ASA device:
- Log in to Threat Response.
- Navigate to the
Devicespage. - Click on the
Cisco ASAdevice that you want to map a list to. - In the
Device Detailspanel, click the blueAdd (+)button next toList Mappingsto open theNew Device Mappingpanel. - Select the appropriate list from the
Listdropdown. - Input a
Group Nameto tell Threat Response what to name the object-group in the Cisco ASA. Savechanges.