Threat Response - Integration with Microsoft Exchange
This document covers the Threat Response integration with Microsoft Exchange Servers to enable the email quarantine capability. Threat Response provides the capability to move malicious emails (manually or automatically) from a user’s mailbox to a predefined quarantine location.
Further, Threat Response supports email quarantining as it relates to a Microsoft 365 multi-tenant / multi-geo tenant configuration. Enabling such a configuration between Threat Response and Microsoft 365 presupposes that for every (Microsoft 365) tenant, there exists an Exchange server in Threat Response utilizing Azure AD (modern) authentication.
Supported Exchange Versions
| Platform | Version(s) |
|---|---|
| Microsoft Exchange Server | 2010, 2013, 2016 and 2019 |
| Microsoft Exchange Online Microsoft 365 |
Current |
Supported Permissions for Quarantine
Threat Response requires one of the following permission types for being able to quarantine messages from users’ mailboxes:
| Permission Type | Benefit | Considerations |
|---|---|---|
| Full Access | Retains original message headers. Retains message read status when quarantine is undone. Allows organization into subfolders in quarantine mailbox. |
Requires a scheduled task to apply permissions to new mailboxes. Permissions are set at the mailbox level. |
| Application Impersonation | Allows for more concurrent quarantines. Permissions only need to be set once. |
Does not need permissions to be set as a scheduled task. Permissions are set at the account level. |
Note
If using Azure AD (“modern”) authentication for an Microsoft 365 implementation, Application Impersonation permissions will be used.
Preparing Microsoft Exchange 2010
Threat Response interfaces with Microsoft Exchange 2010 through the Exchange Web Services API. This chapter details the steps required to determine the Exchange Web Services URL used to interface with Exchange, as well as how to create the quarantine destination, and a service account for Threat Response to use when interacting with Exchange.
Identifying the Exchange Web Services URL
Threat Response interfaces with Exchange via the Exchange Web Services API. The Threat Response configuration requires that you provide the Exchange Web Services URL so that it can communicate with Exchange. The steps below detail how to find this URL.
To identify the Exchange Web Services URL:
- Connect to Exchange and start the Exchange Management Shell utility.
- Execute the command below to display the Exchange Web Services URL.
Get-WebServicesVirtualDirectory|Select name, *url*|fl
- Confirm that the Internal URL shown is correct, and routable on your network. This is your Exchange Web Services URL.
Make note of the Exchange Web Services URL for now. This will be used when configuring Exchange connectivity in Threat Response.
Creating a Location for Quarantined Emails
Threat Response needs a secure location to place emails that have been identified as malicious. This location needs to be a special mailbox created for quarantine purposes.
Note
This location will contain emails identified to contain malicious content, and should be treated as such. Caution should be exercised when handling items in the quarantine.
Using a Mailbox for Quarantine
A mailbox can be used as a quarantine destination for emails deemed to be malicious. A quarantine mailbox can be created via the Exchange Management Console.
To create a quarantine mailbox:
- Connect to Exchange and run the Exchange Management Console utility.
- Navigate to
Microsoft Exchange>Microsoft Exchange On-Premises>Recipient Configuration>Mailbox.

- Click
New Mailboxin the right-hand panel, and follow the wizard to create a new user mailbox that will serve as the quarantine location.
Creating a Service Account for Threat Response
To search user mailboxes and move suspect messages to the quarantine, Threat Response will need an account with elevated permissions.
Note
Proofpoint recommends creating a dedicated account for performing search and quarantine actions.
To create a service account using the Exchange Management Console:
- Connect to Exchange and run the Exchange Management Console utility.
- Navigate to
Microsoft Exchange>Microsoft Exchange On-Premises>Recipient Configuration>Mailbox.

- Click New Mailbox in the right-hand panel, and follow the wizard to create a new user mailbox that will serve as the service account for Threat Response.
Setting Permissions for the Service Account
The service account will need to be granted access to all user mailboxes that will be protected by the quarantine function. These permissions can be set using the Exchange Management Shell.
To assign permissions using the Exchange Management Shell:
- Connect to Exchange and start the Exchange Management Shell utility.
- For Application Impersonation | Execute the command below to give the service account access to all mailboxes (Note: replace “username” with the service account name).
New-ManagementRoleAssignment -Name:ThreatResponseImpersonation -Role:ApplicationImpersonation -user:Domain\ServiceAccountNote
-Name: ThreatResponseImpersonation is for example purposes, this can be any unique name that fits within your organization’s naming standards
- For FullAccess delegation | Execute the command below to give the service account access to all mailboxes inclusive of shared mailboxes. Be sure to replace username with the service account name.
Get-Mailbox -ResultSize unlimited -Filter {(RecipientType -eq 'UserMailbox')} | Add-MailboxPermission -User username -AccessRights FullAccess -InheritanceType all
This command can locate all mailboxes (inclusive of shared mailboxes) in Microsoft Exchange as well as granting FullAccess rights to both “regular” and shared mailboxes.
Note
This action only applies to mailboxes that currently exist in Exchange. When new mailboxes are created, this command will need to be run again to grant access to the new mailboxes.
Preparing Microsoft Exchange 2013, 2016 and 2019
Threat Response interfaces with Microsoft Exchange 2013, 2016 and 2019 through the Exchange Web Services API. This chapter details the steps required to determine the Exchange Web Services URL used to interface with Exchange, as well as how to create the quarantine destination, and a service account for Threat Response to use when interacting with Exchange.
Identifying the Exchange Web Services URL
Threat Response interfaces with Exchange via the Exchange Web Services API. The Threat Response configuration requires that you provide the Exchange Web Services URL so that it can communicate with Exchange. The steps below detail how to find this URL.
To identify the Exchange Web Services URL:
- Connect to Exchange and start the Exchange Management Shell utility.
- Execute the command below to display the Exchange Web Services URL.
Get-WebServicesVirtualDirectory|Select name, *url*|fl
- Confirm that the Internal URL shown is correct, and routable on your network. This is your Exchange Web Services URL.
Make note of the Exchange Web Services URL for now. This will be used when configuring Exchange connectivity in Threat Response.
Creating a Location for Quarantined Emails
Threat Response needs a secure location to place emails that have been identified as malicious. This location needs to be a special mailbox created for quarantine purposes.
Note
This location will contain convicted malware emails identified to contain malicious content, and should be treated as such. Caution should be exercised when handling items in the quarantine.
Using a Mailbox for Quarantine
A mailbox can be used as a quarantine destination for emails deemed to be malicious. A quarantine mailbox can be created via the Exchange Admin Center.
To create a quarantine mailbox:
- Log in to the Exchange Admin Center from a browser.
- Navigate to
recipients>mailboxes. - Click the
“+”sign to create a new mailbox for quarantined emails.

Creating a Service Account for Threat Response
To search user mailboxes and move suspect messages to the quarantine, Threat Response will need an account with elevated permissions.
Note
Proofpoint recommends creating a dedicated account for performing search and quarantine actions.
Important
Make sure there is an active mailbox enabled for the service account that has been created and is being used to perform a quarantine using either Full Access permissions or the Application Impersonation role. Note that if there is no mailbox for the service account, quarantining from a regular mailbox will still work but quarantining from distribution lists on Exchange will fail.
To create a service account using the Exchange Admin Center:
- Log in to the Exchange Admin Center from a browser.
- In the Exchange Admin Center, navigate to recipients > mailboxes.
- Click the “+” icon to create a new mailbox to serve as the service account.

Setting Permissions for the Service Account
The service account will need to be granted access to all user mailboxes that will be protected by the quarantine function. These permissions can be set using the Exchange Management Shell.
To assign permissions using the Exchange Management Shell:
- Connect to Exchange and start the Exchange Management Shell utility.
- For Application Impersonation | Execute the command below to give the service account access to all mailboxes (Note: replace “username” with the service account name).
New-ManagementRoleAssignment -Name:ThreatResponseImpersonation -Role:ApplicationImpersonation -user:Domain\ServiceAccountNote
-Name: ThreatResponseImpersonation is for example purposes, this can be any unique name that fits within your organization’s naming standards
- For FullAccess delegation | Execute the command below to give the service account access to all mailboxes inclusive of shared mailboxes. Be sure to replace username with the service account name.
Get-Mailbox -ResultSize unlimited -Filter {(RecipientType -eq 'UserMailbox')} | Add-MailboxPermission -User username -AccessRights FullAccess -InheritanceType all
This command can locate all mailboxes (inclusive of shared mailboxes) in Microsoft Exchange as well as granting FullAccess rights to both “regular” and shared mailboxes.
Note
This action only applies to mailboxes that currently exist in Exchange. When new mailboxes are created, this command will need to be run again to grant access to the new mailboxes.
Configuring EWS Throttling Policy
The throttling policies in Exchange affect not only EWS, but also all client connections to the Exchange server, including the protocols used by Office Outlook, Outlook Web App, and Exchange ActiveSync. These Throttling policies are assigned per user, and the system has a default throttling policy out of the box.
To improve TRAP quarantine speed, we strongly recommend removing EWS Throttling policy for the user account you plan on using for email quarantines.
Important
Microsoft 365 does not expose throttling policies. Microsoft 365 subscribers should contact Microsoft with any throttling questions. These instructions only apply to on-premise Exchange deployments.
Throttling Settings for Application Impersonation role vs. Full Access
There are two options for the EWS Service Account configured for TRAP:
- TRAP EWS User has Full Access Permission: If you’re quarantining using a service account that has Full Access permissions, then just set a throttling policy with unlimited (or high number) EWS settings (as already described in the installation guide) for that account.
- TRAP EWS User has Application Impersonation role: If you’re quarantining with impersonation, you must create and assign a new throttling policy to quarantine-user, but you must also allow each individual account more head room. To do so, it’s likely that the best course of action is to update the default throttling policy on the network.
Settling Throttling Policy for TRAP EWS User
From the Exchange Management PowerShell (run on the CAS), you can see the existing policies by running:
Get-throttlingpolicyTo create a new policy that has no EWS throttling and assign it to the quarantine user, do the following:
- Create a new policy:
New-throttlingpolicy PFPT_ThreatScanner_ThrottlingPolicy- Set the EWS throttling portion of that new policy to “unlimited”:
For Exchange 2010, use the following:
set-throttlingpolicy PFPT_ThreatScanner_ThrottlingPolicy -EWSMaxConcurrency $null -EWSPercentTimeInAD $null -EWSPercentTimeInCAS $null -EWSPercentTimeInMailboxRPC $nullFor Exchange 2013, 2016 and 2019:
Set-ThrottlingPolicy PFPT_ThreatScanner_ThrottlingPolicy -EWSMaxConcurrency Unlimited -EWSMaxSubscriptions Unlimited -EwsCutoffBalance Unlimited -EwsMaxBurst Unlimited -EwsRechargeRate Unlimited- Assign the policy to the quarantine user:
Set-ThrottlingPolicyAssociation -Identity Domain\TRAPService -ThrottlingPolicy PFPT_ThreatScanner_ThrottlingPolicyNote
Replace Domain\TRAPService with your service account
Preparing Microsoft Exchange Online
Threat Response interfaces with Microsoft Exchange Online through the Exchange Web Services API. This chapter details the steps required to determine the Exchange Web Services URL used to interface with Exchange, as well as how to create the quarantine destination, and a service account for Threat Response to use when interacting with Exchange. The service account will be an Azure app registration.
Note
All Microsoft 365 accounts used can be a shared mailbox which requires no user license. You will need one shared mailbox for quarantine and one shared mailbox for reported abuse.
Identifying the Exchange Web Services URL
Threat Response interfaces with Exchange via the Exchange Web Services API. The Threat Response configuration requires that you provide the Exchange Web Services URL so that it can communicate with Exchange. In Exchange Online deployments, this is a standard URL that is used for all Exchange Online customers.
Exchange Online EWS URL:
https://outlook.office365.com/EWS/Exchange.asmxMake note of the Exchange Web Services URL for now. This will be used when configuring Exchange connectivity in Threat Response.
Creating a Mailbox for Quarantined Emails
Threat Response needs a mailbox to place emails that have been identified as malicious. This mailbox should be dedicated for quarantine purposes.
Note
This location will contain emails identified to contain malicious content. Caution should be exercised when handling items in the quarantine.
To create a quarantine account in Microsoft 365:
- Log in to the Microsoft 365 Portal as an admin user.
- Click on the Exchange Admin Center

- In Exchange Admin Center navigate to
Recipients>Mailboxes. - Click the “Add a shared mailbox” button to create a quarantine mailbox.


Note
The name of the mailbox, e.g. Inbox, must be in the English language, as per Microsoft’s instructions, in order to allow Threat Response to access it.
Enabling Azure AD Authentication
To search user mailboxes and move suspect messages to the quarantine, Threat Response will need elevated permissions.
Note
In version 4.2.0, Threat Response added support for Azure AD Authentication (“Modern Auth”) for Microsoft 365 configurations. This authentication method is not supported for on-premise Exchange deployments.
Important
Basic Auth for O365 is no longer recommended by Proofpoint. If you are still using Basic Authentication on O365 we recommend changing to Azure AD Auth as Basic Authentication will be deprecated on or around the second half of 2021. Microsoft began to disable Basic Authentication for newly created tenants by default and began to disable Basic Authentication in tenants that have no recorded usage starting October 2020.
Azure AD Authentication provides a more secure, certificate-based method of authenticating to Microsoft 365. It also simplifies assigning permissions.
Creating an Application in Azure AD
- Launch Azure Active Directory. (https://portal.office.com/adminportal/home#/homepage)
- Click
Admin Centers, thenAzure Active Directory. -
Click
App Registrations(not Enterprise Applications).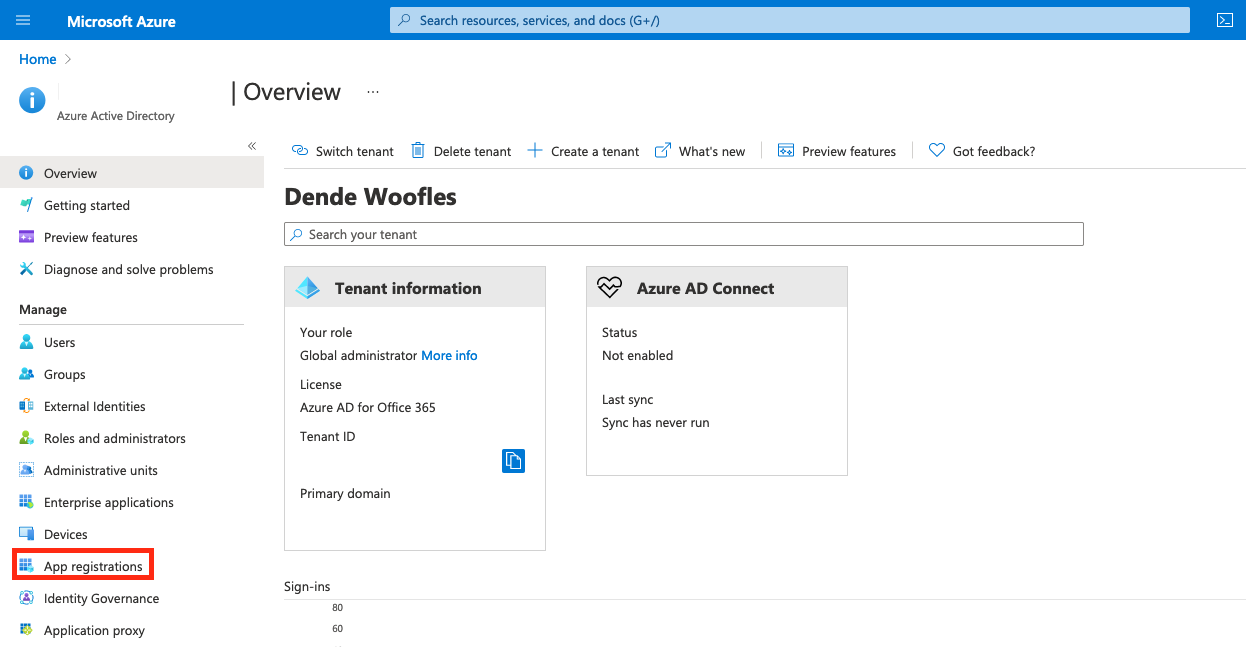
-
Click
New Registration.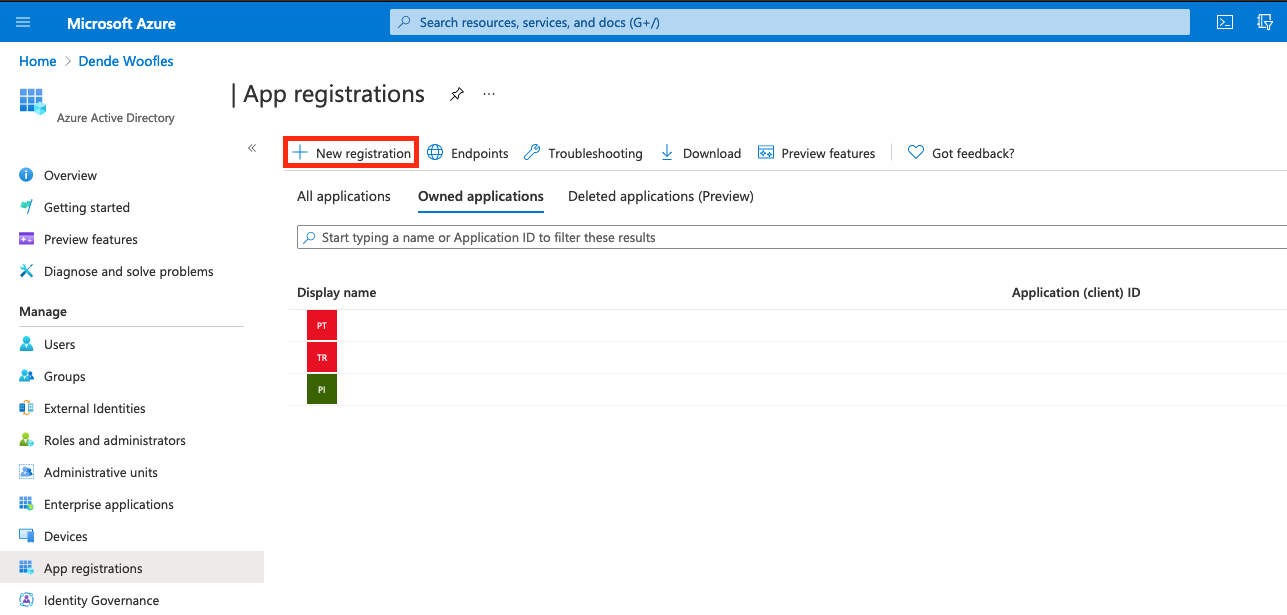
-
Register the application.
- Enter a name for the App. It can be anything. Try to keep it unique against the other apps already registered.
- For
Supported Account Typesselect theAccounts in this organizational directory onlyradio button. - Leave the Redirect URI blank.
- Click
Registerat the bottom of the page.

-
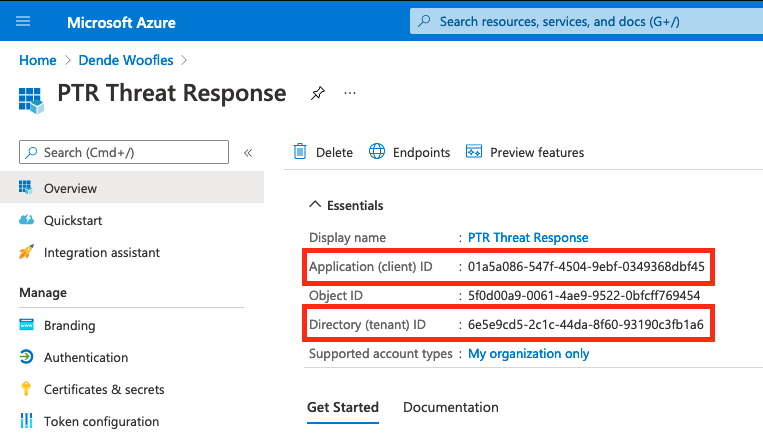
Record/Save the Application (client) ID and the Directory (tenant) ID. These will be needed later when configuring Threat Response.
Tip
Clicking on the ID field gives a little icon to “copy to clipboard”
Creating a Certificate as a Key for the Application
Note that it is possible to accomplish this task in two different ways:
-
Option one includes the following instructions for uploading the certificate file.
Navigate to Microsoft Azure’s application registration for the client application and
Select Certificates & Secrets.
Click on Upload Certificate and then select the certificate file to be uploaded.
Click on Add. Once the certificate is uploaded, the thumbprint, start date, and expiration values should be displayed.
-
Option two includes both the following information and the instructions contained in the Installing the Certificate Into the Application’s Manifest section below.
Note
You must have Powershell 3 or higher to execute the commands below
Execute the following Powershell commands (in this example, we’re in the directory c:\temp\oauth_cert). These commands will create a self-signed cert in the variable $cert, then generate a thumbprint so it can be registered in Azure. For this example, the certificate is set to expire 3 years from now.
$cert=New-SelfSignedCertificate -Subject "CN=TRAP_cert" -CertStoreLocation "Cert:\CurrentUser\My" -KeyExportPolicy Exportable -KeySpec Signature -NotAfter (Get-Date).AddYears(3)
$bin = $cert.RawData
$base64Value = [System.Convert]::ToBase64String($bin)
$bin = $cert.GetCertHash()
$base64Thumbprint = [System.Convert]::ToBase64String($bin)
$keyid = [System.Guid]::NewGuid().ToString()
$jsonObj = @{customKeyIdentifier=$base64Thumbprint;keyId=$keyid;type="AsymmetricX509Cert";usage="Verify";value=$base64Value}
$keyCredentials=ConvertTo-Json @($jsonObj) | Out-File "keyCredentials.txt"
The contents of keyCredentials.txt will be used in the next section.
Execute the following Powershell commands to export the cert as a PFX file so it can be securely uploaded to Threat Response. Remember to update “password” to contain your chosen secure password.
Export-Certificate -Cert $cert -FilePath .\cert.cer
$mypwd = ConvertTo-SecureString -String "password" -Force -AsPlainText
Export-PfxCertificate -cert $cert -FilePath .\cert.pfx -Password $mypwd
Installing the Certificate Into the Application’s Manifest
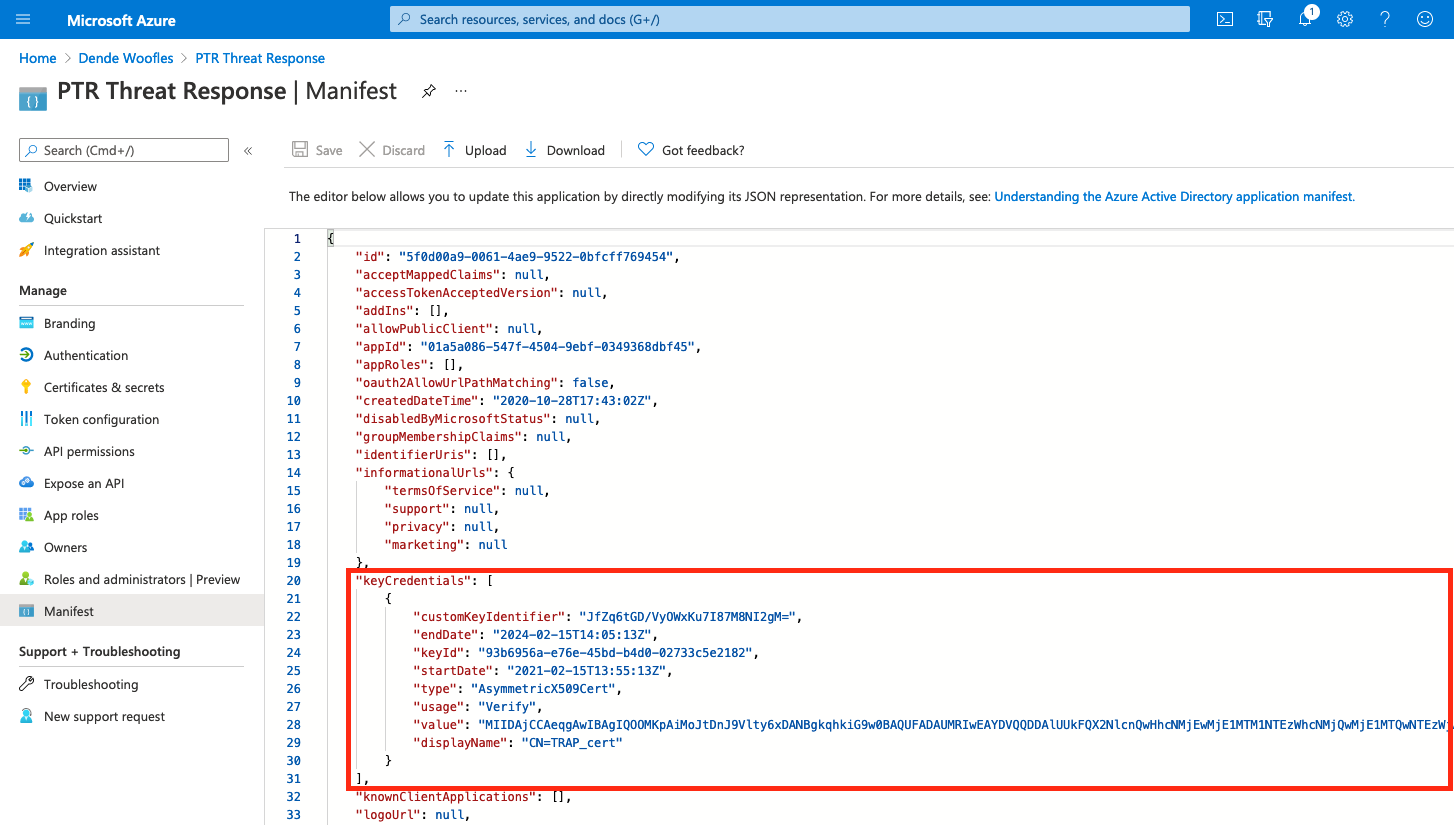
In order to associate the generated certificate with the newly created app, we must modify the Manifest in Azure AD.
-
Go to the newly created app in the Azure Active Directory, under App Registrations, and click
Manifest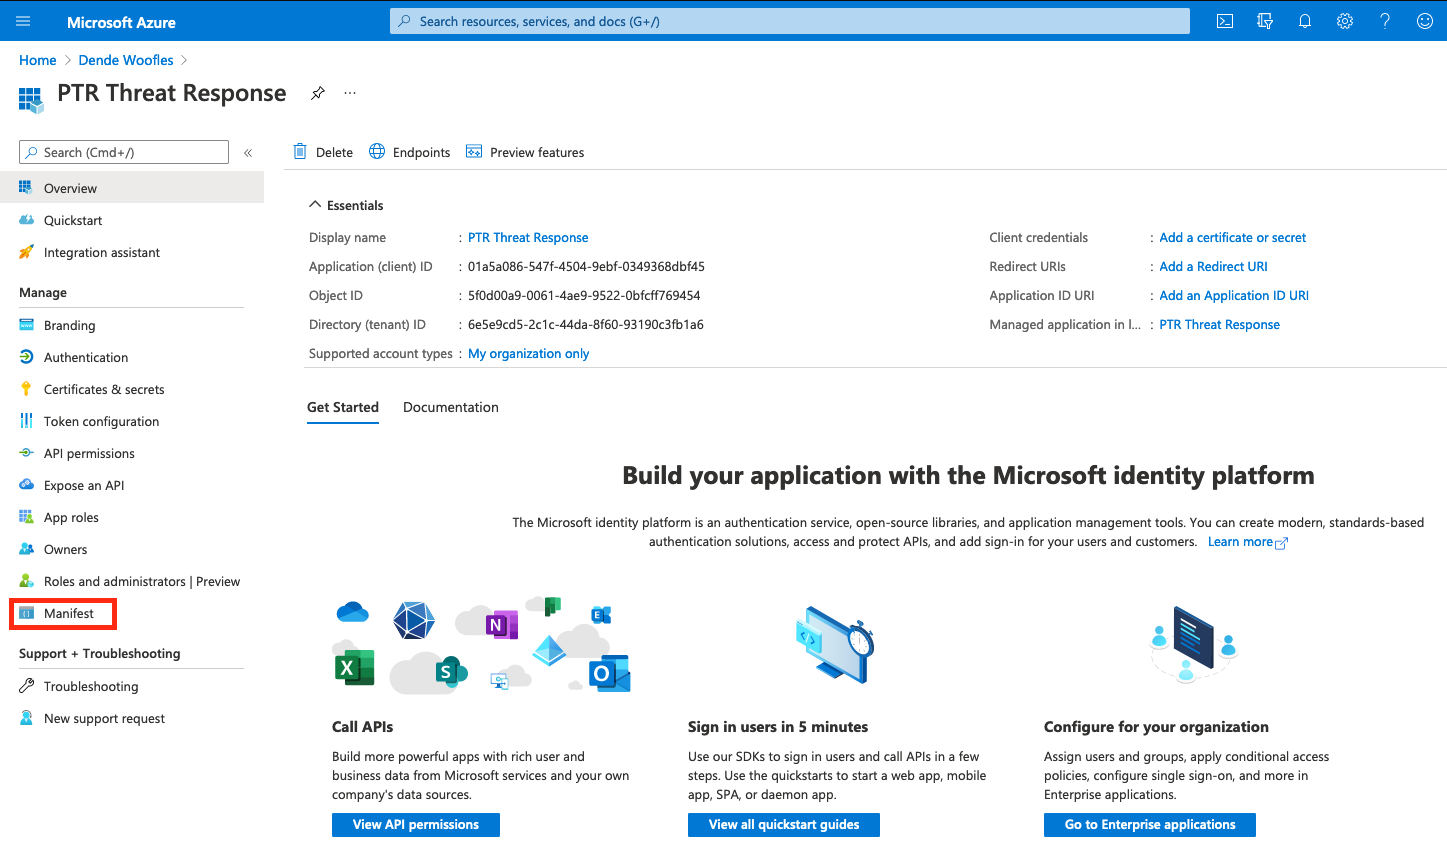
-
Replace the contents of the
keyCredentialsproperty with the contents ofkeyCredentials.txt, and then save the manifest.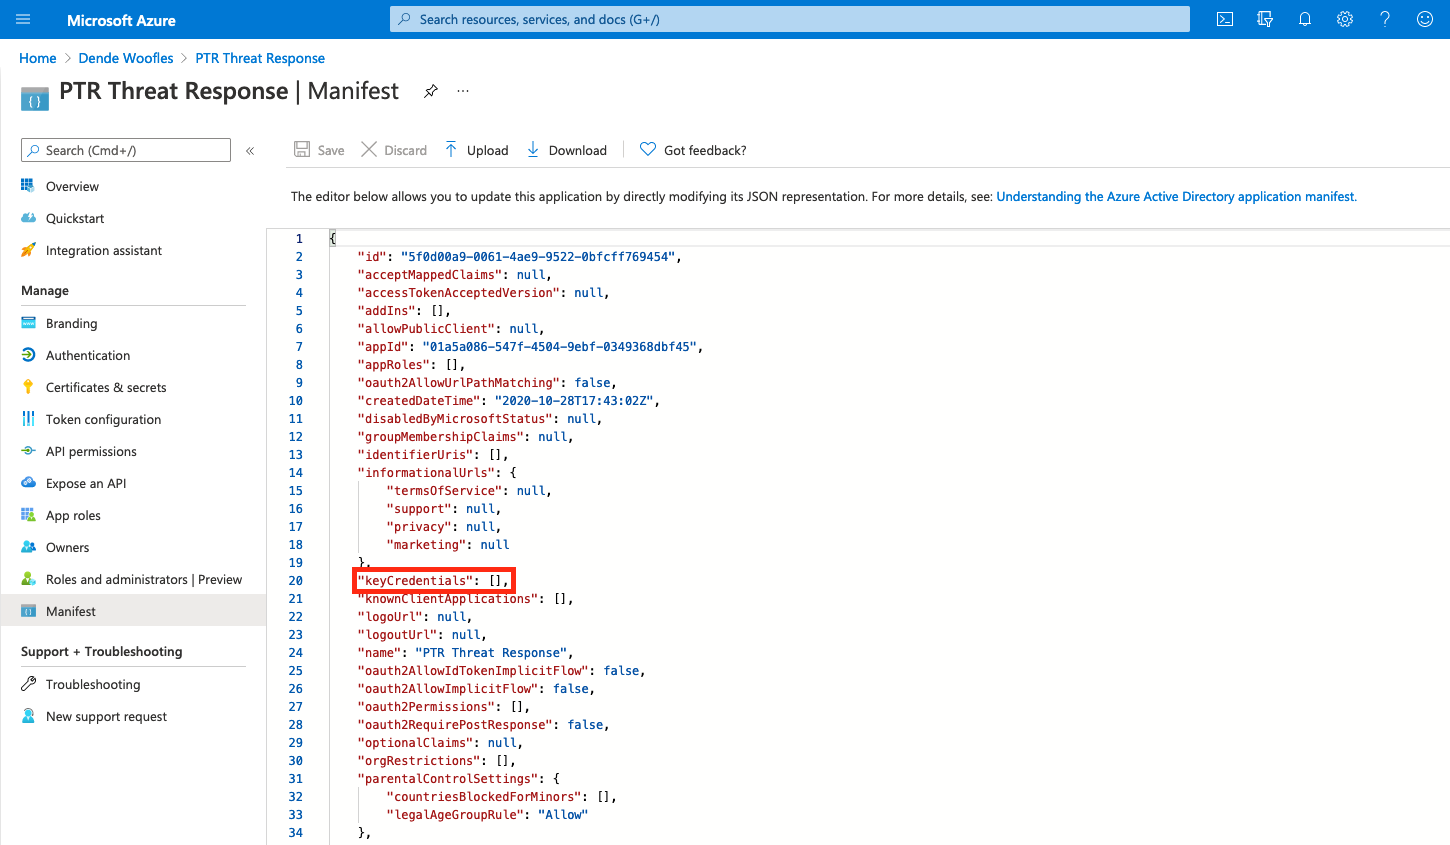
Assigning Permissions to the Application
Complete the following steps to tell Azure AD that our application has permission to use Exchange.
-
Click
API Permissions.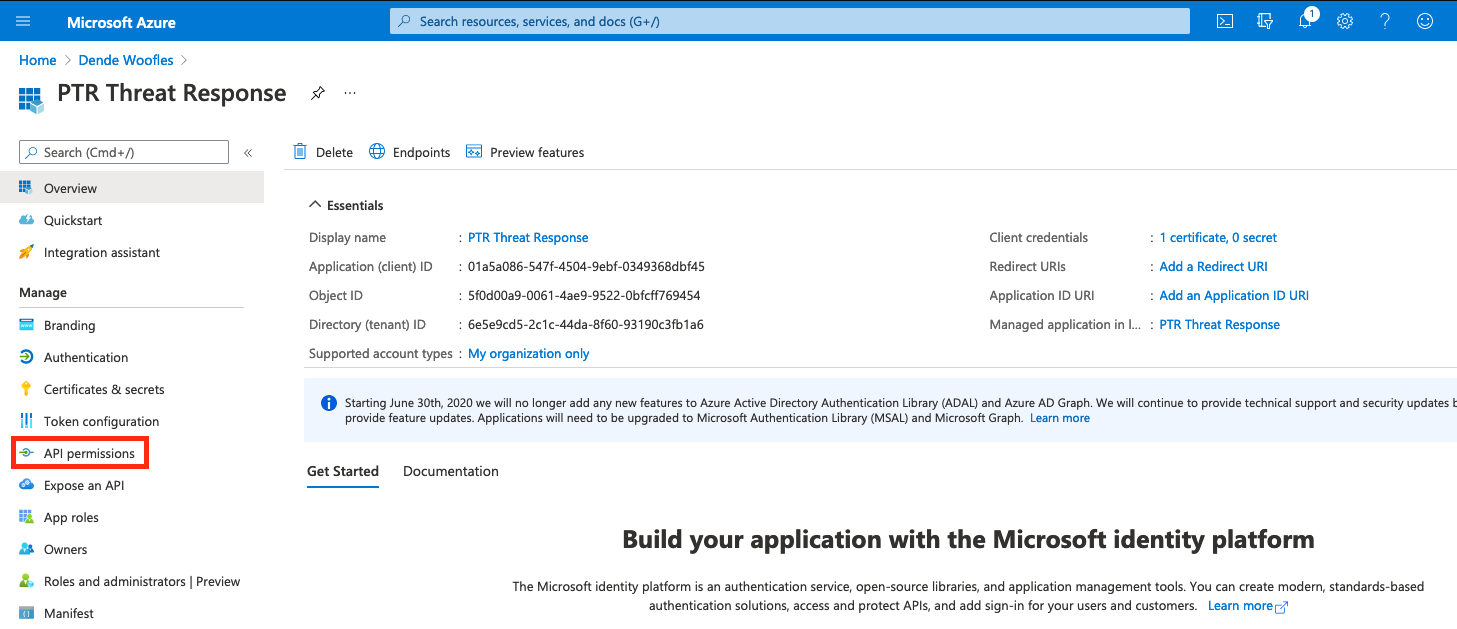
-
Click
Add a Permission.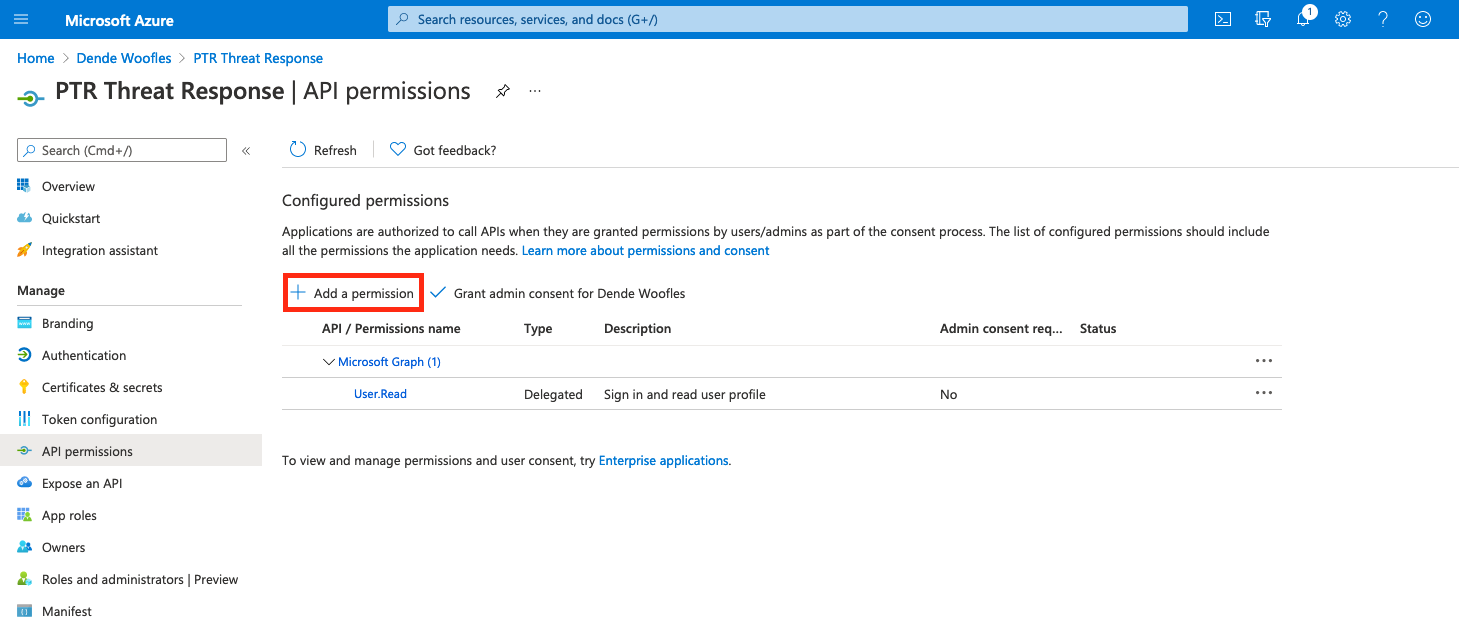
-
The
Microsoft APIstab will be selected by default.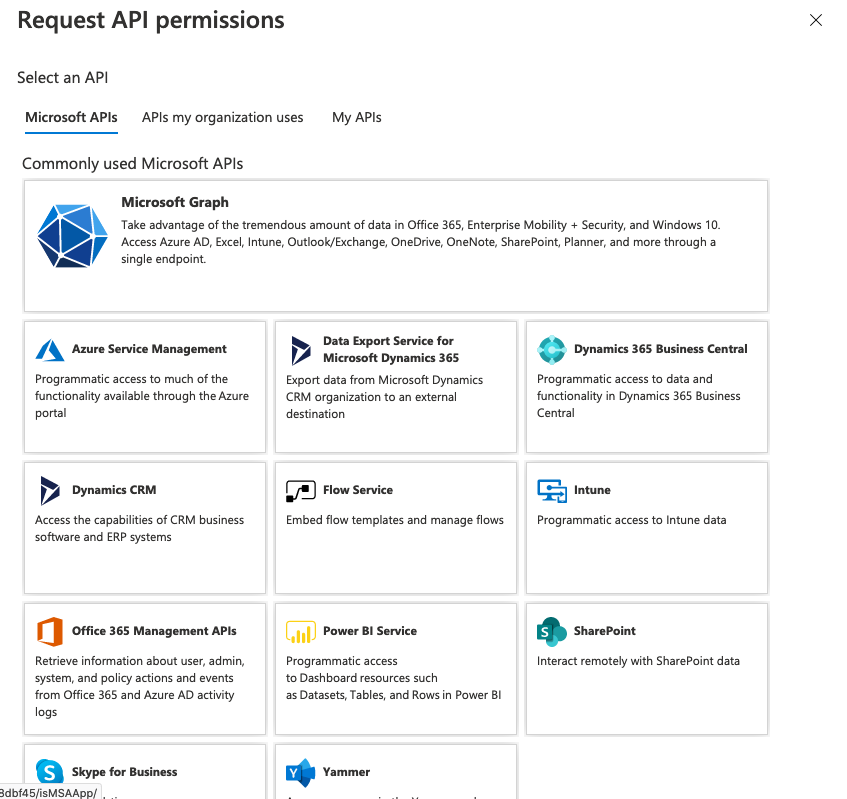
Select the
APIs my organization usestab and then search for Microsoft 365.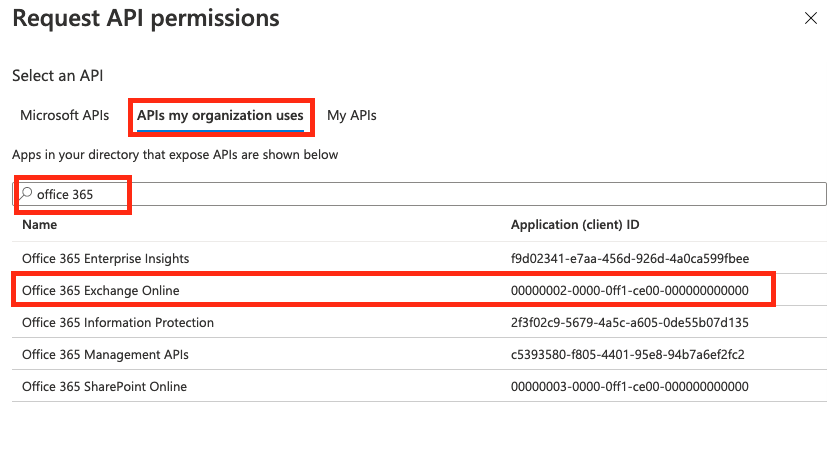
-
Select
Microsoft 365 Exchange Onlineand thenApplication permissionson the next screen.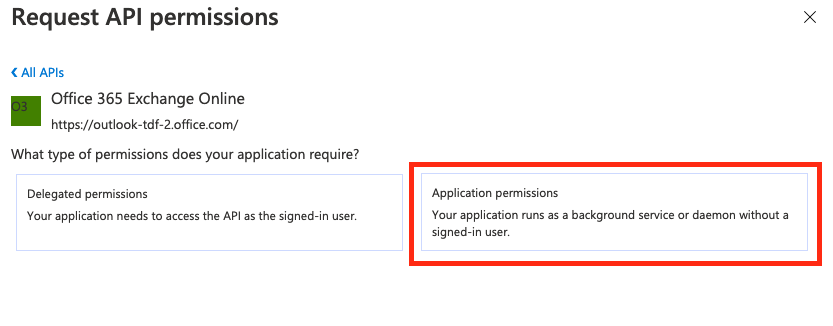
-
Select
full_access_as_appto grant application permissions and then clickAdd Permissionat the bottom of the screen.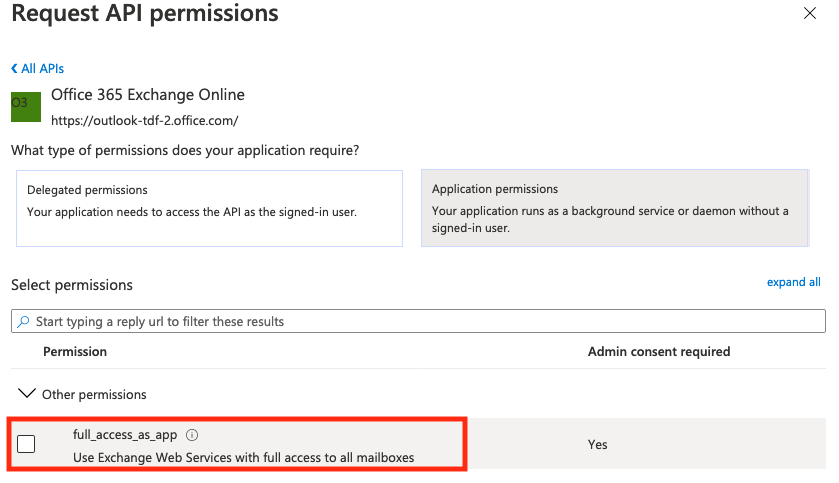
-
Lastly, click
Grant admin consent.
The application has now been granted the necessary permissions to use Exchange.
Threat Response Configuration
Configuring Threat Response for Exchange integration requires that you create an Exchange Server device in Threat Response. This device will hold all of the information that Threat Response needs to interface with Exchange to quarantine messages, including the EWS URL, quarantine location, and service account to use when interfacing with Exchange.
Configuring Exchange Connectivity in Threat Response
In order for Threat Response to communicate with an Exchange Server it must be properly configured in the System Settings.
To add an Exchange server in the System Settings:
- Log in to Threat Response.
- Using the top menu bar open the settings menu and navigate to the
System settingspage.

- Navigate to
Email Integration>Exchange servers - Click the blue
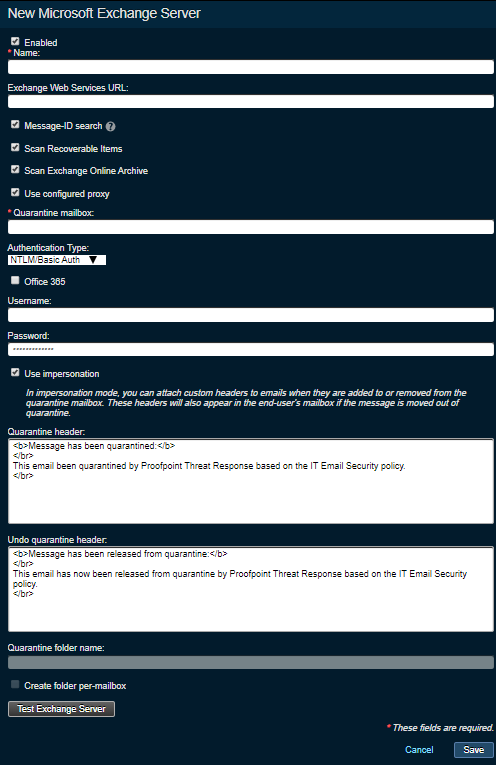
Add (+)button next toMicrosoft Exchange Serversto bring up theNew Microsoft Exchange Serverpanel.

-
Set the following fields:
- Enabled: Check the box if you want to enable the configuration for the Exchange server; if off, the configuration will be saved but not enabled
- Name: A label / name for this Exchange Server.
- Exchange Web Services URL: The complete EWS URL for the exchange instance.
- MessageID search: Check this option to fallback to searching the mailbox for the message if the message-ID is missing from the alert, and the alert type is URL-based.
- Scan Recoverable Items: Allows the quarantine of deleted items that remain in the recoverable items folder.
- Scan Exchange Online Archive: Allows messages to be quarantined out of EOA (Exchange Online Archive).
- Use configured proxy: Allows Threat Response to use or bypass proxy configuration (typically used for communication to on-premise Exchange).
- Quarantine mailbox: The SMTP address of the quarantine mailbox.
- Authentication Type: Choose
Azure ADorNTLM/Basic Authentication
-
For Basic Authentication set the following fields:
- Microsoft 365: Do not check this option since Basic Authentication is only used for Exchange Onprem.
- Username: Username used to login to EWS (typically a service account). Typically entered as
domain\useror in UPN format. - Password: Password used to login to EWS.
- Use impersonation: Check this option if you want to use the Application Impersonation role (for the credentials that you created for Threat Response). Uncheck this option if you’re using full mailbox access.
- Quarantine folder name: The name of the mailbox folder that quarantined messages should be placed into (not available if using Application Impersonation).
- Create folder per mailbox: Check this box to organize quarantined emails into separate recipient folders below the quarantine folder (not available if using Application Impersonation).
-
With impersonation mode, custom headers to emails are configurable and visible when a message in the end-user’s mailbox is quarantined and restored.
- Quarantine header (impersonation mode only): This header informs the user that the message was originally quarantined for a reason.
- Undo quarantine header (impersonation mode only): This header informs the user that the quarantined message was restored back into the mailbox for a reason.
-
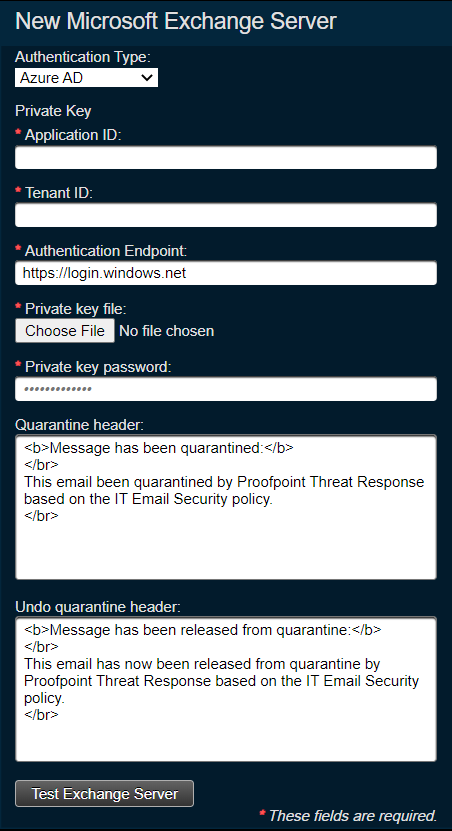
For Azure AD set the following fields:
- Application ID: Enter the Application ID of the app created in Azure AD
- Tenant ID: Enter your Microsoft 365 tenant name (e.g.
customer.onmicrosoft.com) - Authentication Endpoint: For most deployments, the value should be https://login.windows.net (default). If you are deploying TRAP in a geography (e.g. China, Germany) that requires a different Microsoft authentication endpoint, please change this field to your local authentication end-point recommended by Microsoft.
- Private key file: Choose the .pfx file you saved with the application private key
- Private key password: Enter the password for the .pfx file
-
Click
Saveto complete the configuration
Test Exchange Server button enables the user to test the configuration and reflect any errors in the Microsoft Exchange Servers table (red or green indicator icon).
With a successful configuration in place, you will see a green status icon next to the newly created Exchange Server in Threat Response.