Threat Response - Administration Guide
The Administration guide has been created for Threat Response administrators who need to configure various functionalities of Threat Response. This document covers the features that users can configure in the UI and in the dedicated “System Settings” section. A navigation bar on the left-hand side of the screen is included for ease of reference: similarly, “Search” functionality can be used to locate topics of interest.
Configuring Threat Response functionality
This sections will provide information on how to configure various functionality and features of Threat Response product.
Alert sources configuration
Alert sources are your detection systems that generate security alerts on your network. These systems are Threat Response’s primary data input for generating incidents. Alert sources are generally configured during the initial installation to begin feeding the system with security alerts.
Note
Threat Response supports a variety of sources from which it can consume alert data. For a complete list of integrations, please, refer to the PTR supported integrations.
Adding a source
Open the Navigation menu and select the Sources button to open the Sources window where you can create and manage the detection systems from which Threat Response will receive security alerts, e.g. Proofpoint TAP or other SIEM or IDS vendors.

You will be redirected to the following page:

To add the source:
- Click the blue add (+) button next to Sources in the left panel to add a new alert source to Threat Response.
- Select a source type from the Type drop down list.
- Complete the alert source configuration. (see next sections)
- Save changes.

Note
The options presented vary by alert source. Common settings are outlined below. For more information regarding your specific alert source vendor, please refer to the appropriate vendor integration guide.
Name and description
A Name is required for each new alert source, and is used as an identifier for the alert source throughout the UI. A name that clearly represents the source type, as well as its location, is recommended.
The Description allows an administrator to input a more detailed description of the source (to be displayed when viewing the source in the Sources page). Including a description for the alert source is optional.
Operating modes
Threat Response offers two operating modes allowing users to view alerts in two different ways: mapped and linked. These event-to-incident relationships are described below:
- Linked: (default) Threat Response intelligently links incoming alerts to existing incidents based on the system being targeted.
- Mapped: Each new alert received is mapped to a separate incident with a one-to-one mapping. Uncheck the Link alerts box in the Edit Source pane to create a new incident for each individual alert that is received.
Alert linking can be configured from the New Source pane when adding a source, or when editing a source that has already been created.
Access control lists
Threat Response lets you create access control lists (ACLs) to restrict the IP addresses that can send events to your alert source listeners on Threat Response. Create ACLs when adding a source.
The following steps assume you have the New Source panel open to add a source.
- Click
Enable Event Source Locationin the right panel. - For the first IP address you want on the ACL, enter a unique name and the host IP address.
- Click the blue add (+) button in the same section and repeat the previous step for every IP address you want to add to the ACL.
- Click
Savewhen you have completed adding the source.
Alert sources management
Click on a row in the Source table on the left to open the Details pane on the right for the selected source. Use this panel to manage sources.
Editing an alert source
With a source selected, you can edit, remove, disable, or enable the source from the Details Menu. To access this menu, click on the button in the details panel header. The options presented in the menu are Edit, Remove, Disable (shown below) or Enable, depending on the state of the source.

Show POST URL for alerts
The Show POST URL for alerts link opens a pop-up window containing the URL created by Threat Response (the URL for the source to set up notifications). The POST URL is a unique URL for each source where the source is configured to push alerts to this URL to create incidents in Threat Response.

Viewing received alerts
To view a list of alerts received from an alert source, click on the Show link in the alert source table.

Finding high-volume alerts
Threat Response’s built-in reporting engine can be used to quickly find high-volume alerts that either need attention, or may need to be reviewed to determine if they are false positives that should be ignored.

To find high-volume alerts:
- Log in to Threat Response.
- Navigate to
Reports > Threats > Threatsto open the Threats report - Adjust the timeline below the chart to view alerts within a specific time period
- Threats that are most commonly reported will appear at the top of the chart
Identifying, and reducing false-positive, or “noisy” alerts will eliminate the unnecessary creation of incidents in Threat Response, resulting in a better user experience. Threat Response allows you to ignore the alerts when they are received, or take an automatic action prior to ignoring the alert.
A common use of taking an action before ignoring an alert is for handling persistent brute-force attacks against a publicly accessible server.
Creating alert filters
Alert filters can be used to ignore alerts from an alert source. This may be necessary for alert sources that are prone to false positives or for the purpose of ignoring alerts reporting traffic from certain IP subnets.
- Log in to Threat Response
- Navigate to the
Sourcespage - Click on the source that you want to create an alert filter for to bring up the Source Details panel on the right.
- Click the Add (+) button next to Alert Filters to open the New Alert Filter popup. Specify the filter criteria to look for (see below).
- Save changes.

Creating Match Conditions
Match Conditions define automatic actions to be taken on alerts. Match conditions provide a wide array of metrics that you can automatically match within the incoming alerts and then apply certain actions on those matches. For example, Threat Response can perform automatic response action depending on whether the attacker is within a certain network, or a target has a certain LDAP attribute. What is more, Threat Response admin users can create multiple responses in a single match condition.
Use the steps below to create a match condition that takes action, and then suppresses the alert to avoid creating a new incident.

- Log in to Threat Response.
- Navigate to the
Sourcespage. - Click on the source that you want to create a match conditions for to bring up the Source Details panel on the right.
- Click the Add (+) button next to Match Conditions to open the New Match Condition popup. See below.
-
Create the match condition with the following settings:
- Define the match criteria on the left-side of the popup
- Create responses on the right-side of the popup
- Check the box in the upper-right corner to Suppress incident creation.
- Save changes.

Define the match criteria
The Match Criteria on the left-hand side of the Match Condition window tells Threat Response to which alerts to apply the responses. Define the severity and type of alert(s) to look for by placing check marks next to the desired alert attributes.
An additional filter can also be applied to restrict the behavior to specific subnets based on the attacker or target’s IP.
Define the Response Action
Define a Response action to take by clicking on the add (+) button next to Responses in the Match Condition pop-up window.


Available response types mirror the manual response types that can be created within an incident. See Custom Responses and Scripted Responses below.
| UI Text | Description | Team Permission | Other Requirements |
|---|---|---|---|
| < Name of Custom Response > | Execute a Custom Response (defined in Settings > Customization > Custom Responses). | N | A Custom Response has been defined in “Settings.” |
| Run a script | Run a specified Python script. | N | A Response Script has been uploaded in “Scripts.” |
| Move email to quarantine | Quarantine a malicious email by moving it out of an end-user’s mailbox. | Y | |
| Set incident team | Change the Incident’s Team and/or Assignee. | N | |
| Set incident field | Set an incident field to a particular value, e.g. “Classification = Maliious” | N | |
| Add to host list | Add a hostname or IP address to a List. | Y | A Host List exists. |
| Add to URL list | Add a URL to a List. | Y | A URL List exists. |
| Add to file list | Add an MD5 or SHA256 hash to a List. | Y | A File List exists. |
| Add to user list | Add a username to a List. | Y | A User List exists. |
| Invalidate AD user password | Invalidate a user’s Active Directory password to lock them out of secure resources. (Requires an AD admin to restore the password to a usable state) | Y | An LDAP Server has been configured in “Settings.” |
| Disable AD users | Disable a user in Active Directory. | Y | An LDAP Server has been configured in “Settings.” |
| Force AD user password change | Force a user to change their Active Directory password on their next login. | Y | An LDAP Server has been configured in “Settings.” |
| Close incident | Close the incident after performing all Responses. | N | |
| Analyze email | Submit the email body to CLEAR for analysis. | Y | |
| Send email notification | Send a templated email response to the reporter of the abuse email. | N | An SMTP Server and an Email Notification Template have been configured in “Settings.” |
| Isolate hosts | Isolate the PC using the installed Carbon Black agent. | Y | Carbon Black integration has been enabled in “Settings.” |
Set Response Expiration Time
Use the Expires slider to define the length of time that a response is to be active. When the expiration time is reached, the response is deactivated and any hosts or users added to a list as part of the response are removed. Applicability is limited to the following response types:
- Add to host list
- Add to URL list
- Add to file list
- Add to user list
Suppress incident creation
You can choose to suppress incident creation to discard the alert after the responses have been taken. This allows an administrator to create response actions for common alerts without creating a new incident every time. To suppress incident creation, click on the Suppress incident creation box in the Match Condition pop-up window.
Managing match conditions
Select a match condition and then click on the Change link to modify your selection. Click on the Disable link to disable a match condition or remove a match condition by checking off the box next to your selection and then clicking on the Remove (-) button.

Lists configuration
Threat Response allows analysts to respond to security alerts to contain threats as they are reported. Analysts can manually create responses when reviewing incidents, or responses can be automatically triggered via match conditions as events are received.
Preparing Threat Response to support responses involves creating block lists to host items, such as bad IPs and URLs, and mapping those lists to security devices for use when building policies.
In to see Threat Response supported integrations, please, check the following document PTR supported integrations for further details.
The first step to enabling responses is to create lists in Threat Response. Analysts can place malicious IP addresses or URLs into these lists, which are then mapped to your security devices for policy enforcement.
Examples of lists:
- Malware Callback Sites – To block command & control activity at a firewall.
- Malicious URLs – To block malicious URLs at a proxy.
- Suspicious Users – To place users suspected of infection in a Security Group.
- Infected Users – To place users confirmed of infection into a Security Group.
The last two examples above demonstrate the system’s ability to elevate the restrictions on an object based on the list it resides on. Like with users, IP addresses and URLs can be placed into different lists to vary the restrictions placed on them. The restrictions applied to the list are entirely dependent on the policy created in the enforcement device.
Creating lists

- Log in to Threat Response.
- Navigate to the
Listspage and click on appropriate the sub-tab for the list type that you want to create.- Host Lists: These are lists that contain hostnames and IP addresses that can be pushed to a firewall for use in firewall rules.
- URL Lists: These are lists that contain URLs that are intended for forward proxies.
- User Lists: These are lists that contain usernames that can be mapped to a directory server.
- Whitelist: These are IP addresses that should not be blocked. (They are exceptions.)
- Click the Add (+) button in the header section of the left panel to open the Add New List panel on the right.
- Create a
NameandDescription(optional) for the list. - Save changes.
Note
You can add URLs to a web content filter. Threat Response pushes the URLs to such a filter for vendors that have these filters.
Threat Response syncs the lists, either on demand or on schedule, depending on how they were configured in Threat Response. When you open this window for the first time, it has neither lists nor associated data.
Use the left pane in the Lists window to review, add, or search for lists of IP addresses or URLs. Use the right pane to map one list to one or more devices. Once Threat Response maps a list to groups on the device, you can include the group list in device policies.
Lists management
When on the Lists page, click on a row in the Lists table on the left to open the Details pane on the right for the selected list. Use this panel to manage your lists.
Mapping lists to devices
Threat Response allows you to map lists to devices for use in building security policies. You can map multiple devices or one device type at a time to a list. List mappings associate a Threat Response list to an object group on a device.
There are two ways to map a list to a device:
- Open the
EditMenu for the list and selectMap to Devices. - Click on the blue add (+) sign next to Mapped to Devices in the Details pane.
Both options open the same New List Mapping pane (see below).

Select the device type and then select the device you want to use. Use the filter and sorting features to narrow your search for selecting a device.
The Group Name field allows you to specify the name of the group that you want to map to on the device. If this group does not yet exist on the device, it will be created automatically.
Note
If a group with the same name already exists on the device, then the existing group contents will be overwritten with the contents of the new list.
Reviewing list members
Click on the Show All Members link to flip the panel to display all the objects assigned to a list. Individual items can be added or removed from this view. Clicking on the Back arrow in the panel header takes you back to the details pane for the selected list.

Lists publishing
List publishing allows Threat Response to publish list information to a web URL. Enforcement devices supporting a “pull” mechanism for block lists can reference the URL to “pull” a list directly from Threat Response.
Threat Response can publish list information in the following formats:
- Palo Alto Networks: Formats a list for publishing to Palo Alto Networks systems
- Blue Coat: Formats a list for publishing to Blue Coat systems
Use the steps below to publish a list:
- Navigate to the
Listspage in Threat Response. - Select the list that you would like to publish by clicking on it in the Lists table.
- Click on the menu button in
List Detailsand then selectEdit. - Place a check mark next to the Publish option to publish the list.
- Save the changes.
Now that the list has been published, it can be accessed via the URL. Click on the Show published URL link from the list details to view the available URLs.

Management of Scripts
The script management UI enables users to manage scripts for PC data collection, ETL, and (Scripted) Responses.
Note
You must belong to the Script Admins team in Threat Response in order to add or modify any scripts. Users that don’t belong to this team will have read-only access to the Scripts section.
PC Data scripts are Visual Basic or PowerShell scripts that can be used to collect custom IOC data from endpoints. (Note that they existed under System Settings > Customization > Custom Scripts in the versions preceding Threat Response 4.0.0.)
ETL scripts (Extract, Transform, Load) are Python scripts that can be used to ingest alert data from sources not natively supported by Threat Response. (They were introduced in Threat Response 4.0.0.)
Information about writing ETL and PC Data scripts can be found in the Extensibility documentation.
Response scripts are Python scripts. They are created to “respond” to alerts based on match conditions. Note that they were introduced in Threat Response 4.5.0.
To manage scripts in Threat Response, navigate to the Scripts page in Threat Response:

The default view shows all scripts (PC Data, ETL, and Response) that have been uploaded to Threat Response:

Note
Scripts can be added from either the All Scripts or ETL Scripts / PC Data Scripts / Response Scripts sections of the scripts management interface. The instructions below cover adding directly from the section that corresponds to the script type. If adding from All Scripts, you will have to first select the script type you are uploading.
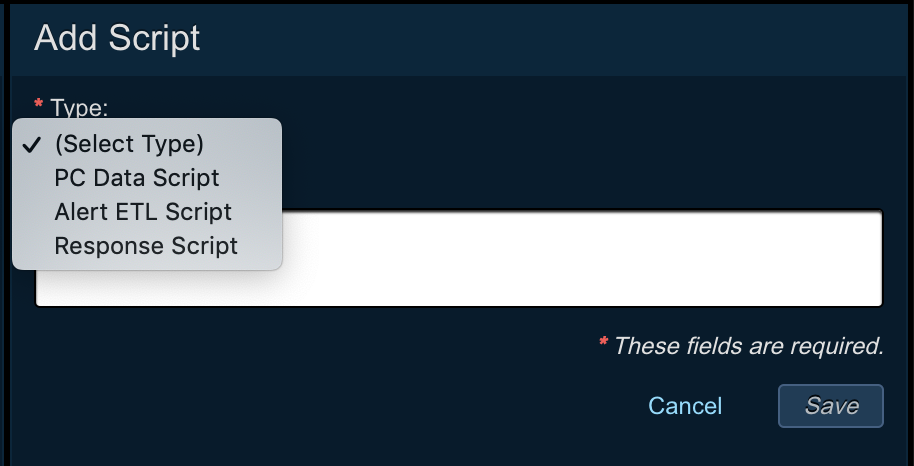
Adding alert sources for ETL scripts
To enable the use of custom ETL scripts, two new alert sources have been added to Threat Response:
-
Scripted Listener - Allows you to run the script on-demand in response to an HTTP post from the remote source. This is normally used to accept alerts from “push-based” security devices; these devices must be configured to POST to the Scripted Listener alert source’s POST URL.
-
Scripted Poller - Runs the script on a regular interval (minimum 60 seconds). This is normally used to poll a remote source for raw threat data, which the script then transforms into an alert recognized by Threat Response.
Scripted alert sources can be configured to run in either Production or Test modes. While running in Test mode, the scripts will be fully executed, but will not create any alerts (the list of alerts that would be generated in a production run is available in the run history).
To add a new source to connect to your custom ETL script, follow the instructions for adding a source in Alert sources configuration, and choose the appropriate source type.
Adding ETL scripts
-
Navigate to the
Scriptspage in Threat Response.
-
Select
ETL Scriptsfrom the menu on the left. -
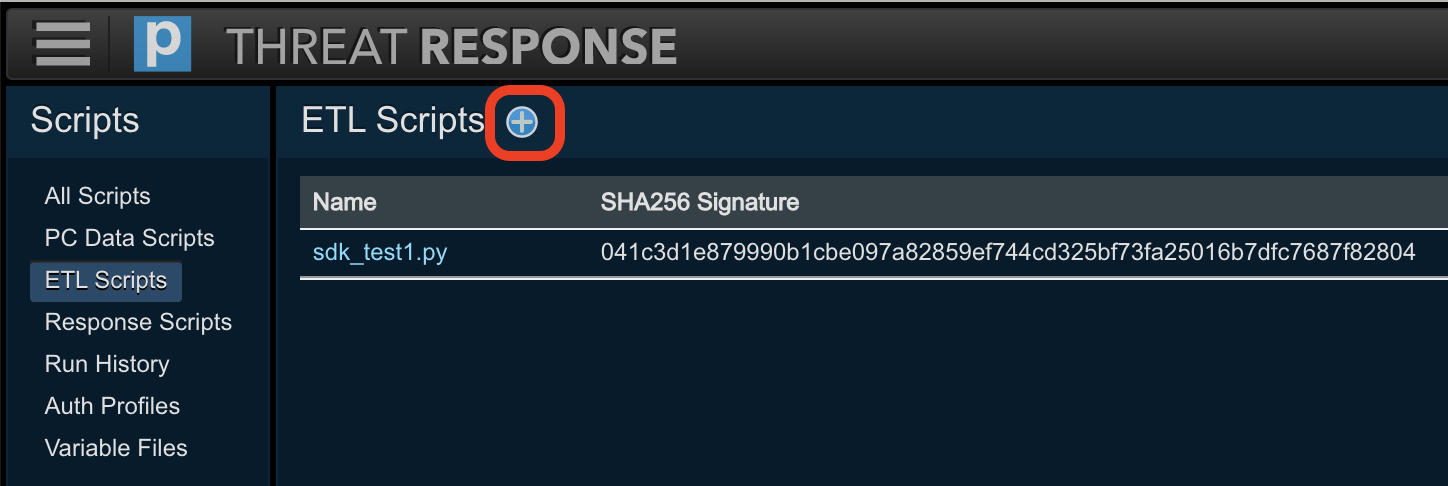
Click the Add (+) button in the header section of the left panel to open the Add ETL Script panel on the right.
-
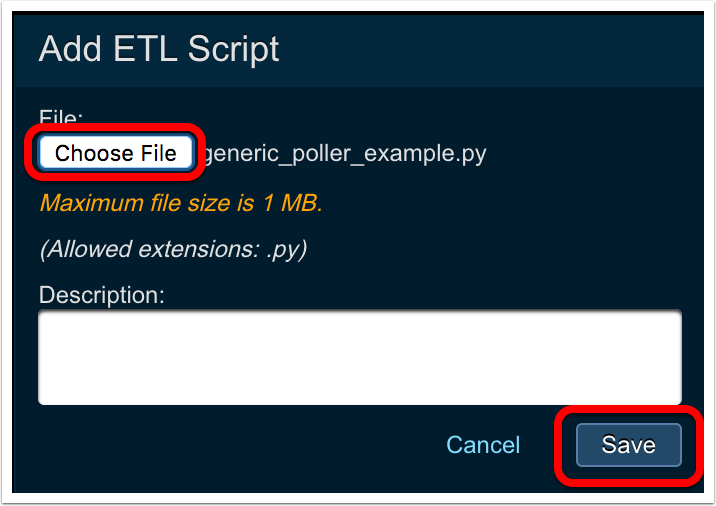
Choose the script file you wish to upload and enter an optional description.
-
Click
Save
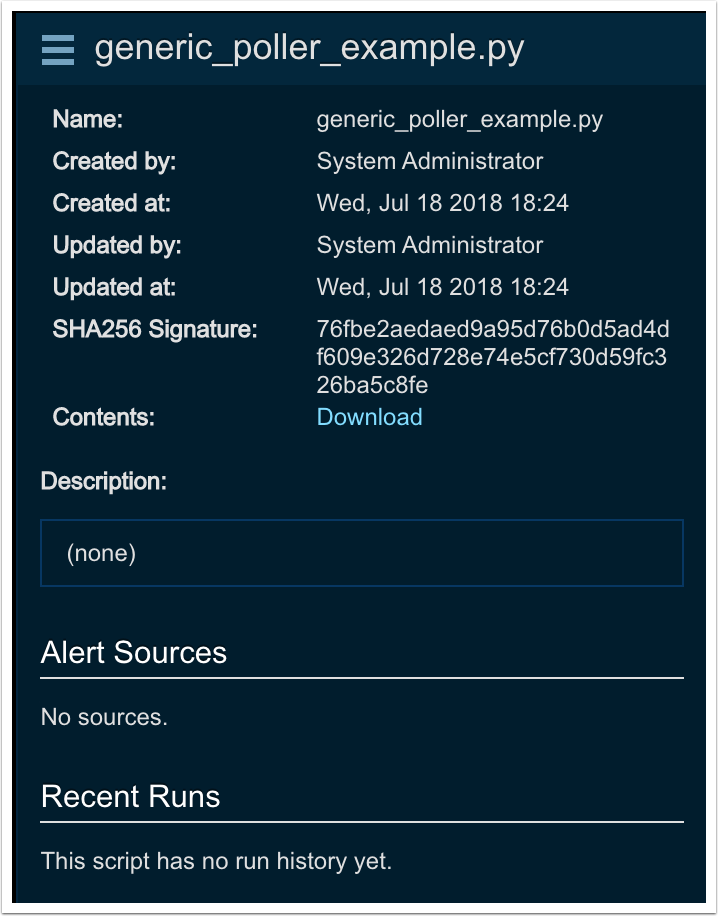
Once saved, the script information will be presented in the right-hand panel:
Note
Maximum ETL script file size is 1 MB.
Creating Auth Profiles for ETL and Response Scripts
To eliminate the need to embed usernames and passwords within your ETL and response scripts, Threat Response allows you to create one or more auth profiles that can then be referenced within a script. An auth profile is linked to one or more alert sources (ETL) or responses (Scripted Responses), allowing it to be shared by multiple scripts if desired.
To create an auth profile:
-
Navigate to the
Scriptspage in Threat Response.
-
Select
Auth Profilesfrom the menu on the left.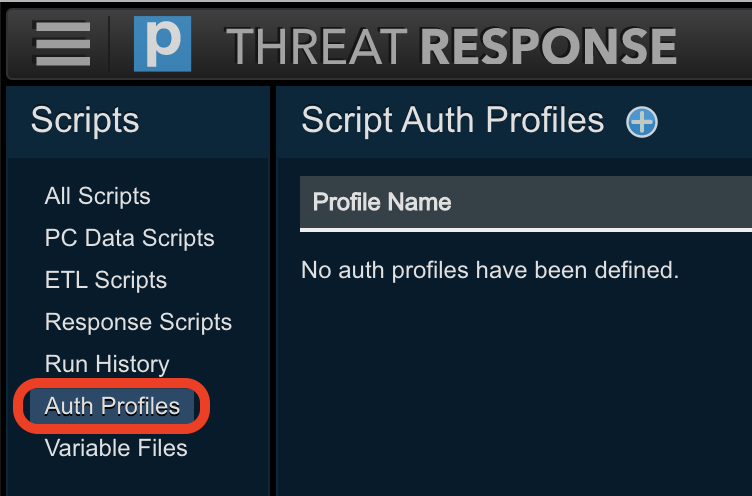
-
Click the Add (+) button in the header section of the left panel to open the
Add Auth Profilepanel on the right.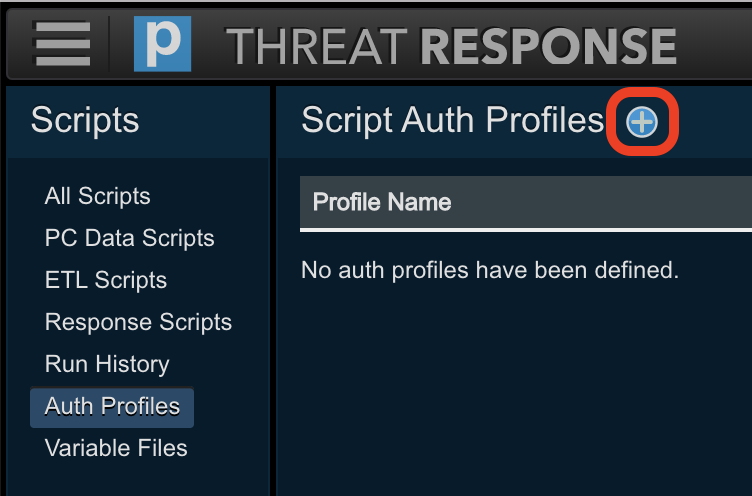
-
Give the auth profile a name and optional description, then click the Add (+) button next to the “key/value” fields.
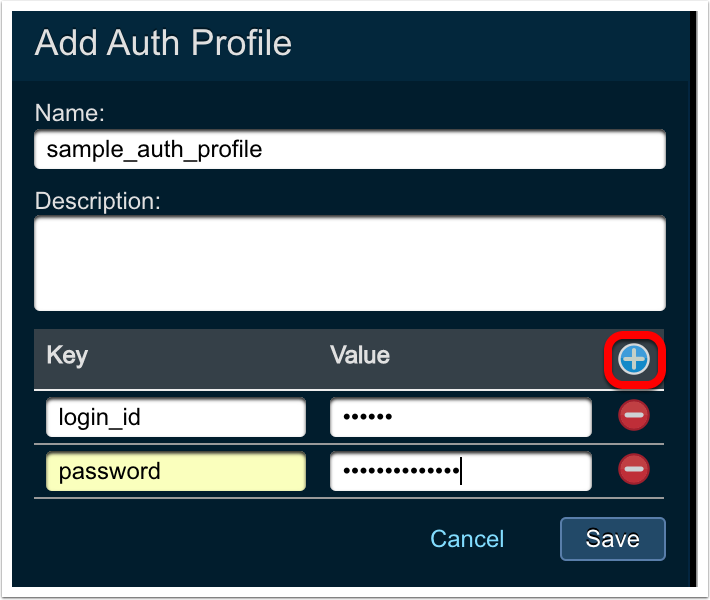
-
Enter the Key name and its associated value.
Note
The key’s value will not be displayed as you type it. You can see its value after saving by clicking the
Reveallink. -
Repeat step 5 for each key/value pair required.
-
Click
Save.
To link an auth profile to an alert source (ETL only):
Note
These steps assume the alert source has already been created. If it hasn’t, please follow the steps in Adding a source to create a new one. You can link the auth profile during source creation.
-
Navigate to the
Sourcespage in Threat Response.
-
Select the alert source from the list, then click on
Editfrom the details menu.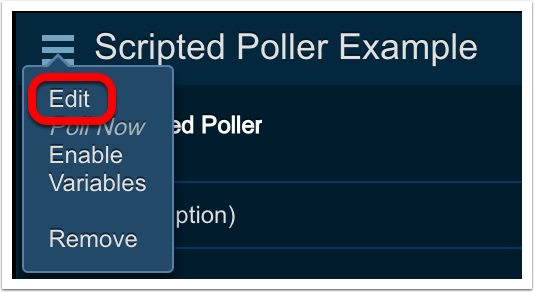
-
In the
Python ETL Scriptingsection of the details panel, choose the desired auth profile from theAuth Profiledrop-down.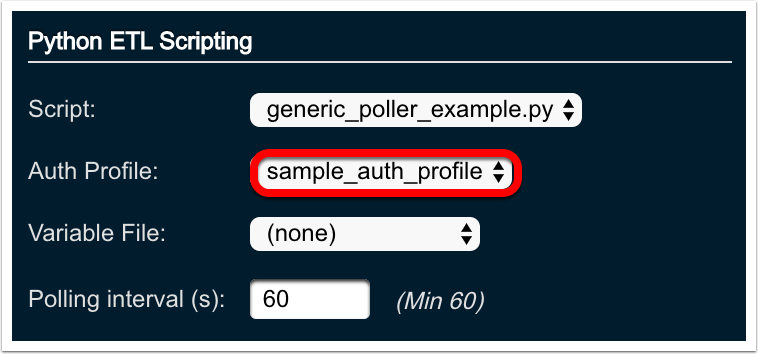
-
Click
Save Changes
Uploading Variable Files for ETL and Response Scripts
Threat Response allows you to upload JSON-formatted text files to store variables and their values that you do not wish to embed in your scripts. A common use case would be to store API access URLs, server names or ports. A variable file is linked to one or more alert sources (ETL) or responses (Scripted Responses), allowing it to be shared by multiple scripts if desired. The variables stored in this file are read-only.
Data is stored in “key”: “value” format in a .json file:
{
    "server": "www.mywebserver.com"
    "port": "8001"
}
Important
Variables and their associated values are stored in plain text, so do not use variable files to store credentials or other sensitive information. Sensitive items should be added to an auth profile, where they are stored in an encrypted manner.
To upload a variable file:
-
Navigate to the
Scriptspage in Threat Response.
-
Select
Variable Filesfrom the menu on the left.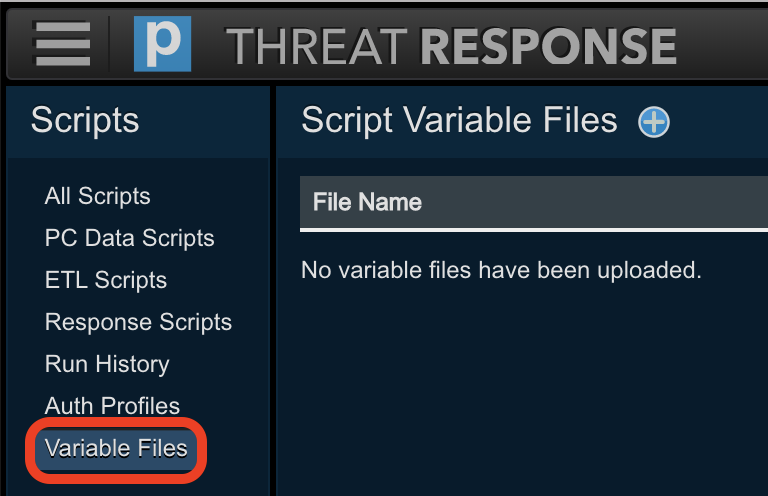
-
Click the Add (+) button in the header section of the left panel to open the
Add Variable Filepanel on the right.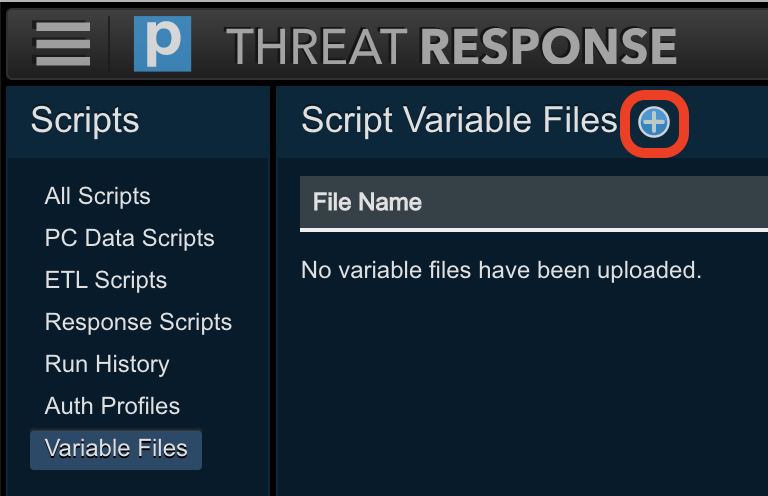
-
Click
Choose fileand browse to the JSON file to upload. Enter an optional description.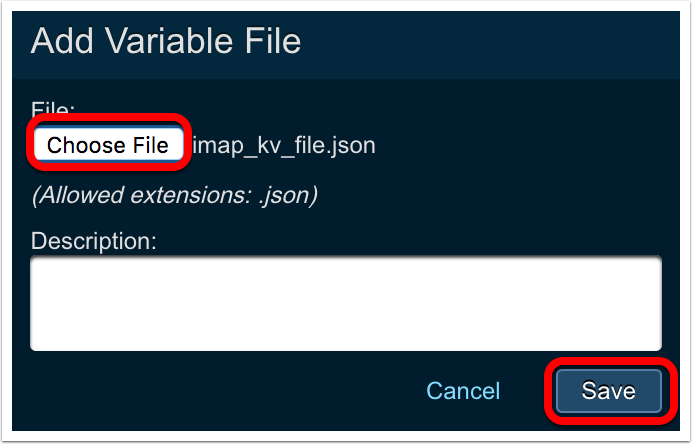
-
Click
Save.
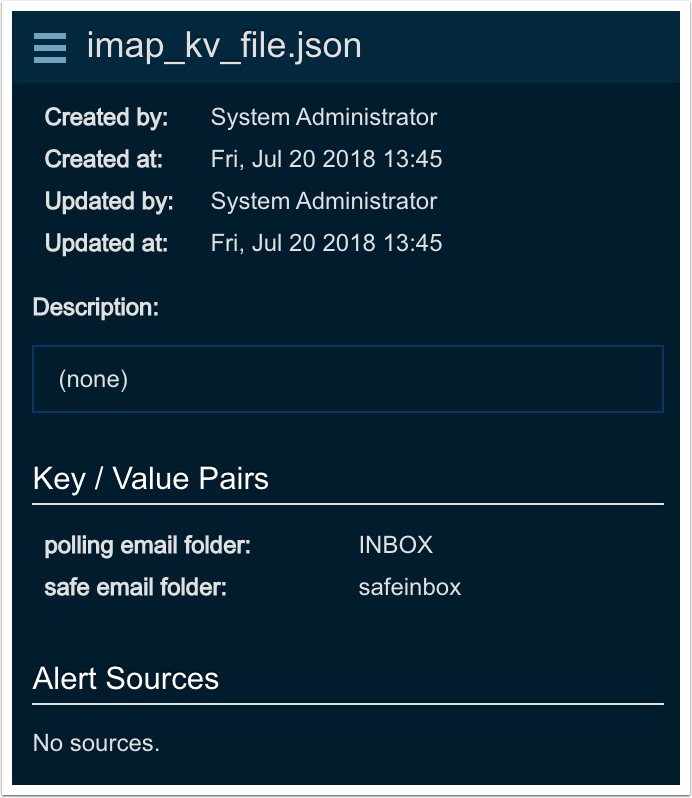
Once the file has been uploaded, selecting it in the list will allow you view the key/value pairs in the details panel on the right:
To link a variable file to an alert source (ETL only):
Note
These steps assume the alert source has already been created. If it hasn’t, please follow the steps in Adding a source to create a new one. You can link the variable file during source creation.
-
Navigate to the
Sourcespage in Threat Response.
-
Select the alert source from the list, then click on
Editfrom the details menu.
-
In the
Python ETL Scriptingsection of the details panel, choose the desired variable file from theVariable Filedrop-down.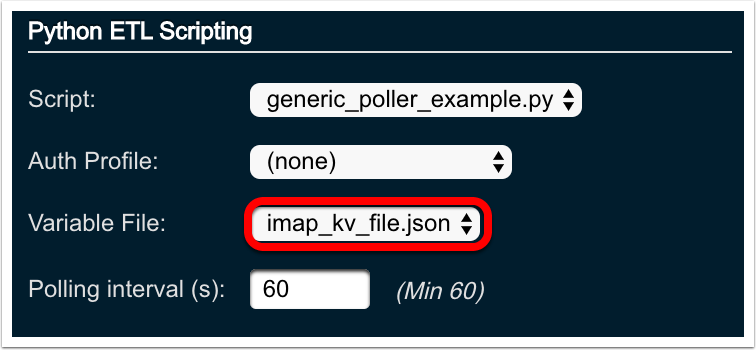
-
Click
Save Changes
View all variables associated with an ETL alert source
-
Navigate to the
Sourcespage in Threat Response.
-
Select the ETL alert source from the list, then click on
Variablesfrom the details menu.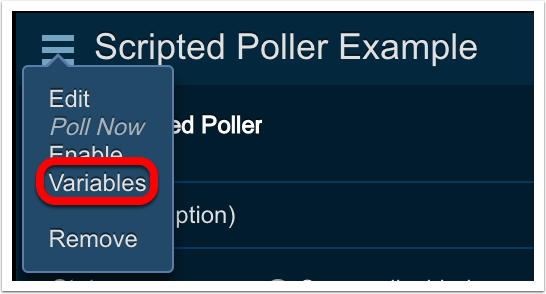
-
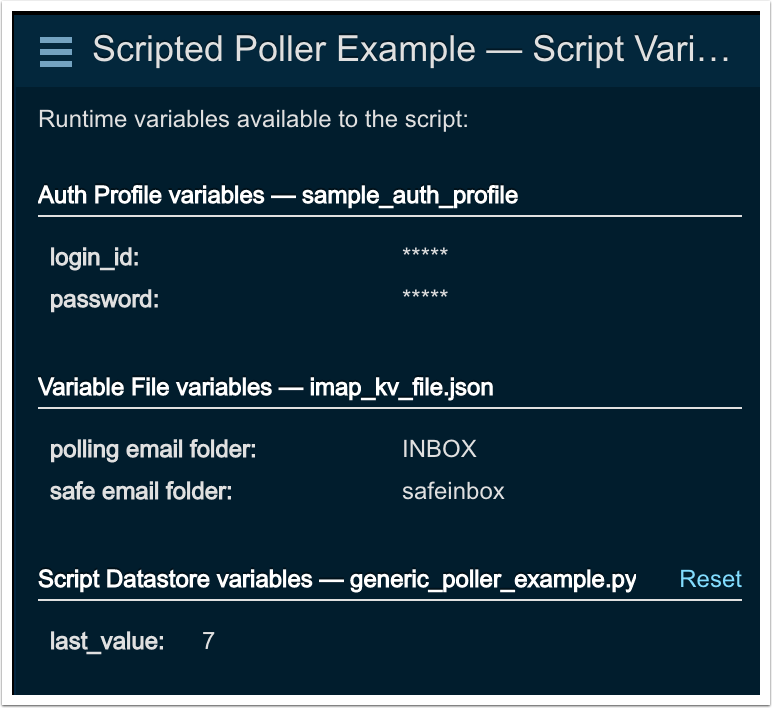
All variables found in the linked auth profile, variable file and the script datastore (discussed in the Extensibility Guide) will be displayed.
Adding PC Data Scripts
Before Threat Response users can use custom PC Data scripts to collect custom IOC data from endpoints, the scripts need to be uploaded to Threat Response.
To upload PC Data scripts to Threat Response:
-
Navigate to the
Scriptspage in Threat Response.
-
Select
PC Data Scriptsfrom the menu on the left. -
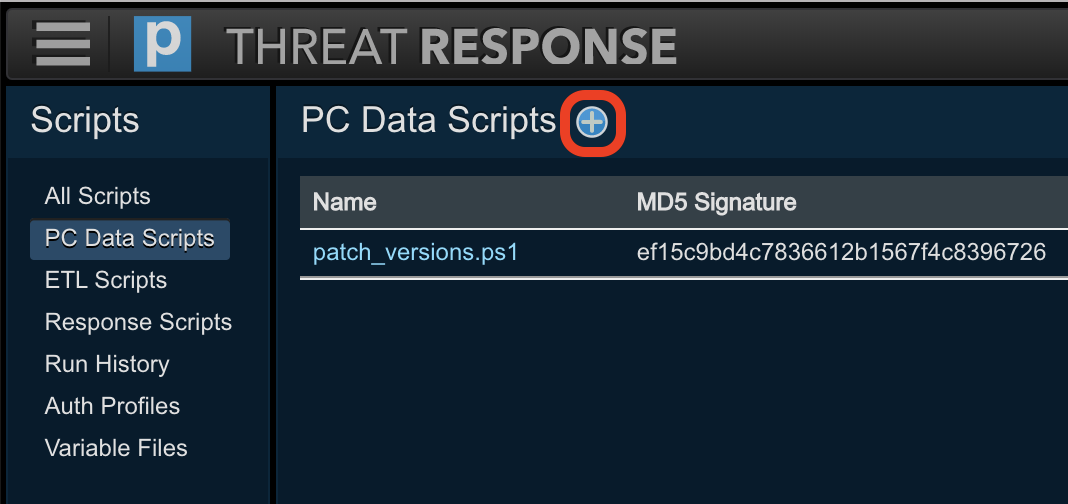
Click the Add (+) button in the header section of the left panel to open the Add PC Data Script panel on the right.
-
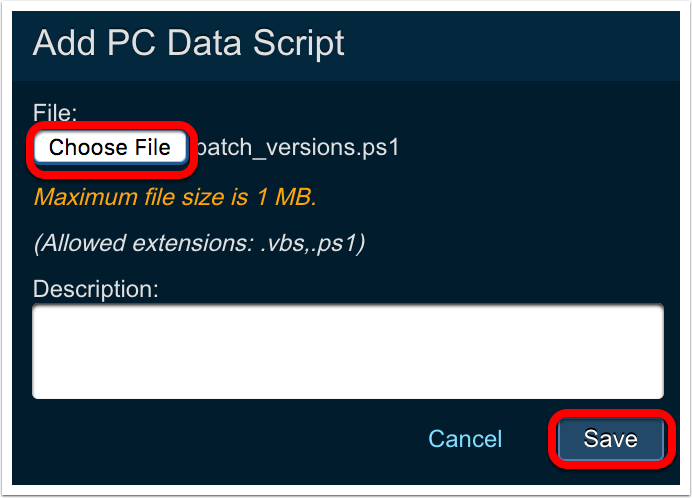
Choose the script file you wish to upload.
-
Click
Save
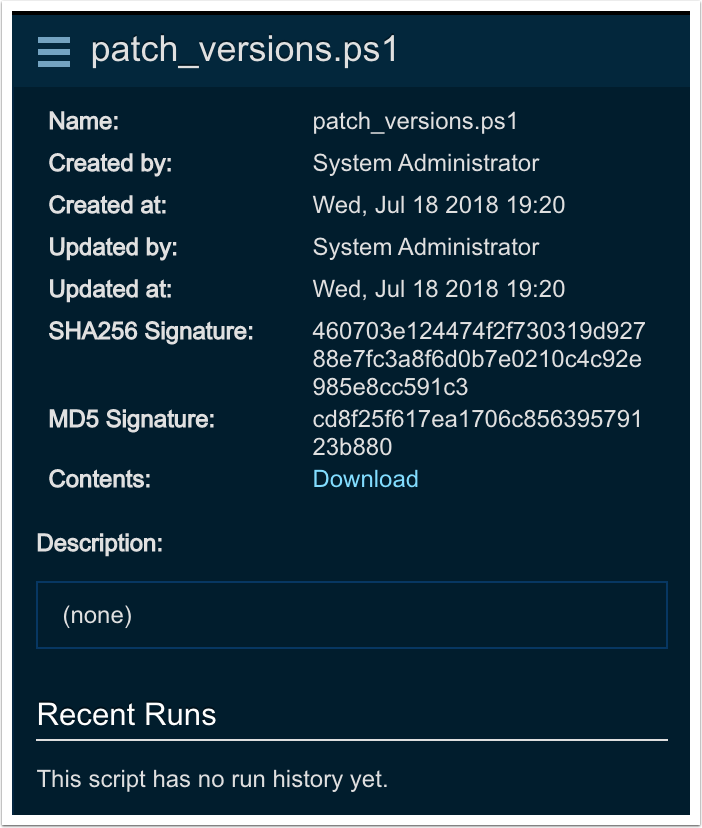
Once saved, the script information will be presented in the right-hand panel:
Note
Maximum PC Data script file size is 1 MB.
Adding Response Scripts
-
Navigate to the
Scriptspage in Threat Response.
-
Select
Response Scriptsfrom the menu on the left. -
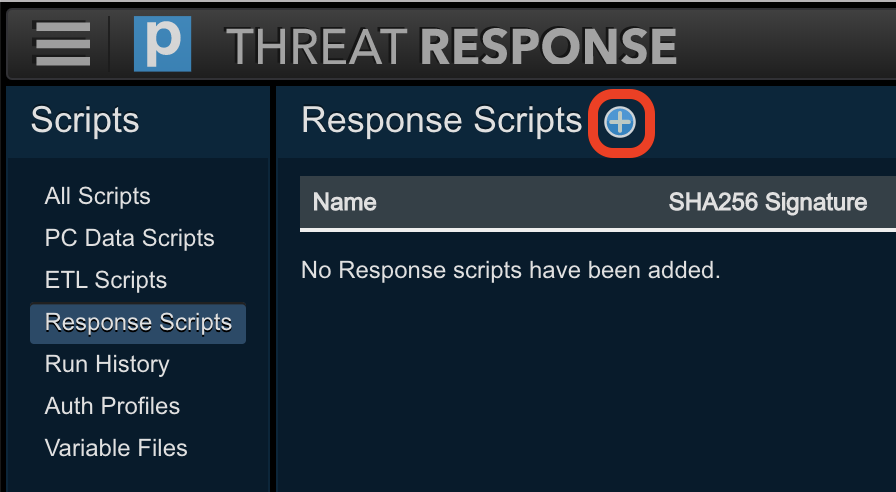
Click the Add (+) button in the header section of the left panel to open the Add Response Script panel on the right.
-
Choose the script file you wish to upload.
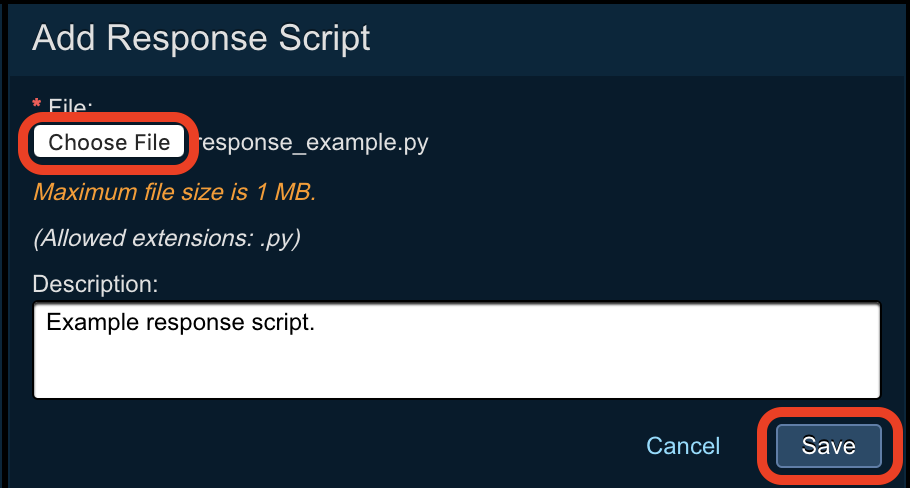
Note that clarifying detail can be added to the “Description” field, i.e. the purpose of the script; for example, talking to an external API.
-
Click
Save
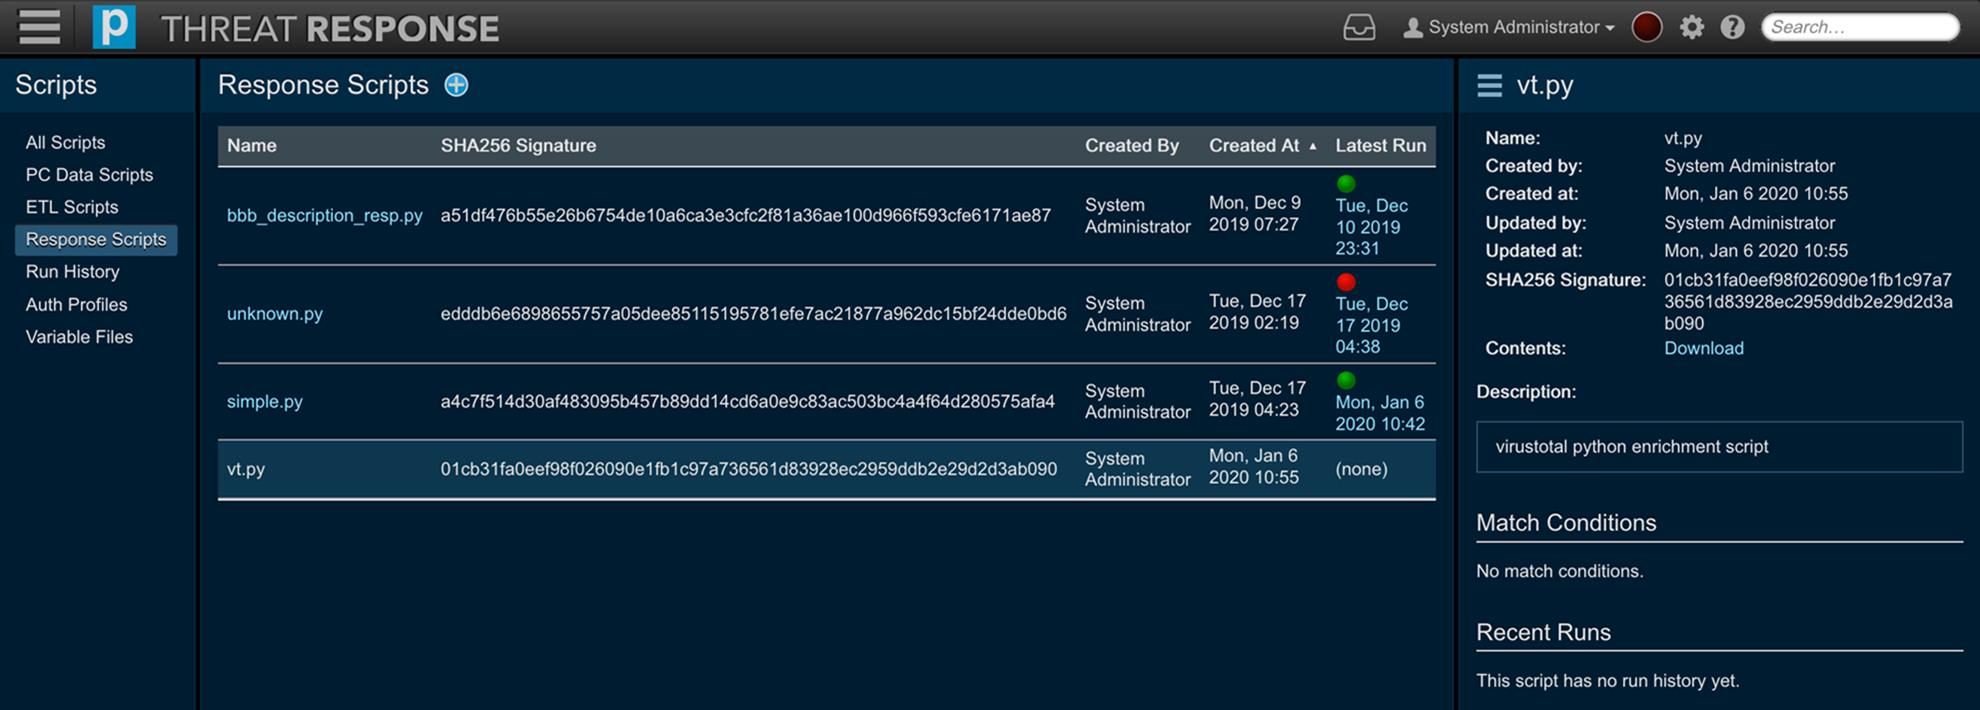
Once saved, the script information will be presented in the right-hand panel:
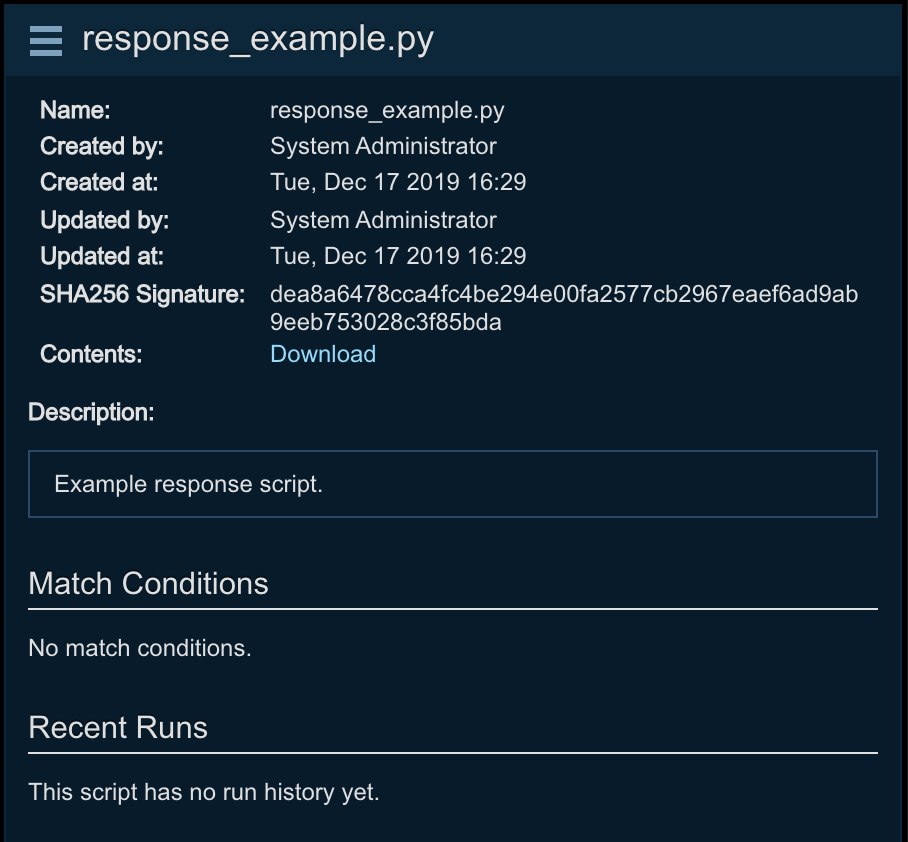
Moreover, match conditions can be viewed by means of the following locations.


Note
Maximum Response script file size is 1 MB.
Uploading a New Version of a Script
Threat Response provides versioning capabilities for your scripts (for PC data collection, ETL, and Response Scripts). To update an existing script with a new version:
-
Click on the name of the script you wish to update in any of the script list views.

-
Click the menu next to the script’s name in the right-hand panel and click
Versions.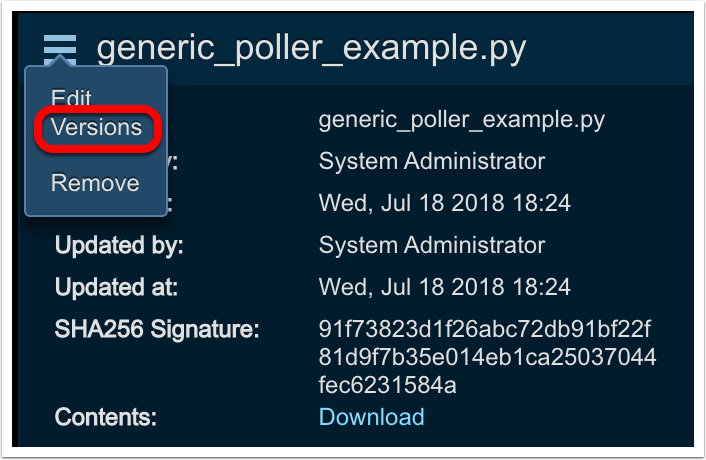
-
Details of the current and previous versions will be displayed. Click the Add (+) button.
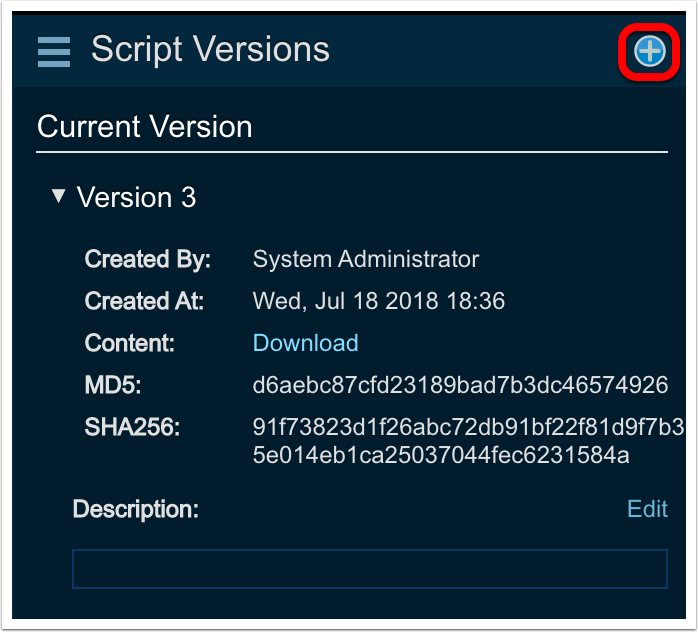
-
Choose the file you wish to upload, set it as the current version, and click
Save.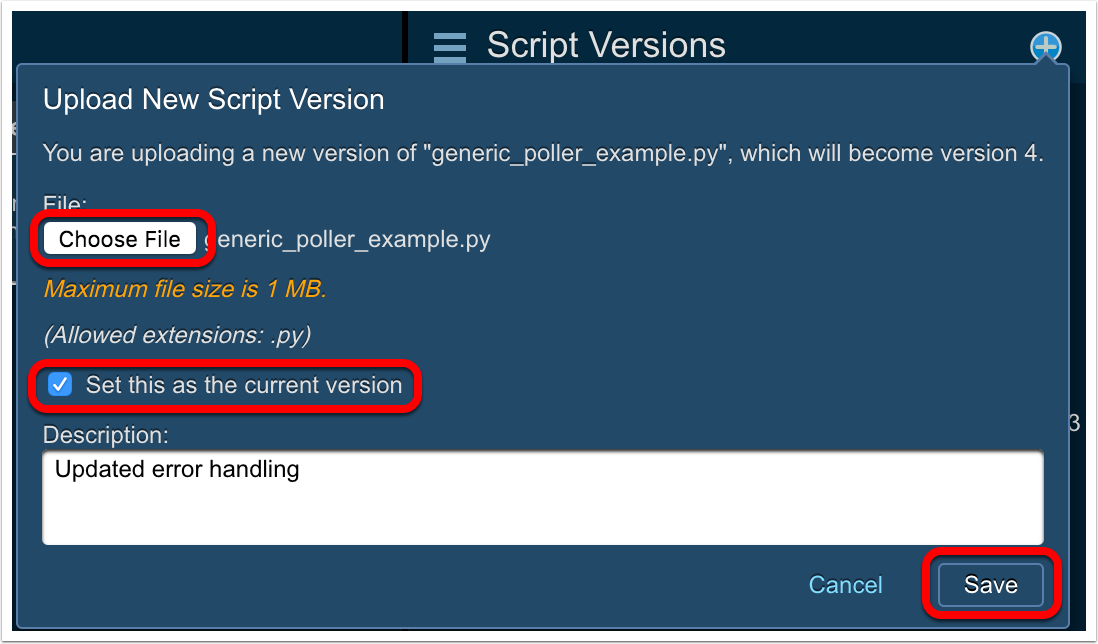
Info
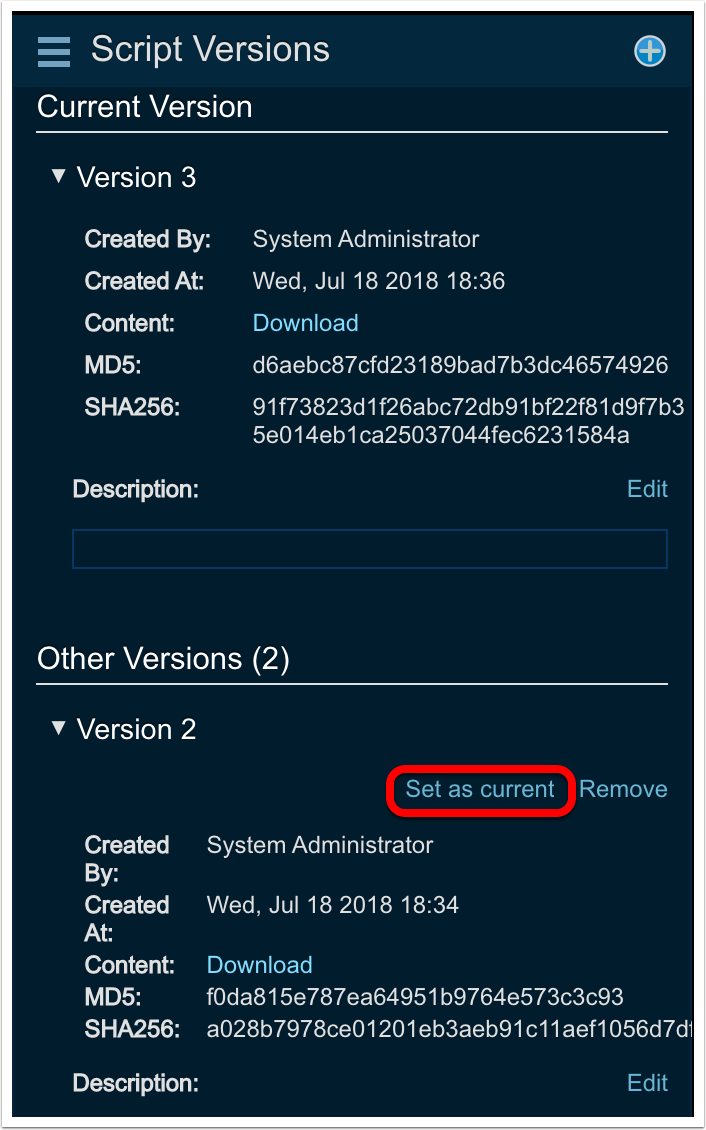
To return to a previous version of a script, click the disclosure triangle next to the version you wish to return to in the Script Versions panel and click on Set as current.
Monitoring Script Run History
Threat Response gives you the ability to monitor script run history, providing information such as status, output, errors and alerts created. Reports are also available to monitor the success/failure of script runs and can be exported to PDF or CSV.
To view the Script Run reports:
-
Navigate to the
Reportspage in Threat Response.
-
Navigate to
Script Runsand choose eitherBy ScriptorBy Source.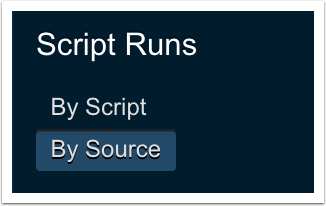
To view a summary of the script run history:
-
Navigate to the
Scriptspage in Threat Response.
-
Click on
Run Historyin the menu on the left.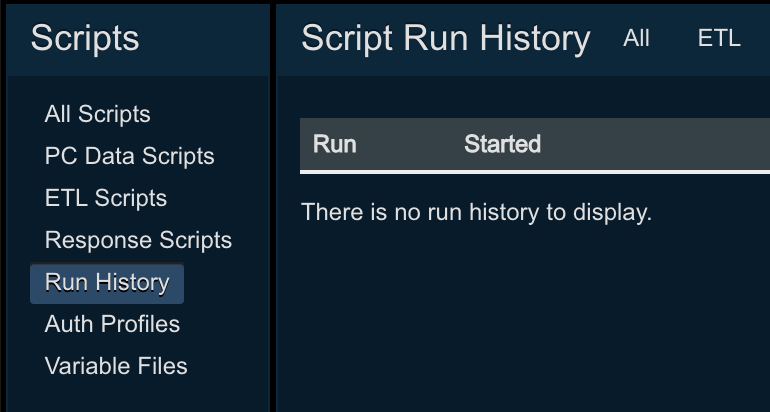
Select from among the tabs shown on this screen to view All script runs, or script runs filtered by script type (ETL, PC Data, or Response), Failures, or script runs that happened Today. You can also apply a filter to further restrict your view to specific script runs (for a specific alert source, or only runs that created alerts) by clicking the Filter link in the top-right.

Note
By default, Threat Response only maintains the last 100 successful script runs (all failures are maintained). To adjust this, navigate to System Settings > Scripted Alerts > Python Script Settings and modify the value in Max successful script runs to retain
To view detailed information about a specific run:
-
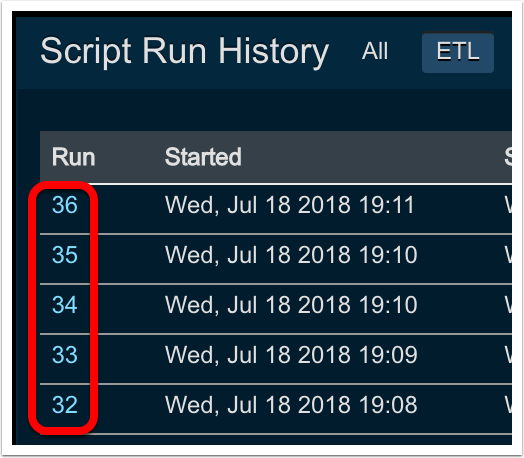
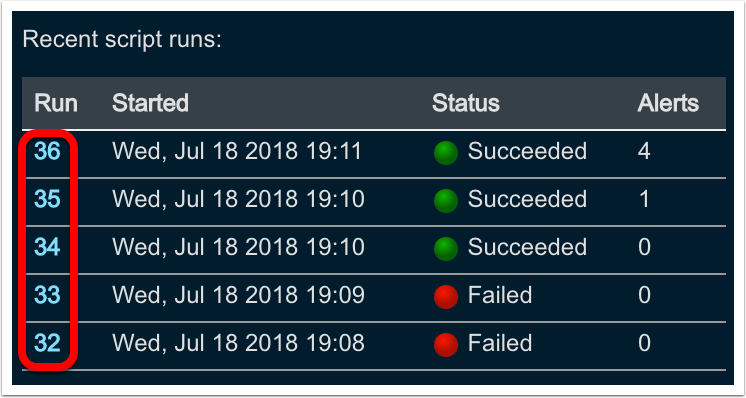
Click on the run number in the Script Run History summary table, or the Recent Script Runs section in the Source view.
From the Run History summary table:
From the Recent Script Runs section in Source view:
The following details are available:
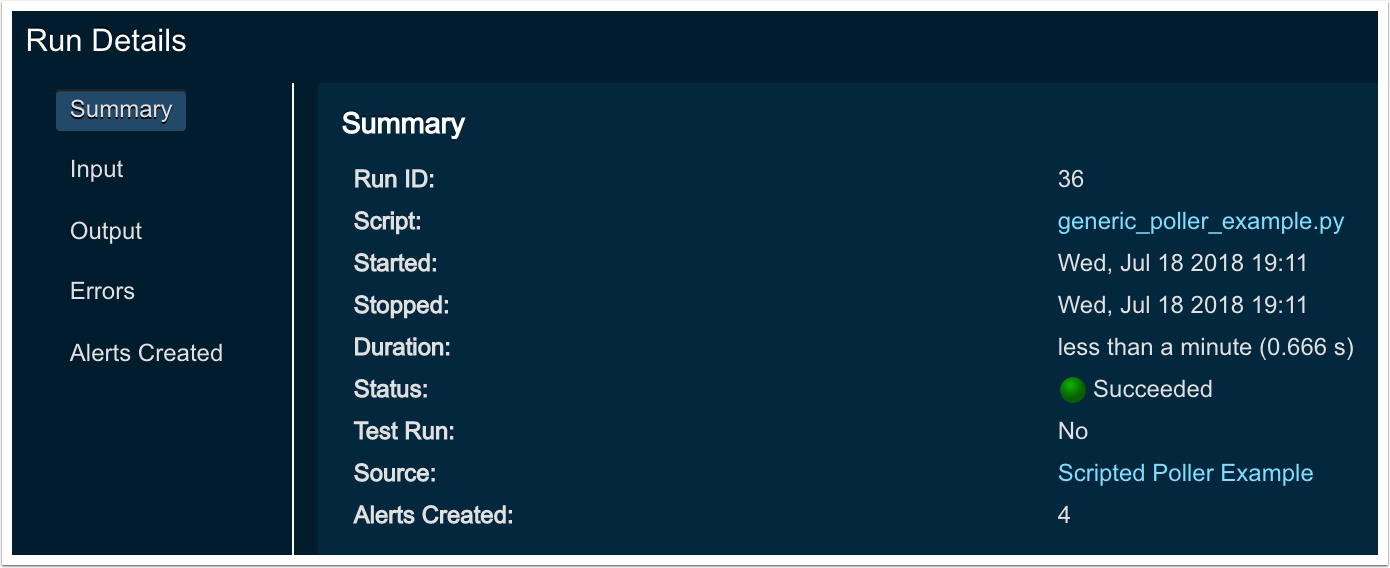
- Summary - Basic start/stop/status info and number of alerts created
- Input - The raw JSON sent to the Python script runner
- Output - Anything written by the script to
stdoutorstderrand JSON representations of any alerts generated - Errors - Traceback of any unhandled errors
- Alerts Created - Summary table of all alerts created during the run, with links to the alerts/incidents
Python Script Settings
Note
The settings below apply per source.
To change the maximum number of successful script runs for which run history is retained or to change the maximum size of the script key/value datastore:
-
Using the top menu bar open the settings menu and navigate to the
System settingspage.
-
Navigate to
Scripted Alerts>Python Script Settings
-
Make the desired changes.
-
Click
Save.
Devices configuration
Devices are systems with which Threat Response can communicate to enforce policies enacted by analysts when creating responses in Threat Response. Devices include network equipment with ACL support, URL filtering systems, and directory servers that provide user management functionality.
Devices window
To create and manage devices in your network, open the Navigation menu and select the Devices button to open the Devices window. If this is your first time opening this window, it contains no devices or associated data.

Use the left pane in the Devices window to add or search for devices. Use the right pane to view or edit devices or to map multiple lists to a device. The right pane also shows the five most recent updates and the most recent error in the past seven days.
The colored circles in the left and right panes are error indicators with the following states:
- Green (Success)
- Red (Fail)
- Grey (Disabled)
In the Status column of the Devices table, the error indicator is green if the last update was successful and red if the last update failed.
Device grouping
Threat Response groups devices by their type. Devices supported by Threat Response include:
- Network Devices (Firewalls and Routers)
- Directory Servers
To navigate between these different device types, use the subtabs located at the top of the Devices workspace. Next to each tab, there is a number indicative of how many devices have been created of that specific type.
Adding a device
To create a device in Threat Response:

- Log in to Threat Response.
- Navigate to the
Devicespage and click on appropriate the sub-tab for the device type that you want to create. - Click the Add (+) button in the header section of the left panel to open the Add New List panel on the right.
-
Create a Name and Description (optional) for the device, and complete any other required settings for your device vendor.
The settings required vary by vendor. For more details regarding a specific device vendor, please refer to the vendor integration guide.
-
Save changes.
Name & Description
A Name is required for each device created in Threat Response and is used as an identifier for the device throughout the UI. A name that clearly represents the device type, as well as its location, is recommended.
The Description allows an administrator to input a more detailed description of the device (to be displayed when viewing the device) in the Devices page. Including a description for the device is optional.
Update Scheduling
Administrators can schedule the frequency of their device updates. To define when devices should be updated, select the update interval from the Update this device drop-down menu.

Alternatively, you may click on the Advanced link to define the update schedule using a cron syntax. This offers greater control over the scheduling.
Devices management
Click on a row in the Devices table on the left to open the Details pane on the right for the selected device. Use this pane to manage each device.

The Devices window includes the following sections:
- Basic Information — This table includes the following information:
- Device Update Status
- Device Name
- Device Type
- Description
- Update Schedule
- Device Details — This pane includes the following information:
- Device In Sync
- List Mapping
- Recent Updates
- Most Recent Errors in the Last Seven Days

The Devices Detail pane on the right includes the following sections:
- Device In Sync — This section includes the following information:
- Device Type
- Description
- Update Schedule
- Last Attempted Sync
- Last Successful Sync
- List Mapping — This section includes the following information:
- List Filter
- Add Icon (+)
- Remove Checkbox
- Remove Icon (-)
- List Name
- Object Group Name
- Edit Device Mapping Link
- Activity of Status Link
- Recent Updates — This section includes the following information:
- A table displaying the five most recent device updates with the following:
- The status of the update: success (Green) or failed (Red)
- A timestamp showing when the update took place
- message detailing the status of the update or error
- An All-Status Activity link to display the fully-updated activity
- A table displaying the five most recent device updates with the following:
- Most Recent Errors in the Last Seven Days — This section includes the following information:
- A date/timestamp of when the error occurred
- A description of the error
- An update in the form of a message
Disabling a device
Disabling a device halts all device updates from Threat Response. To disable a device, select the device in the Devices window. In the device’s Details panel, click on the Details Menu in the upper left-hand corner and then select Disable.
To re-enable the device, follow the same procedure.

Deleting a device
To delete a device from Threat Response, select the device from the Devices window. In the device’s Details panel, click on the Details Menu in the upper left-hand corner and then select Remove.
Mapping devices to lists
List Mappings associate a Threat Response list to an object group on the device that can then be used when building security policies.
There are two ways to map a list to a device:
- Open the
Edit Menufor the list and selectMap to Devices. - Click the blue add (+) sign next to Mapped to Devices in the Details pane.
Both options open the same New List Mapping panel.
Select the device type then select the device you want to use. Use the filter and sorting features to narrow your search for selecting device(s).
The Group Name field allows you to specify the name of the group that you want to map to on the device. If this group does not yet exist on the device, it will be automatically created.
Note
If a group with the same name already exists on the device, the existing group contents will be overwritten with the contents of the new list.
Tanium configuration
Before Tanium can be used in Threat Response, it must be enabled and configured in the System Settings.
To configure Tanium in Threat Response:
- Log in to Threat Response.
- Navigate to the
System Settings>Tanium Integration>Tanium Servers page. - Click on the blue plus “+” sign to add a new Tanium Server.
- Configure the
hostnameandcredentialsfor your Tanium server. - Tick off the
Enable Collectionscheckbox to enable sensor queries. - Save the changes.
With the server in place, Tanium is now enabled, and you can see the Tanium tab when viewing an incident. A default set of Tanium sensors is made available and additional sensors can be added via the Tanium settings.
To add new Tanium sensors:
- Navigate to the
System Settings>Tanium Integration>Tanium Sensorspage. - Click on the blue plus “+” sign to add a new Tanium Sensor.
- Input the name of the sensor, as reflected in Tanium.
- Save the changes.
User-IP tracking
User-IP tracking enables Threat Response to map usernames to IP addresses reported in alerts. Once enabled, mappings can be pushed to Threat Response by installing the Threat Response DC Agent on any domain controllers used for user authentication onto the network.
Enabling user-ip tracking
- In Threat Response, navigate to the
System Settings>Contextual Data Sources>DC Agent Configuration page. - Tick off the checkbox to enable
User-IP Tracking. - Set the expiration time for username mappings (Recommended: 1 hour).
- Download and install the DC Agent software.
Note
For more information regarding downloading and installing the DC Agent, please refer to Domain Controller Agent (DC agent) section in the installation guide.
Active Directory Integration
Refer to the Threat Response Auto Pull Administration Guide for information about the features associated with the Active Directory Integration - Enrichment and Responses. Note that these features are supported equally by both Threat Response and Threat Response Auto Pull.
PC data collection
Threat Response allows an investigator to retrieve information from a PC regarding the system’s current state. This information can be compared to a malware report provided by a malware detonation system to determine whether there are any indicators of compromise on the machine that may confirm the presence of malware.
When requesting this type of data collection, a series of scripts are pushed to the client, thus allowing it to compile and package the necessary information so that it can be sent to Threat Response.
PC Data Collection is supported by the following operating systems:
- Windows 7
- Windows 8
- Windows 10
Benefits of Collection & Correlation
Automated PC data collection represents a critical element in understanding the range and depth of a documented attack. By utilizing the PC data collection and correlation capabilities in Threat Response, security analysts can improve their security posture while reaping these important benefits:
- Save time collecting and organizing information about each security alert.
- Evaluate the extent of an infection or determine if an alert is a false positive.
- Reducing false positives saves time by ensuring that security teams know if reimaging a system is really necessary.
How It Works
The PC data collection works by copying a package to the endpoint and executing the scripts within to collect information about that system. Upon completion of the collection, the package is removed and no trace of the collection is left on the endpoint.
Summary of PC Data Collection:
- Threat Response connects to the ADMIN$ share of the endpoint and copies collector files to a new directory in the share.
- Threat Response then uses RPC calls to start the data collection service.
- The service utilizes system APIs and scripts copied to the endpoint to collect information about the system and then formats the information as a JSON structure.
- The information is sent back to Threat Response via HTTPS POST.
- Upon completing the process, Threat Response stops the service and deletes the files it copied to the endpoint.
When Threat Response receives this data, it links it to the appropriate incident and then begins the process of comparing the collected data to various threat intelligence sources, such as reputation feeds and malware reports generated by malware analysis systems and services, e.g. Proofpoint TAP.
Data Collection
Collected data is organized into tabs on the PC Data page when viewing an incident. One or more collections for the target host are listed in the table of collected data. Clicking on a row provides the details of the selected collection, including a summary of matched IOCs across malware reports, threat intelligence, Proofpoint campaigns, and other malware reports.

Details include:
- Summary
- Host Information
- Users
- Network Connections
- Running Processes
- Active Mutexes
- Registry Changes
- File Changes
- Browser History
- DNS Cache
- Custom Script (if configured)
Exact Matches vs. Fuzzy Matches
When executing a correlation routine against collected data, Threat Response performs comparisons by looking for exact matches and fuzzy matches. Exact matches provide a one-to-one hard match on threat data, while fuzzy matches apply a proprietary contextual analysis algorithm to suggest when IOC data or data subsets match known data patterns of malware infections.
Matching data exactly can be painstaking and time-consuming for security analysts, even when the process is executed properly, as it is limited by exact matches. Fuzzy matches enable powerful algorithms to find and analyze patterns of data that slip past exact matches which would otherwise be detectable using time series, multiple data sets, and the application of heuristic methods to foil obfuscation attempts.
Summary – Reported Malware
Threat Response automatically correlates IOCs from forensic reports, third-party threat intelligence feeds, or Proofpoint email campaigns. A summary of all matches can be viewed under the Summary tab.

Summary – Threat Intelligence
Threat Response automatically correlates third-party threat intelligence (collected via STIX/TAXII or manually) with the data collection from the endpoint and summarizes the list of observables that were found on that endpoint. This summary can be viewed under the Summary > Threat Intel tab.

Summary – Campaigns
Threat Response automatically correlates Proofpoint email campaign IOCs with data collected from the endpoint. The following Campaigns table summarizes a list of linked campaigns along with one or more IOCs that were found on the endpoint.

Summary – Other Malware
Threat Response not only correlates IOCs from malware reports (forensics) linked to current incidents but also checks indicators found on the endpoints across all malware reports it has received in the past.

Host Information
Threat Response collects useful details about a system to provide an analyst with better insight about its type and other general points of interest. The general information section is displayed at the top of all PC data pages and includes high-level details about the system, such as OS type and antivirus vendor.

Users
The Users tab provides a list of all user profiles, local or domain, that are found on the endpoint. It also includes information, such as the last login timestamp, administrator privilege, and last modification.

Network Connections
Network connections represent command and control channels as well as paths for the exfiltration of data. The PC data collection process pulls in active connections that may be sending or receiving commands, downloading malware-laden files, streaming keystroke data, or exfiltrating intellectual property. The PC data collection also includes “listening to” information via address, port, and port type data which can reveal newly exposed “backdoors” awaiting a connection from hacker-controlled servers.

Running Processes
Threat Response retrieves a list of processes running on the endpoint. Details about the processes are captured as well, such as execution paths, process IDs (PIDs), and account identification.
Running processes can be compared to generating malware analysis reports by sandboxing platforms and sending them to Threat Response. With the collected data, Threat Response can see if processes listed in the report are indeed running on the system in question. In the latest version of PC Data Collection, an automatic search and comparison of processes is performed for an analyst (in the interest of saving time with respect to a collection and analysis).

Active Mutexes
Mutexes represent a running snapshot of a system’s processes that ensure that the same program, or the same malware, is not running more than once (i.e. writing over other copies of itself). Because of the necessity of standardizing mutexes for malware in general, they inevitably provide a relatively dependable indicator that some form of malware has indeed infected a target system (when correlated with a malware analysis report).
However, one limitation of mutexes is that they are transient. They disappear when a process is terminated. Consequently, they represent “indicator” data that is more powerful when used in combination with other indicators.

Registry Changes
Registry entries are modified or created in a “recent time” window and are “pulled” as part of a PC data collection. Registry changes are often used to ensure that malware runs in the event of a restart or the disabling of AV programs. Registry changes are also part of a malware report. They can help to confirm that certain changes match the known behavior of malware.
Note
The time window to which Threat Response looks back for changes is user-configurable and can be adjusted when starting a collection.

File Changes
Files modified or created in a “recent time” window are also “pulled” as part of a PC data collection. File changes may include files that were downloaded to the endpoint or created as part of a malware execution. File changes are also part of a malware report. They can help to confirm that certain changes match the known behavior of malware.
Note
The time window to which Threat Response looks back for changes is user-configurable and can be adjusted when starting a collection.

Browser History
Browser history is collected from all the browsers installed on the endpoint and from all the profiles associated with each of those browsers. The collected browser history is compared to URLs reported as download sites for malware and is also checked against reputation services.
Note
The time window to which Threat Response looks back for changes is user-configurable and can be adjusted when starting a collection.

DNS Cache
DNS cache data is collected by Threat Response and made available in the UI for an analyst to review.

Preparing for a PC Data Collection
Prior to running a PC Data Collection, you must ensure that the necessary configuration is in place on your client machines as well as in Threat Response. The basic requirements include:
- A Windows machine running Windows 7 or later
- An account with administrative rights
- ADMIN$ share must be enabled.
- .NET 4 or later must be installed.
Preparing Windows Clients
In most cases, clients in a Windows domain do not require any additional configuration to prepare for a PC data collection. However, non-domain systems may require you to manually enable the ADMIN$ share on the endpoint or to allow the remote administration of that system This section outlines the steps to enable theADMIN$ share and remote administration on a Windows endpoint.
Note
It is recommended that you try a PC data collection prior to executing the steps below. For more details regarding specific errors you may encounter, please see the “Troubleshooting” chapter at the end of this document.
To prepare a client for data collection:
- Ensure that .NET 4 or later is installed.
- Enable the ADMIN$ share on the client.
- Navigate to
Control Panel>Network & Internet >Network & Sharing Center. - Click on
Change advanced sharing settings. - Expand your current network profile (Home, Public, or Work/Domain).
- Click on the radio button to Turn on file and printer sharing.
- Navigate to
- Allow
TCP/445through the Windows Firewall to connect to the ADMIN$ share.- Navigate to
Control Panel>System & Security>Windows Firewall. - Click on
Advanced Settings. - In the Windows Firewall With Advanced Security editor, click on
Inbound Rules. - Click on
New Ruleto create a new rule. - Follow the wizard to allow port
TCP/445through the firewall.
- Navigate to
- Enable the remote administration of the computer.
- Start a PowerShell with administrative credentials and run:
reg add HKLM\SOFTWARE\Microsoft\Windows\CurrentVersion\Policies\system /v LocalAccountTokenFilterPolicy /t REG_DWORD /d 1 /fThe client is now ready for a PC data collection.
Preparing Threat Response
Threat Response can be preconfigured with credentials to use when performing a PC data collection. This enables you to create a service account and to pre-populate the collection form with those credentials.
To preconfigure the collection credentials:
- Log in to Threat Response.
- Navigate to the
System Settings>Endpoint Monitoring>PC Data Collectionpage. - Populate the PC Data Collection section with the appropriate credentials.
- Save the changes

The following options are available for this setting:
| Setting | Description |
|---|---|
| Collection Method | Allows you to select between native (direct) or Tanium-initiated collections. For more information on Tanium options, refer to the Tanium Integration Guide. |
| Authentication Type | Allows you to force NTLM or Kerberos authentication. (Default: Auto) |
| Username | Specifies the administrative user account to use when executing a collection |
| Password | Specifies the administrative user account password |
| Lookback Minutes | Specifies the length of time to look back for registry changes, file changes, and browser history |
| Run cross-incident correlations | If this option is checked PTR will correlate collected IOCs across other incidents and related malware forensic reports. All IOC matches will be displayed in the Summary - Other Malware section. |
| Enable automatic collections | If this option is checked, the PC data collection will be triggered automatically for the created incidents that have associated forensic reports. |
| Minimum alert severity | Choose minimum alert severity for the incidents that will have PC data collection triggered automatically (if Enable automatic collections is checked) |
Manual PC Data Collection
The collection can be run from within an incident by navigating to the PC Data tab. Clicking on the Start Collection button will open a pop-up where a user can input basic information to run the utility.

The system will pre-populate an offending IP into the collection form. If you have not yet configured the PC Data Collection setting in the System Settings, you will be asked to input the following information:
- An administrator’s username and password
- (Optional) Select an authentication method (NTLMv2 or Kerberos).
- Lookback Minutes: Amount of system history to collect
Press Collect to begin the collection. Upon its completion, Threat Response enables the tabs at the top of the page and then begins its correlation routine.
Threat Intel integration
TAXII servers
Threat Response supports the collection of external threat intelligence via STIX and TAXII. In order to automate this collection, one or more TAXII servers must be configured.

Note
Starting with version 4.5, Threat Response supports TAXII/STIX 2.x in addition to the older 1.x protocol. Customers can choose the version of TAXII/STIX while setting up a server.
Adding a TAXII feed
Follow the steps below to add a new TAXII feed:
- Navigate to
System Settings>Contextual Data Servers>TAXII Servers. - Click on the plus (+) icon to add a specific feed from a given TAXII server.
- In the
Add TAXII Serverpanel, provide the following information:- Enabled: Tick off this checkbox to ensure that the feed is active.
- URL: This is the TAXII server URL.
- Feed: This is the name of the feed that is being served by the TAXII server.
- TAXII Version: The available versions include “1.x” and “2.x.” The differentiation between the two is visible in the screenshots below.
- Media Type: One or more MME file types can be added here (as they relate to TAXII 2x only). The alternative is to leave the field blank to merely use generic STIX/TAXII JSON file types.
- Confidence: Choose the default confidence for the feed. Make your selection from the list below:
- Use STIX: When STIX is selected, Threat Response uses the confidence information provided in the STIX feeds.
- Confirmed: When this value is selected, Threat Response overrides the confidence value in the STIX feed to Confirmed. Most feeds do not use this confidence. It has a special purpose, which is to designate observables that the analyst has confirmed to be malicious. This setting can be used for some high fidelity threat intelligence feeds as well.
- High: When this value is selected, Threat Response overrides the confidence value in the STIX feeds for this TAXII server to High.
- Medium: When this value is selected, Threat Response overrides the confidence value in the STIX feeds for this TAXII server to Medium.
- Low: When this value is selected, Threat Response overrides the confidence value in the STIX feeds for this TAXII server to Low.
- Poll Interval: Choose one of the following options from the drop-down:
- Never: Threat Response never polls the TAXII server. This setting is useful when an analyst chooses to poll the TAXII server feed manually by using Poll Now.
- Every Minute: Threat Response polls the TAXII server feed every minute and collects any new observables during this interval of time.
- Hourly: Threat Response polls the TAXII server feed every hour and collects any new observables during this interval of time. All hourly polls start at the top of the hour, e.g. 3:00 pm appliance local time, with a one- to two-minute approximation.
- Daily: Threat Response polls the TAXII server feed daily and collects any new observables during this interval of time. All hourly polls start at midnight (appliance local time) with a one- to two-minute approximation.
- Initial Lookback: This is applicable for a newly added TAXII feed only. Threat Response goes back one, seven, or fifteen days when downloading the observables for the first time.
- Require Authentication: Tick off this checkbox if authentication is required for connection to the TAXII server.
- Username: The authentication username.
- Password: The authentication password.
- Select SSL Client Certificate: The validation of your identity to the server.
Once you have provided the settings described above, click on Test TAXII Server to ensure that Threat Response is able to connect to the TAXII server. If everything looks good, click on Save to save the configuration.


Editing a TAXII Feed
In order to edit a TAXII feed, navigate to System Settings > Contextual Data Sources > TAXII Servers and select the TAXII feed that you want to edit. From the drop-down (hamburger) menu, click on edit.
Manually Polling a TAXII Feed
In order to poll a TAXII feed, navigate to System Settings > Contextual Data Sources > TAXII Servers and select the TAXII feed that you want to poll. From the drop-down (hamburger) menu, click on Poll Now.
Please note that when a feed is disabled, the Poll Now option is unavailable. You must enable the feed before it is polled.
Enabling or Disabling a TAXII Feed
In order to enable or disable a TAXII feed, navigate to System Settings > Contextual Data Sources > TAXII Servers and elect a TAXII feed. From the drop-down (hamburger) menu, click on disable or enable.
Removing a TAXII Feed
In order to remove a TAXII feed, navigate to System Settings > Contextual Data Sources > TAXII Servers and select a TAXII feed. From the drop-down (hamburger) menu, click on remove.
Note that once you have removed a TAXII feed from Threat Response, all the collected observables from that feed are deleted from Threat Response as well. Please use this step with caution. In addition, if a given observable is collected from more than one feed, then Threat Response retains those observables even though one of the TAXII feeds is removed.

Manual Threat Intelligence Sources
Threat Response supports the collection of external threat intelligence (manually) by importing a STIX file or a bulk copy and paste of observables from emails, reports, web articles, and blogs. In order to clearly preserve a source of intelligence, you need to create a list of manual threat intelligence sources. Once configured, these values are available as drop-down options when a security is trying to add one or more observables.

Adding or Editing Manual Sources
In order to add or edit a manual threat intelligence source, navigate to Settings > Contextual Data Sources > Manual Threat Intel Sources.
In order to add a new source, click on the plus (+) icon next to the Manual Sources heading. The Add Manual Source panel is presented for you to define the source.
In order to edit an existing source, select the source, click on the drop-down (hamburger) menu and then click on the edit link.
Flexible Email Notifications
Threat Response allows an administrator to set up email notifications to alert an administrator or analysts of various system changes. Users have the flexibility to choose which notifications they want to receive, to whom they send the notifications, as well as what to include in the notification information.
Flexible email notifications configuration follows the following paradigm:
- WHEN users want to receive notifications:
- Incident Changes: this notification is sent when a new incident is created in Threat Response.
- Email Digest: this is a report that can be sent out on a daily, weekly, or monthly basis and represents the snapshot of activity in Threat Response for that time period.
- Device Updates: this notification is sent when Threat Response updates a device.
- WHO to send the notifications to:
- Assignee
- Team email address
- One or more additional email addresses
- WHAT to include in the notifications information:
- Assignee
- Team
- Threat Score
- Alert Count
- Latest PC data collection summary
- Attack Vector
- Classification
- Severity
- Confirmation
The example below shows Incident Changes notification email that was triggered based on the team update change.

The following example shows the Device Update notification that was trigged upon updating ASA device.

The following example shows the Email Digest notification.

Configuring SMTP Server Settings
Before enabling email notifications, some basic email parameters must be set up. Use the SMTP Server Settings to define these parameters.
- Log in to Threat Response.
- Navigate to
System Settings>Email Notifications>SMTP Settings. - Configure the SMTP Settings.
- Source Email Address: Te sender address used for the notifications
- Threat Response FQDN: Threat Response’s full DNS hostname. It is used to build any links presented in the notification emails.
- SMTP Server (Optional): The server through which notifications should be routed. If left blank, Threat Response uses the MX record for the recipient domain.
- SMTP Port (Optional): The port number that should be used when connecting to the SMTP Server
- Use STARTTLS: The encryption (TLS-based) that should be used for the message transfer
- Use SSL: The encryption (Secure Sockets Layer) that should be used for the message transfer
- Authentication: The username and password that should be used with the SMTP Server, if defined
Configuring Flexible Email Notifications
Let’s take a closer look at how to configure Threat Response Flexible Email Notifications.
- Navigate to
System Settings>Email Notifications - Click on the
+sign next to theEmail Notificationstitle to create a notification - In the
New Email Notificaitoinwindow define the following parameters:- Name: name of the email notification
- Notification Type: choose the type of the email notification
- Incident Changes: get notified every time there is an incident change
- Email Digest: generate daily, weekly, or monthly email digests that will represent the activity snapshots in Threat Response
- Device updates: generate email notifications when there are any device updates
- Stale Incident: generate email notifications whenever incidents have not been updated recently. The check frequency and the staleness threshold can be configured as part of the Trigger Conditions.
- Notification trigger: notification trigger option is available only for Incident Changes notification type. By specifying this parameter you can define the trigger for email notifications
- New Incident: generate email notification every time there is new incident created. For this option, you can additionally specify the threshold that you want to apply, such as Incident Threat Score or Severity. Thus, you will be able to trigger new incident notifications only for specific alert.
- Incident Updates: generate email notifications whenever there is an incident update. For this option you can choose what updates you want to generate notifications for, including but not limited to Team Updated, New Alert, New Collection, etc.
- Incident Closed: generate email notification every time the incident in Threat Response is closed
- Notification Recipients: define who will be receiving the configured notifications. You can choose Incident owner, Team email list, or specify additional email addresses in the free form field.
- Include Incident Attributes: you can also specify what information you want to include in the configured notifications, including by not limited to Assignee, Team, Threat Score, Alert Count, and others. You also have the option to select all available fields.

Ticketing Systems Email Notifications Integration
There is an additional use case for email notifications where admins can generate notifications and send them to ticketing systems, such as BMD Remedy in order to create ticketing cases.
For that purpose, Threat Response supports custom delimiter fields that will be used to generate notifications. Once that is configured, users can go to their ticketing system and specify what delimiters will be used and how ticketing system needs to be mapping the ingested fields from email notifications.

To learn more about this integration, please, refer to the following integration guide:
BMC Remedy Email Notifications Integration
Custom Geo-IP
Administrators can upload a CSV-formatted file containing location data for internal IP subnets to Threat Response. This enables Threat Response to display location data for internal hosts, which can be useful for multi-office businesses and global enterprises with offices in many different countries. Administrators can also use this function to override the default locations applied by Threat Response.
CSV Column Order:
IP/Subnet, Label, Country Code, Country, State/Province, City, Latitude, LongitudeColumns broken down by value type:
- IP/Subnet — The IP Address to which the entry applies (CIDR syntax)
- Label — The text string that can be used to label the location
- Country Code — The two-letter code representing the country of origin (ISO 3166-1 alpha-2 standard)
- Country — The text string listing the country name
- State/Province — The text string listing the state/region for the location
- City — The text string listing the city for the location
- Latitude — The latitude specified in decimal degrees (xxx.xxxx)
- Longitude The longitude specified in decimal degrees (xxx.xxxx)

Note that if latitude and longitude are not included in a file, Threat Response attempts to resolve the location based on the city, state, and country code. Other considerations:
- No column headers should be included in the file.
- Each entry must include an IP, plus one other field (minimum).
- Extra commas after the last defined field can be omitted.
Custom Responses
Threat Response allows an administrator to create custom responses that can be used while investigating an incident. These custom responses can be created when building integration with third-party systems.
Custom responses send a JSON-formatted version of an incident and all associated alerts to an external system. In addition to the incident, a custom string can be included in the response to trigger the external system to take a predefined course of action. An example of this may be triggering a packet capture for a specific host or annotating the incident with additional details, such as usernames or comments.
Creating a Custom Response
Custom responses are configured in System Settings. The steps below outline the process for creating a new custom response.
To create a custom response:
- Log in to Threat Response.
- Navigate to
System Settings>Customization>Custom Responses. - Click on the add (+) button n the Custom Responses section to open the New Custom Response panel on the right-hand side of the page.
- Configure the following options:
- Name: The label for the custom response that will appear in the response drop-down menu
- URL: The URL to which the response should be POSTed
- Username: The credential used to log in to the system to send custom information
- Password: The credential used to log in to the system to send custom information
- Payload: The customizable section of the JSON that can be used to specify a response action
Example of a custom response payload:
{"action":"packet_capture"}
With the custom response configuration in place, an administrator can define match conditions in Threat Response to activate these responses automatically as new alerts are received. Additionally, a Threat Response user can activate one of these responses manually during their investigation.
Upon activating the custom response, Threat Response combines the administrator defined payload with details about the incident. The resulting JSON that is sent to the remote server appears similar to the following:
{
  "type": "pcap",
  "incident_id": 58,
  "event_ids": [
    58
  ],
  "automated": true,
  "event": {
    "event_id": 58,
    "event_source_id": 3,
    "event_source_name": "FireEye Web MPS",
    "category": "malware-object",
    "severity": "MAJOR",
    "users": [
      "SALESDEMO\\ematula"
    ],
    "hosts": {
      "src": [
        "10.10.124.169"
      ],
      "dst": [
        "92.63.203.241"
      ],
      "-": [
        "5.72.234.136",
        "5.72.84.54",
        "5.75.115.157",
        "219.151.16.190",
        "58.46.234.4"
      ],
      "url": [
        "http:\/\/www2.k6taazzbck86.sxx.in\/hdcp231_5708.php?n63a9x=kqiX2ZzjqJzZys%2FcoNfMz3VrpWZrh6nhz3Onh8Lc3NSgvYyBlKKmnmurnFzj1J7x8JmJzaGaq5iSqn6wkZ7Yzc3rt8vKz6yXlJmWno7LkZ%2FknpaqqJKRnGlpnG9rh6zszKrp1J6roNnMz3Vrolyn1aW1zWeklpOysJmWn5pc4qlwkmyvnGutlZmzrIjH2qWX16Rw2LDvnmTol8ez6NnI362X5Glh1LHwmZ%2Fih9bz88XUqK%2Bw1J6oh6ztzXnhxZ7t39DHsaGi01o%3D"
      ]
    }
  }
}
Note
Alert details are only included when a custom response is generated automatically via a match condition. Manually created custom responses do not include the alert details. When creating a custom response manually, the user has the option of specifying an arbitrary string value, which can include IP addresses, username, or any other data used to trigger the response.
Once the response has been activated, a status icon is displayed next to the response indicating whether it was successful or not. This status is driven by the HTTP status code returned via the server after the response is pushed. If the HTTP status code is 2xx, the response shows a successful status indicated with a green check mark. If the status code is 4xx or 5xx, the response indicates failure with a red circle, backslash symbol.
Server Reply Back to Threat Response
In addition to the response status, the server can optionally provide a JSON reply to Threat Response. This response is treated as a comment on the incident and is recorded in the Incident Activity box. The JSON must include a key/value pair, where the key is a comment, and the value is a string type.
Example server reply:
{"comment":"Packet capture available at: http://www.example.com/pcaps/5cc22de8"}Scripted Responses
Overview
Threat Response enables you to create scripted responses for the express purpose of running Python code to execute arbitrary workflows automatically whenever an alert presents itself. These scripts can also be run on demand within an incident.
Response scripts can also make use of Threat Response API’s listed in the API Guide to retrieve incident/alert data, update or close incidents and manage lists inside Threat Response.
Note
A full Threat Response license is required in order to use the Scripted Responses feature.
Uploading a Script
The scripts used in scripted responses are uploaded in the Threat Response Application UI in either of these two places: “All Scripts” or “Response Scripts.” See Adding Response Scripts for a visual presentation of the process.
Configuring a Scripted Response
See Creating Match Conditions, Creating Auth Profiles for ETL and Response Scripts, and Uploading Variable Files for ETL and Response Scripts for brief overviews of the processes.
In summary, creating an automatic Scripted Response consists of
-
defining a new Match Condition on an Alert Source;

-
choosing the “Run a script” Response type;
-
selecting the Response Script to be run;

-
selecting a Variable File to use;

-
selecting an Auth Profile to use; and

-
saving the Match Condition.

The script will now be run whenever a new Alert, in sync with the Match Condition, is received.
Example Use Case
A distinctive feature of Scripted Responses is the flexibility they provide. For example, they can be used with VirusTotal to “enrich” abuse messages reported by end users, thus providing additional value to the Closed Loop Email Analyst and Response (CLEAR) solution after an abuse message has been analyzed by Proofpoint Threat Intelligence.
See the following steps relating to the example above.
-
Set up an API key as described in the Threat Response API Guide.
-
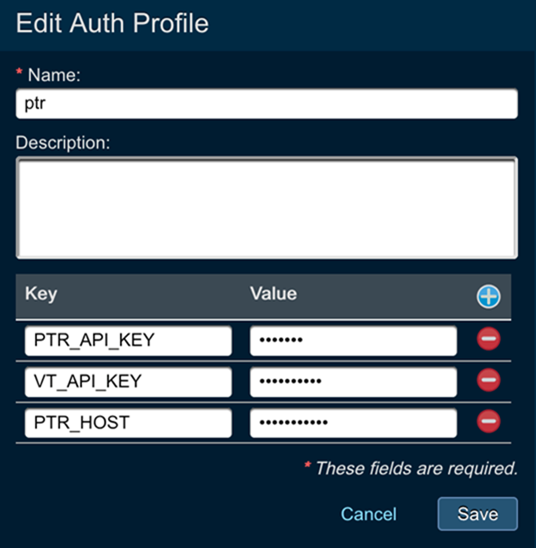
Create an Auth Profile with the following variables in association with a Python response script:
- Hostname of Threat Response,
- API Key for Threat Response, and
- API Key for VirusTotal.
-
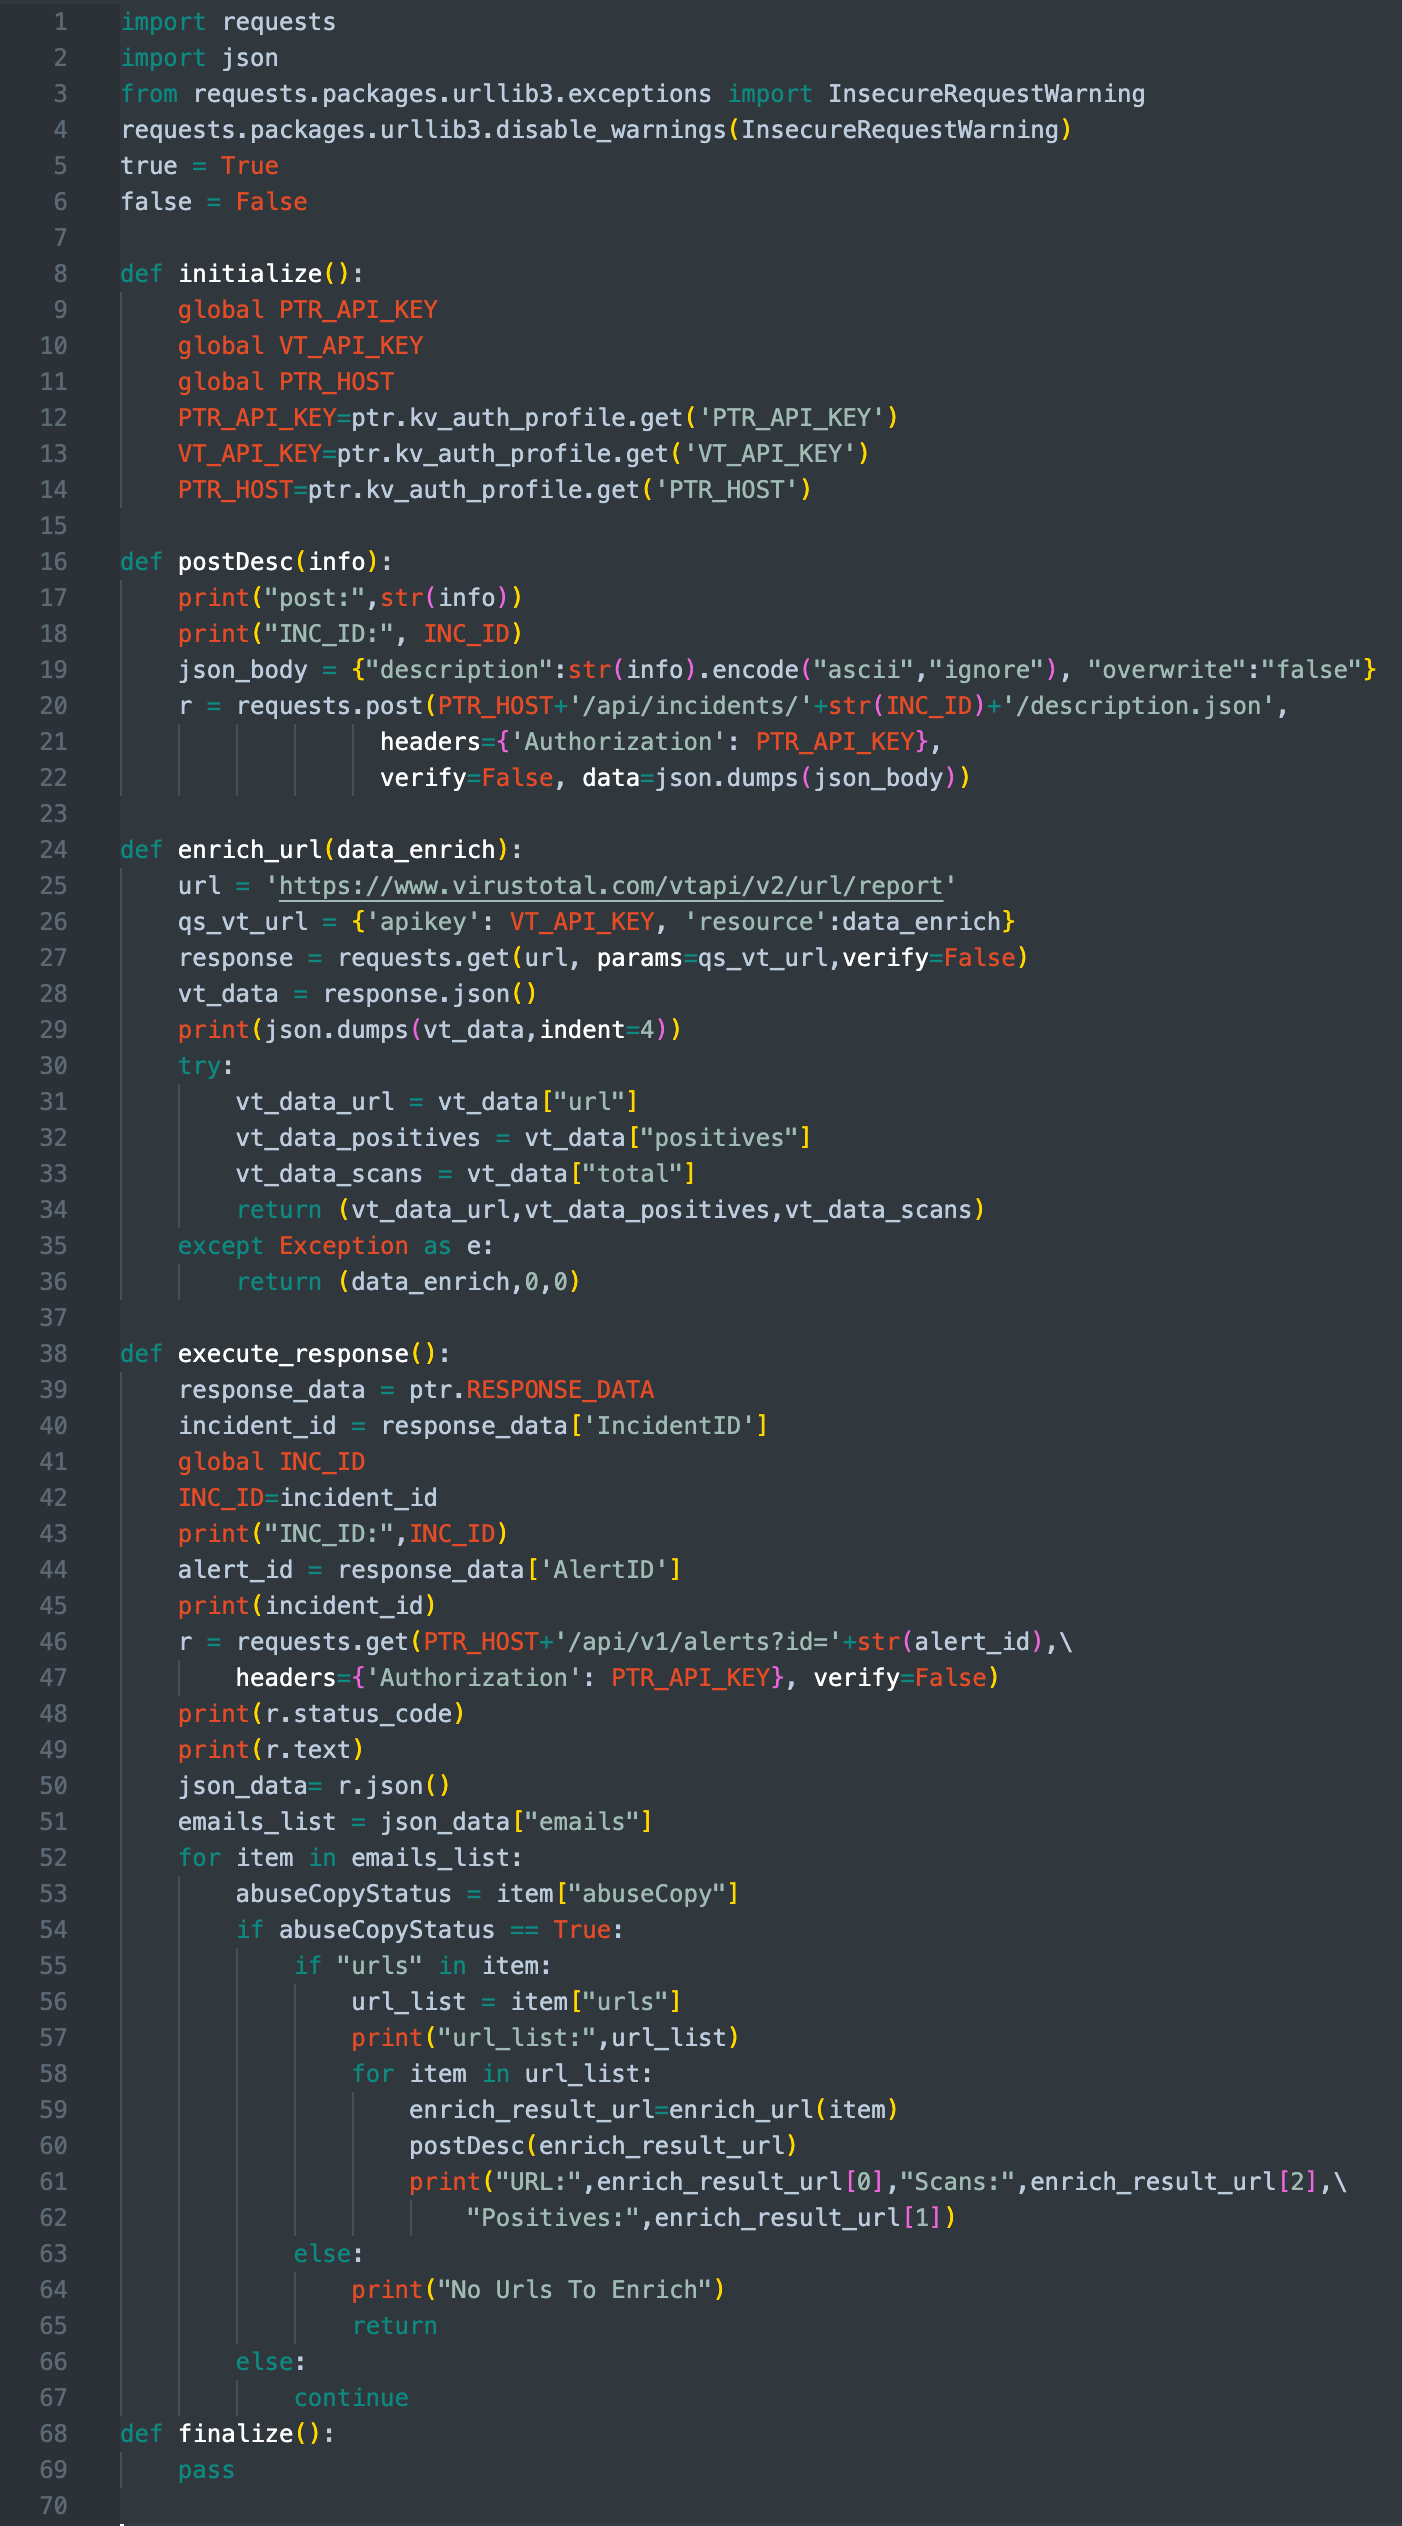
Upload the VirusTotal Python script (vt.py) to perform the following sequence of actions:
- The script uses the Threat Response Alert API to extract URLs in the abuse message.
- The script connects to VirusTotal and requests a lookup of these URLs.
- The VirusTotal lookup returns: Total Positive Hits and Total Enrichment Sources Used.
- The script uses the Update Incident Description API to append the following to the incident description:
URL, Total Positive Hits and Total Enrichment Sources Used.
-
Set up a match condition for the abuse mailbox source as summarized in Configuring a Scripted Response.
-
The match condition must be triggered to run for all alert severity and abuse disposition values after the message is analyzed by Proofpoint Threat Intelligence.
-
Choose the previously uploaded VirusTotal script in the Run a Script response for this match condition in addition to the auth profile.

Subsequently, a reported abuse message (by an end user) is analyzed first by Proofpoint Threat Intelligence and then (the incident is) updated with the resulting abuse disposition. Lastly, the scripted response is “triggered” for the abuse message and the incident is “enriched” using any hits from VirusTotal.

Importantly, the Alerts menu option serves to show that TRAP recognized three URLs in this case.

Moreover, the Activity menu option can show when a script has successfully run.

Essentially, this use case illustrates how Scripted Responses can complement Proofpoint’s CLEAR solution by providing a better evaluation to a SOC analyst, thus enabling them to analyze and respond to abuse message threats efficiently.
Custom and standard incident fields
Custom incident Fields allow you to define a set of fields that users can edit when managing incidents. These fields may be used to specify a custom priority or to tag an attack vector for an incident. Users can also generate reports based on these fields.
Standard incident fields are required for Threat Response normal operation and cannot be deleted.
The following field types can be created for incidents:
- Text field
- List of values
Out of the box Threat Response comes pre-configured with a set of standard and custom incident fields.
- Standard incident fields:
- Attack vector
- Classification
- Severity
- Custom fields:
- Confirmation
- Detection Source
- Impact
- Workflow stage
Threat Response users can perform the following actions on these fields:
- Edit the ordering and values for Attack Vector standard field
- Edit the ordering and values for Classification standard field
- Edit the ordering only for Severity field
- Create one or several Custom fields, including editing or deleting any of the pre-configured custom fields
Create custom fields
To create a new custom incident field:
- Log in to Threat Response.
- Navigate to the
System Settings>Customization>Incident Fieldspage. - Click on the Add (+) button to create a new custom field.
- Define a
Namefor the field; this will be displayed in the incident. - Select a Type (T
ext FieldorList). - Optional: Define values for the field.
- Click on Save to create the new field.

Required Incident Fields
Administrators of Threat Response can define fields that need to be present for the incident before the incident can be closed by an analyst. This is very helpful when admins want to make sure the reporting is accurate (if the reporting is generated for certain incident attributes) or when the admin needs analysts to consider certain things before the incidents can be closed.
Threat Response offers the functionality to define Required Incident fields. In order to do so, please, proceed with the following steps:
- Log in to Threat Response.
- Navigate to the
System Settings>Customization>Required Incident Fieldspage. - Click on the Add (+) button to add Required Incident Field.
- In the new menu specify the following:
- Enabled: check if you want to enable the field to be required
- From the drop down menu choose the filed that you want to be required
- Click
Save

Configuring team-based queues
In this section we will take a look at how to create and configure Threat Response teams functionality. If you are interested in learning more about how to use teams and enable team-based workflows, please, refer to the following User Guide section:
Users can create teams and assign users to them. This mirrors closely the existing workflows of the Security Operations Center, where each customer has multiple teams, such as Tier-1, Tier-2, and Tier-3 analysts.
Out of the box, Threat Response comes with the pre-configured set of teams (administrators can create their own teams if necessary). The following teams are preconfigured as part of Threat Response:

Note
Each team comes with the pre-configured permissions, which administrators can change depending on the security policies.
Creating a new team
To create a new team, users need to perform the following actions:
- Log in to Threat Response.
- Navigate to the
System Settings>User Management>Manage Teamspage. - Click on the Add (+) button to create a new team.
- Enter the following parameters
- Name: name of the team
- Email address: email address of the team (for instance, when using flexible email notifications, team email address can be used to send the notifications to the whole team)
- Description: description of the team
- Allow add to list: check if you want to let the team members to add indicators to lists
- Allow custom responses: check if you want to let the team members to perform custom response actions
- Allow email quarantine: check if you want to let the team members to perform email quarantine actions
- Allow host isolation: check if you want to let the team members to perform host isolation actions
- Allow sample downloads: check if you want to let the team members to perform sample downloads actions
- Hit
Savebutton

Team-based permissions
As you can see in the configuration section above, Threat Response allows you to define and enforce team-based permission.
For example, Tier-1 analysts can investigate incidents, but will not be able to take any actions on them, whilst Tier-3 team analysts have full permissions. Threat Response comes pre-configured with teams and permissions out of the box.
Here is an example of what Tier-2 team is entitled to.

In order to configure team-based permissions, create or edit the team, and specify the following parameters:
- Allow add to list: check if you want to let the team members to add indicators to lists
- Allow custom responses: check if you want to let the team members to perform custom response actions
- Allow email quarantine: check if you want to let the team members to perform email quarantine actions
- Allow host isolation: check if you want to let the team members to perform host isolation actions
- Allow sample downloads: check if you want to let the team members to perform sample downloads actions
Creating default team for incidents
Threat Response users can create the default team queue where all unassigned incidents will land. To create the default queue, perform the following:
- Log in to Threat Response.
- Navigate to the
System Settings>User Management>Manage Teamspage. - Click on the dropdown list next to
Team queue for new incidents - Choose the default team
- Hit
Set

Assigning users to teams
Teams consist of users, and several users can be assigned to a team. In order to put the user into a team, perform the following:
- Log in to Threat Response.
- Navigate to the
System Settings>User Management>Manage Userspage. - Click on the
usernamethat you want to place to a team, or click on the Add (+) button to create a new user. - Click on the team dropdown and choose the team that the user will be placed into
- Click
Save

Sign-in disclaimer
A disclaimer message can be displayed to users connecting to Threat Response to outline the terms of use of the system. The disclaimer message is displayed on the Threat Response Login page upon connecting to the system via SSH.
To set the Login Disclaimer:
- Navigate to the
System Settings>Customization>Sign-in Disclaimerpage. - Enter your disclaimer message into the Login Message field.
- Save the changes.