Threat Response Auto Pull (TR-AP) - Administration Guide
Administration guide is created for Threat Response Auto Pull (TR-AP) administrators who need to configure various functionality of Threat Response Auto Pull. This document covers Threat Response Auto Pull Management Console, as well as all features that users can configure in the UI as well as in dedicated System Settings section. For ease of navigation, please, use navigation menu on the left or utilize search functionality to locate topics of interest.

For additional information about functionality that is common between Threat Response and Threat Response Auto Pull (TR-AP), please, refer to the following documentation:
- Threat Response / TR-AP Management Console - in this document you will learn how to access management console and use management functionality such as upgrading the appliance and creating data backups among other things.
- Threat Response / TR-AP Clustering Guide - in this section you will learn how to configure clustering functionality of Threat Response / Threat Response Auto Pull.
Configuring Threat Response Auto-Pull Settings
Configure Email Security Alert Sources
Threat Response Auto-Pull license supports following alert sources:
- Proofpoint Targeted Attack Protection (TAP): See TAP Integration Guide for detailed configuration steps.
- Proofpoint CSV Upload: See Proofpoint CSV Upload Integration Guide for detailed configuration steps.
- Proofpoint Smart Search: See Proofpoint Smart Search Integration Guide for detailed configuration steps.
- Proofpoint Smart Search - Export to TRAP: See Proofpoint Smart Search - Export to TRAP Integration Guide for detailed configuration steps. Note: this integration is only available PoD customers.
- Proofpoint Threat Response JSON Alert Source (email security alerts only): See the JSON alert source documentation for more information.
- FireEye EX Series: See FireEye EX Series Integration Guide for detailed configuration steps.
Adding a source
Open the Navigation menu and select the Sources button to open the Sources window where you can create and manage the detection systems from which Threat Response will receive security alerts, e.g. Proofpoint TAP or other SIEM or IDS vendors.

You will be redirected to the following page:

To add the source:
- Click the blue add (+) button next to Sources in the left panel to add a new event source to Threat Response.
- Select a source type from the Type drop down list.
- Complete the event source configuration. (see next sections)
- Save changes.

Note
The options presented vary by event source. Common settings are outlined below. For more information regarding your specific event source vendor, please refer to the appropriate vendor integration guide.
Name and description
A Name is required for each new event source, and is used as an identifier for the event source throughout the UI. A name that clearly represents the source type, as well as its location, is recommended.
The Description allows an administrator to input a more detailed description of the source (to be displayed when viewing the source in the Sources page). Including a description for the event source is optional.
Operating modes
Threat Response Auto Pull offers two operating modes allowing users to view events in two different ways: mapped and linked. These event-to-incident relationships are described below:
- Linked: (default) Threat Response intelligently links incoming events to existing incidents based on the system being targeted.
- Mapped: Each new event received is mapped to a separate incident with a one-to-one mapping. Uncheck the Link alerts box in the Edit Source pane to create a new incident for each individual event that is received.
Event linking can be configured from the New Source pane when adding a source, or when editing a source that has already been created.
Access control lists
Threat Response lets you create access control lists (ACLs) to restrict the IP addresses that can send events to your event source listeners on Threat Response. Create ACLs when adding a source.
The following steps assume you have the New Source panel open to add a source.
- Click
Enable Event Source Locationin the right panel. - For the first IP address you want on the ACL, enter a unique name and the host IP address.
- Click the blue add (+) button in the same section and repeat the previous step for every IP address you want to add to the ACL.
- Click
Savewhen you have completed adding the source.
Creating event filters
Event filters can be used to ignore alerts from an event source. This may be necessary for event sources that are prone to false positives or for the purpose of ignoring alerts reporting traffic from certain IP subnets.
- Log in to Threat Response
- Navigate to the
Sourcespage - Click on the source that you want to create an event filter for to bring up the Source Details panel on the right.
- Click the Add (+) button next to Event Filters to open the New Event Filter popup. Specify the filter criteria to look for (see below).
- Save changes.

Creating match conditions
Match Conditions define automatic actions to be taken on alerts. Match conditions provide a wide array of metrics that you can automatically match within the incoming alerts and then apply certain actions on those matches.
Use the step below to create a match condition that takes action, and then suppresses the alert to avoid creating a new incident.

- Log in to Threat Response Auto Pull.
- Navigate to the
Sourcespage. - Click on the source that you want to create a match conditions for to bring up the Source Details panel on the right.
- Click the Add (+) button next to Match Conditions to open the New Match Condition popup.
-
Create the match condition with the following settings:
- Define the match criteria on the left-side of the popup
- Create responses on the right-side of the popup
- Check the box in the upper-right corner to Suppress incident creation
-
Save changes
Configure Microsoft Exchange or Office 365
To quarantine email messages, Threat Response Auto-Pull requires integration with Exchange. Please refer to the Exchange integration guide for detailed steps.
Active Directory and LDAP
Microsoft Active Directory allows network administrators to create and manage users within a network.
Lightweight Directory Access Protocol (LDAP) is an application protocol. It is used to access and maintain directory services - such as Active Directory - and shares that “object” data across the network. Threat Response can manipulate Active Directory via LDAP.
Integrating Active Directory With LDAP
Threat Response has the capability to query Active Directory/LDAP for user information. This information - displayed within the Threat Response console - provides details about users who have been reported in security alerts. User account details such as location and group membership can also be retrieved efficiently. The configuration is divided into the two sections below.
Adding an LDAP Server
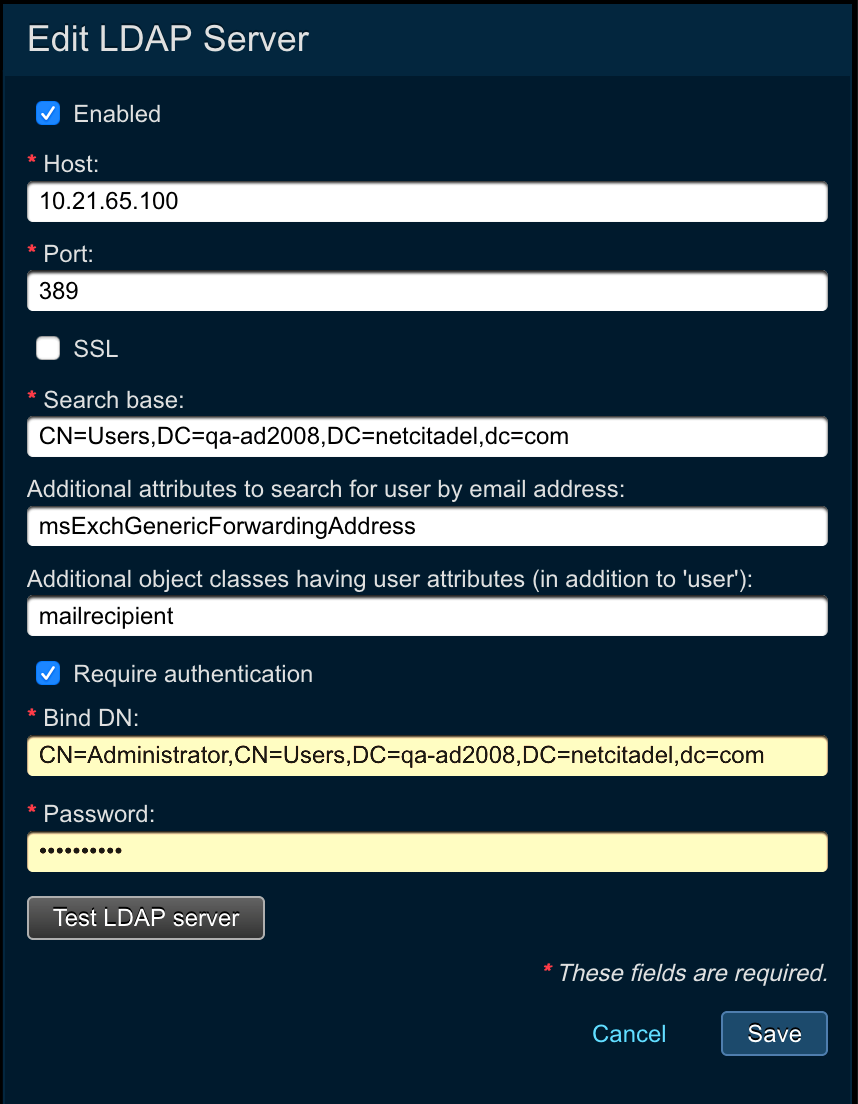
Create a server listing within Threat Response Auto Pull to tell the systems which LDAP server to query for user information. (Multiple servers can be created.)
- Log on to Threat Response.
- Navigate to the
System Settings(via the gear button) >Contextual Data Sources>LDAP Serversand then click the add (+) icon (alongside the heading) to configure a new LDAP server. - Enter the following information into the Add LDAP Server panel.
- IP/Hostname:
<ldap_hostname_or_ip> - Port:
<ldap_port>Use 389 for non-SSL; 636 for SSL. - SSL: Place a tick in the box to enable SSL encryption.
- Search Base:
<directory_path>Enter the Search Base into the field. Note that this is the LDAP search base (the directory from which a search begins, e.g. DC=DOMAIN,DC=local). - Additional attributes to search for user by email address: Enter any other LDAP attribute names that contain the email address for the user (if they have multiple email addresses and/or the Active Directory environment does not conform with standard LDAP attributes for storing the email address).
- Additional object classes having user attributes (in addition to ‘user’): Enter any object classes, in addition to the hardcoded “user” objectClass, to fetch additional LDAP attributes.
- Require Authentication: Place a tick in the Require Authentication box.
- Enter the Bind DN. Distinguished Names (DNs) are used to connect to LDAP, e.g. CN=chris,OU=Users,DC=DOMAIN,DC=local.
- Enter the password for the user/Bind DN above.
- IP/Hostname:
- Click on Save.
Note
The authentication username may vary in syntax depending on your directory server’s authentication requirements. In most cases, the full distinguished name (DN) for the user should be used as the username.
Managing LDAP Attributes
Threat Response Auto Pull allows you to configure the user attributes that are to be retrieved from your LDAP server/Active Directory service to obtain details about users who have been reported in incidents.
LDAP attributes can be edited by navigating to the System Settings (via the gear button) > Contextual Data Sources > Displayed User Attributes webpage.
Editing the Displayed Attributes
Once an LDAP server has been configured within Threat Response, the system queries the schema for that server to determine which attributes are available for user objects.
The following common user attributes are enabled by default.
- Display Name (displayname)
- Telephone (telephoneNumber)
- Mobile (mobile)
- Email Address (mail)
- Company (company)
- Department (department)
- Address (streetaddress)
- City (l)
- State (st)
- Country (co)
- Groups (memberof)

Selecting, Disabling, and Reordering Attributes
Simply select an attribute/disable an existing attribute by placing a tick in the appropriate box, then it is moved from the Available Attributes column to the Selected Attributes column, or vice versa.
Reorder an attribute to change the display order/priority by dragging and dropping a selected attribute in the Selected Attributes column.
Using LDAP Attributes Within TRAP
Two use cases - Incident Enrichment and Automated Responses - are associated with the use of LDAP attributes within TRAP. These use cases will be described in detail in the following paragraphs.
Incident Enrichment
You are reminded that when you are looking at an incident within Threat Response, the incident is tracking a threat, which is targeting a person. Importantly, we can capture relevant information via LDAP attributes such as email addresses in incidents.
Taking the totality of the (defined) user attributes into consideration, an incident is better enriched. Ultimately, it is useful to obtain additional contextual information on a person who was targeted in an incident.
There are two ways to view this information:
-
Navigate to the
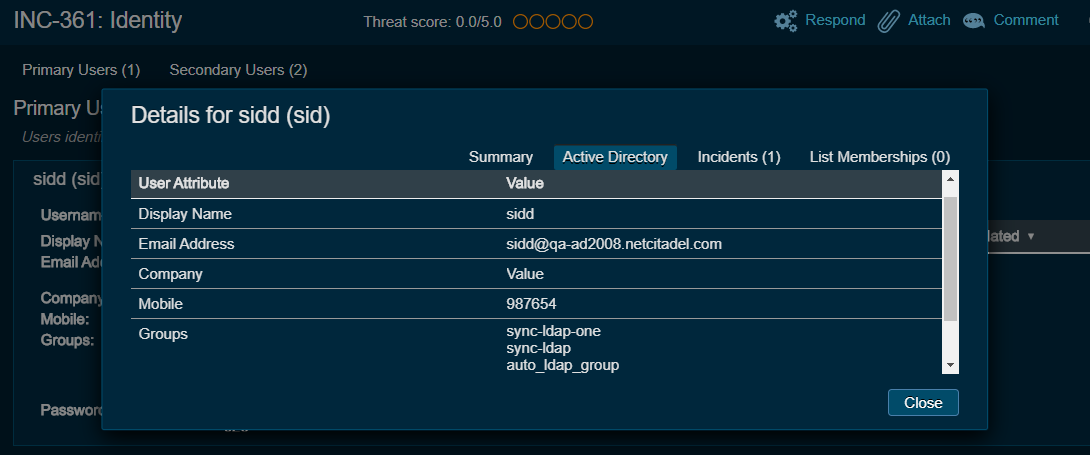
Incidentswebpage (via the hamburger button). Note that you can select incidents from among the categories shown on this screen, e.g. New and Open.Simply click the field alongside the User (in an incident) to display the main details associated with that user and then click on Active Directory to reveal their entire suite of attributes.
-
Navigate to the
Incidentswebpage. Click the incident identification number, e.g. INC-xxxxx to transfer you to the Incident Overview.Click the field alongside the User in the Target Information section of the overview to display the main details associated with that user and then click on Active Directory to reveal their entire suite of attributes.
Note
The list of attributes in this popup window will match the Selected LDAP Attributes configured under System Settings (via the gear button) > Contextual Data Sources > Displayed User Attributes.
Automated Responses
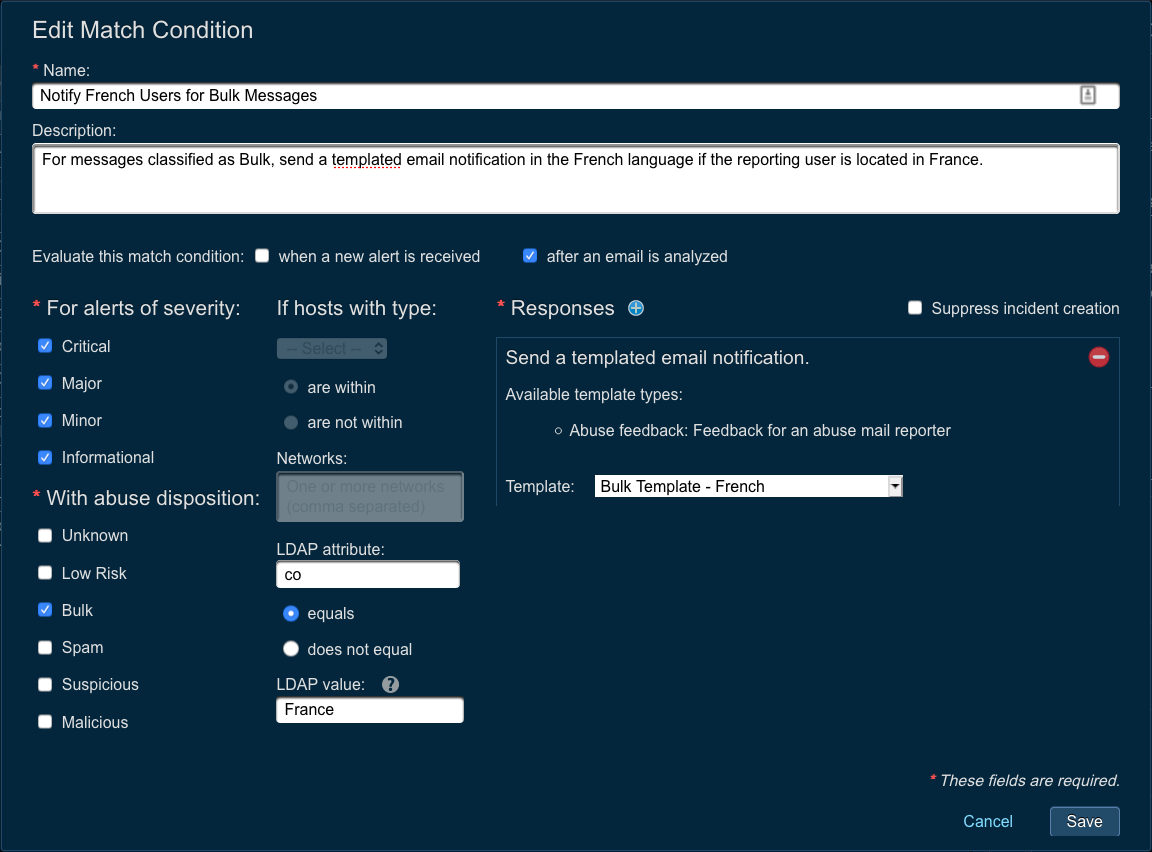
Match condition responses can be run by using the values of LDAP attributes of the end user. This capability enables the end user to “trigger” Automated Responses based on available LDAP attributes. Feedback, for example, for reported abuse messages can be sent to end users in a specific language, e.g. French, which is representative of their location, France, and as noted in an LDAP attribute (country) and LDAP value (France). Preconfigured email templates can be selected from the Template field in the match condition.
Essentially, we’re setting up Automatic Responses by creating match conditions for specific abuse dispositions, or “verdicts” such as bulk.
Note
The LDAP attributes specified in a match condition must be available in the list of Displayed User Attributes configured under System Settings (via the gear button) > Contextual Data Sources > Displayed User Attributes.
Active Directory Responses
Each of the following responses deals with the mitigation of likely internal account breaches. Given the assumption that a tool, namely Proofpoint Cloud App Security Broker (Proofpoint CASB), has detected that an account has been compromised because some malicious actor knows the password (and has used it), one or more of these responses may be set up depending on the nature of the threat and the person whose account was compromised.
Note
The process of integrating with Active Directory is a prerequisite for using these responses.
Three different responses can be applied to an Active Directory account:
- Update a password to a random string (to prevent the malicious actor from logging in again).
- Disable an account (to prevent anyone from logging in).
- Require a user to change their password upon logging in (to require contacting IT because the password set in step one is unknown).
Importantly, the use of the first response alone is a safe bet because it prevents anyone from logging in; users whose accounts are disabled or made inaccessible with a random password must contact their IT Support Team to access their accounts.
Important
An Active Directory account used to set up an LDAP server must have the Account Operators and Domain Users roles available, as shown below, for these responses to work. This is the minimum requirement.
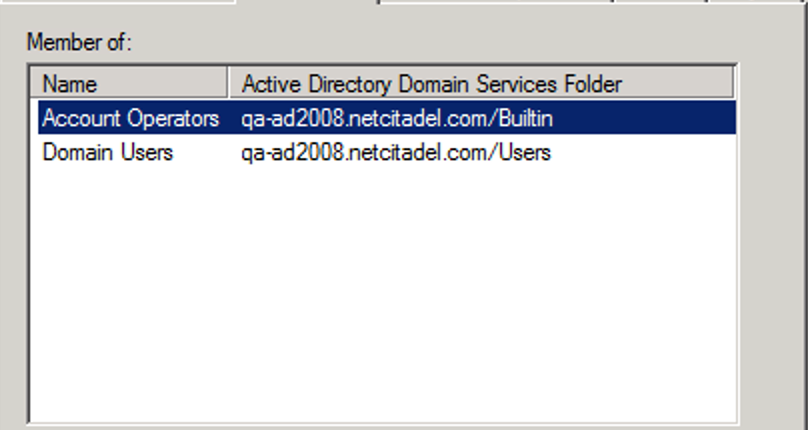
The details of each Response Definition are as follows.
Invalidating a User’s Password in Active Directory

The Invalidate User Password in Active Directory response creates a new, randomly generated password and then assigns it to a user whose password has been invalidated. The password cannot be seen; furthermore, it is not stored in any clear text representation within Threat Response.
This response is designed to mitigate against Account Compromise and to prevent an attacker who has gained access to a user’s account from being able to log on. It is equivalent to going into the Reset Password dialog box in Active Directory Users and Computers and setting the user’s password to a random string.
Disabling a User in Active Directory
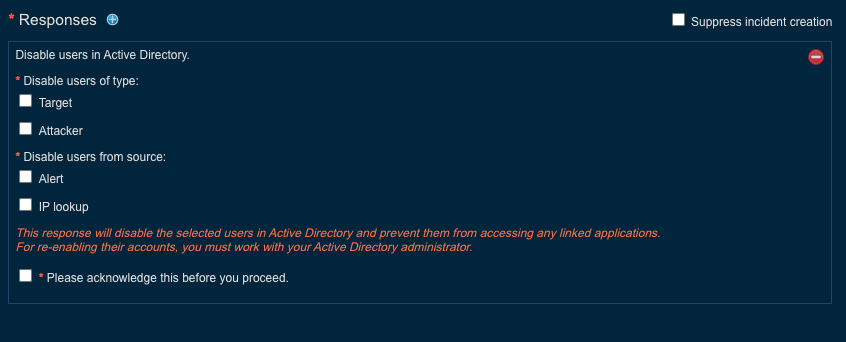
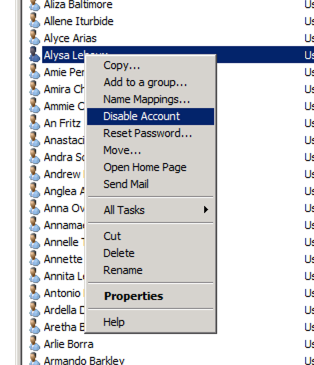
The Disable User in Active Directory response disables a selected user in Active Directory via the configured LDAP servers. It is equivalent to going into the Active Directory Users and Computers app on a Domain Controller and choosing Disable Account from the “per user” context menu.
Forcing a User Password Change in Active Directory

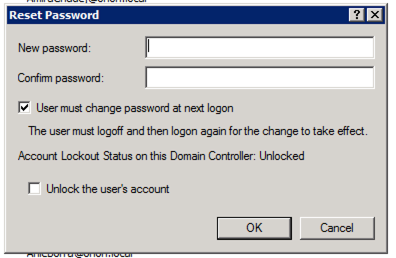
The Force User Password Change in Active Directory response makes a user, upon logging on, change their password. It is equivalent to going into the Reset Password dialog box, from the “per user” context menu, in the Active Directory Users and Computers app on a Domain Controller and clicking on User must change password at next logon.
The implementation of Active Directory responses is based on a previous response called Add users to list. Reusing this component of our code base has resulted in reusing some of the associated terminology.
These responses can be used for both message-centric (TRAP) and network-centric (full PTR) use cases, viz., TAP permitted clicks and firewall or JSON alert sources. The interpretation of the terminology changes accordingly.
A target is a user who is targeted with a threat, or alternatively, an email recipient who performs a permitted click.
An attacker is a user who attacks, or alternatively, an email sender.
Note
Active Directory responses on an attacker’s user account are possible only if an attack originated internally. Attacks can be ignored for most permitted clicks, which tend to be externally originating threats.
Alert: Look up a username directly or via email address in the alert payload.
IP Lookup: Look up a username via an IP address specified in the alert payload.
Note
IP Lookup is generally relevant to JSON alert sources, where the alert payload can include an IP address.
Configuring Proxy Settings (Optional)
If a proxy is used on your network to access the Internet, use the steps below to configure Threat Response Auto-Pull to use the proxy.
- Log in to Threat Response Auto-Pull
- Navigate to
System Settings>Appliance Configuration>Proxy Configuration - Configure Proxy settings
- Check Use proxy server to enable the proxy
- Host:
<proxy_ip_or_hostname> - Port:
<proxy_port> - Requires Authentication (Optional)
- Click
Save Settings - Click
Test Proxy Settingsto confirm that Internet routing works
Flexible Email Notifications
Threat Response allows an administrator to set up email notifications to alert an administrator or analysts of various system changes.
As part of Threat Response 3.1.0 we have expanded the capabilities for email-based notifications. Users have flexibility in choosing what notifications they want to receive, who to send the notifications to, as well as what to include in the notifications information.
Flexible email notifications configuration follows the following paradigm:
- WHEN users want to receive notifications:
- Incident Changes: this notification is sent when a new incident is created or an existing incident is updated in TRAP.
- Stale Incidents: this notification is sent when an incident hasn’t been updated in a configurable amount of time.
- Connection Failure: this notification is sent when there is a connection failure with O365/Exchange/TAP/Overcast
- WHO to send the notifications to:
- Assignee
- Team email address
- One or more additional email addresses
- WHAT to include in the notifications information:
- Classification
- Severity
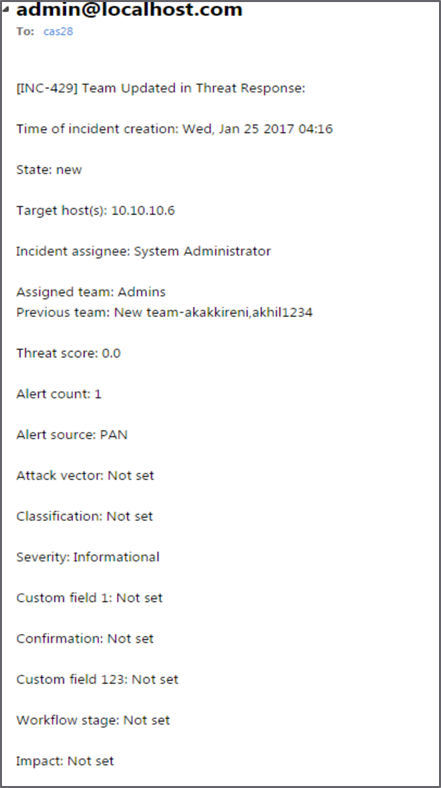
The example below shows Incident Changes notification email that was triggered based on the team update change.
Configuring SMTP Server Settings
Before enabling email notifications, some basic email parameters must be set up. Use the SMTP Server Settings to define these parameters.
- Log in to Threat Response.
- Navigate to
System Settings>Email Notifications>SMTP Settings. - Configure the SMTP Settings.
- Source Email Address: Te sender address used for the notifications
- Threat Response FQDN: Threat Response’s full DNS hostname. It is used to build any links presented in the notification emails.
- SMTP Server (Optional): The server through which notifications should be routed. If left blank, Threat Response uses the MX record for the recipient domain.
- SMTP Port (Optional): The port number that should be used when connecting to the SMTP Server
- Use STARTTLS: The encryption (TLS-based) that should be used for the message transfer
- Use SSL: The encryption (Secure Sockets Layer) that should be used for the message transfer
- Authentication: The username and password that should be used with the SMTP Server, if defined
Configuring Flexible Email Notifications
Let’s take a closer look at how to configure Threat Response Flexible Email Notifications.
- Navigate to
System Settings>Email Notifications - Click on the
+sign next to theEmail Notificationstitle to create a notification -
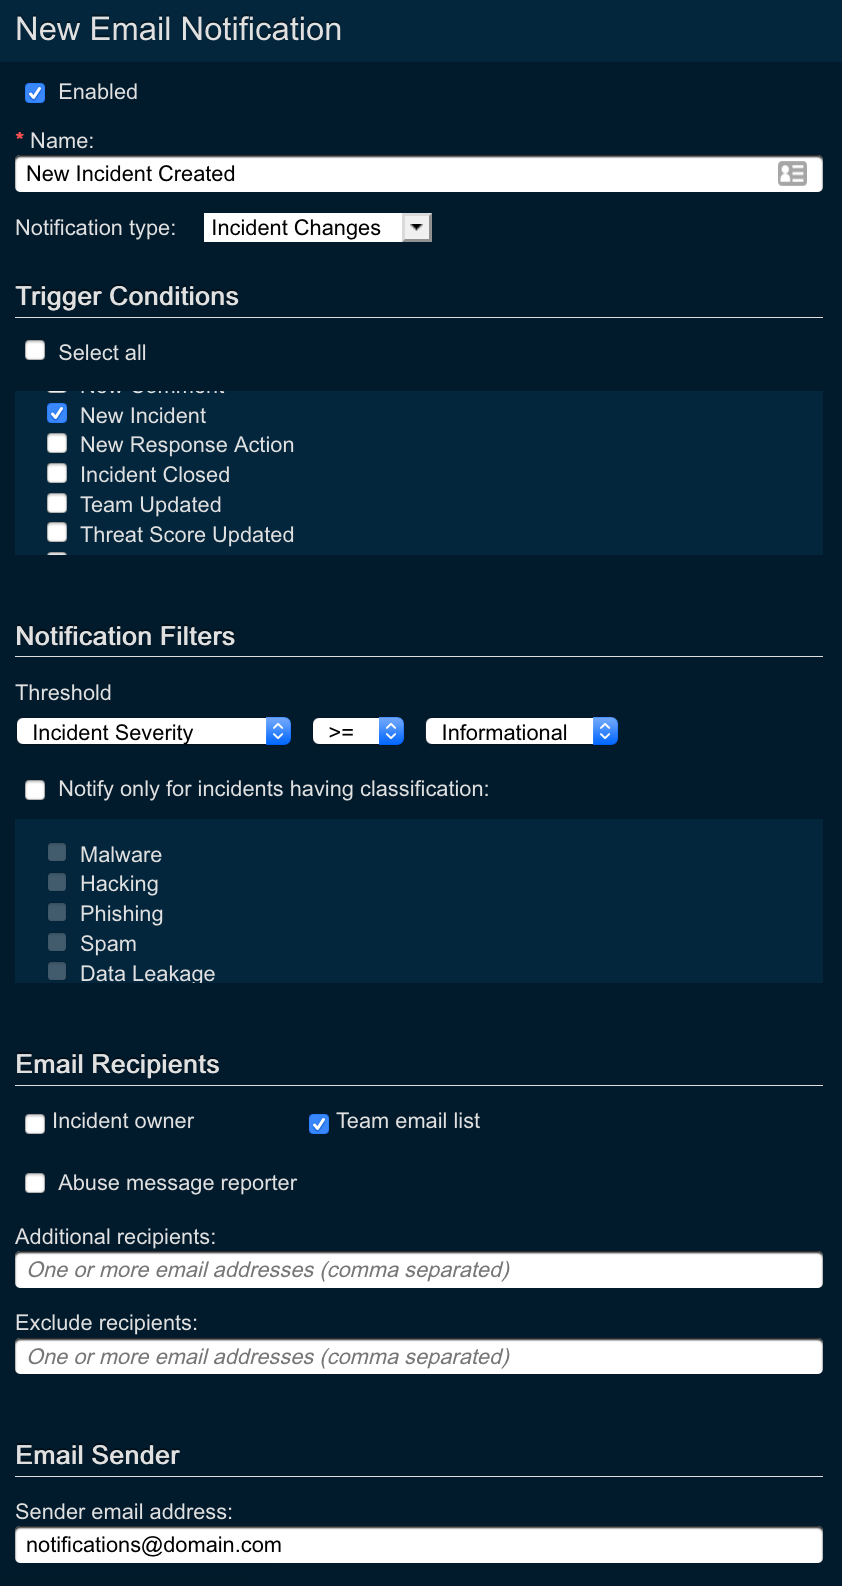
In the
New Email Notificationwindow define the following parameters:- Name: name of the email notification
- Notification Type: choose the type of the email notification
- Incident Changes: get notified every time there is an incident change
- Stale Incidents: generate email notifications when an incident hasn’t been updated in a configurable amount of time
- Connection Failure: generate email notifications when there is a connection failure with O365/Exchange/TAP/Overcast
- Notification trigger: notification trigger option is available only for Incident Changes notification type. By specifying this parameter you can define the trigger for email notifications
- New Incident: generate email notifications every time there is new incident created. For this option, we recommend Incident Severity. Thus, you will be able to trigger new incident notifications only for specific alert
- Incident Updates: generate email notifications whenever there is an incident update. For this option you can choose what updates you want to generate notifications for, including but not limited to Team Updated, New Alert etc.
- Incident Closed: generate email notifications every time the incident in Threat Response is closed
- Notification Recipients: define who will be receiving the configured notifications. You can choose Incident owner, Team email list, or specify additional email addresses in the free form field.
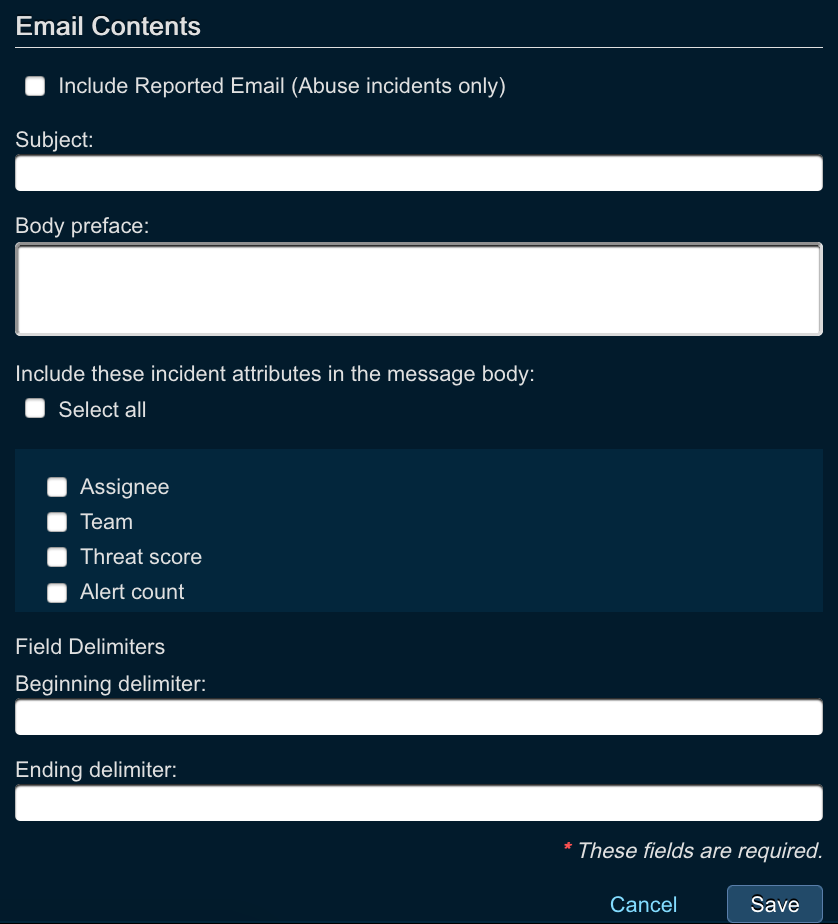
- Include Incident Attributes: you can also specify what information you want to include in the configured notifications, including by not limited to Assignee, Team, Alert Count, and others. You also have the option to select all available fields.
Configuring Team-Based Queues
In this section we will take a look at how to create and configure Threat Response teams functionality. If you are interested in learning more about how to use teams and enable team-based workflows, please, refer to the following User Guide section:
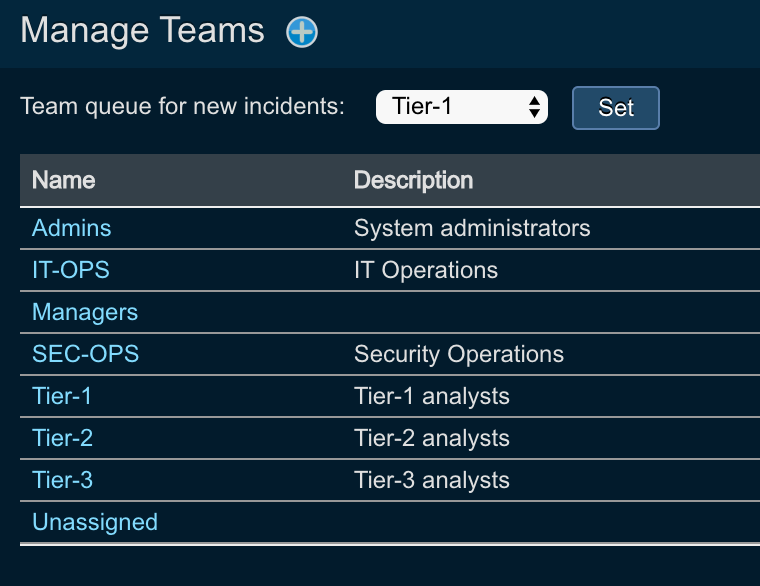
Starting with Threat Response 3.1.0, users can create teams and assign users to them. This mirrors closely the existing workflows of the Security Operations Center, where each customer has multiple teams, such as Tier-1, Tier-2, and Tier-3 analysts.
Out of the box, Threat Response comes with the pre-configured set of teams (administrators can create their own teams if necessary). The following teams are preconfigured as part of Threat Response:
Note
Each team comes with the pre-configured permissions, which administrators can change depending on the security policies.
Creating a New Team
To create a new team, users need to perform the following actions:
- Log in to Threat Response.
- Navigate to the
System Settings>User Management>Manage Teamspage. - Click on the Add (+) button to create a new team.
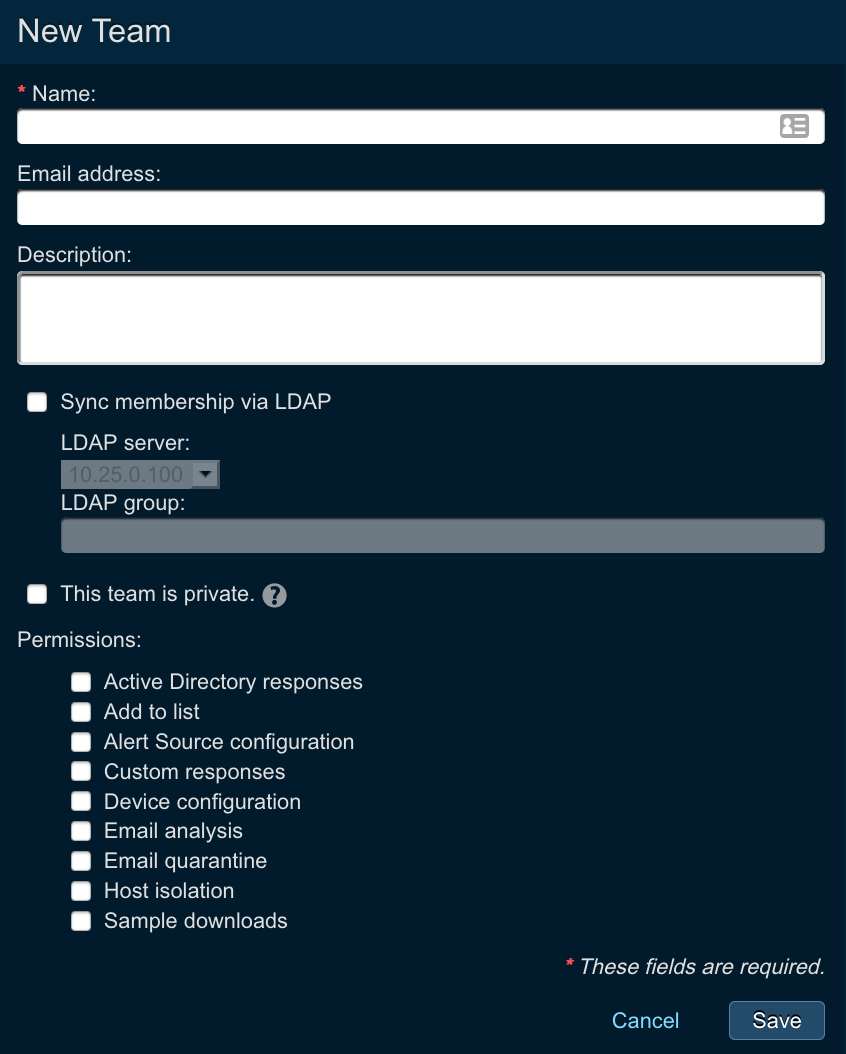
- Enter the following parameters
- Name: name of the team
- Email address: email address of the team (for instance, when using flexible email notifications, team email address can be used to send the notifications to the whole team)
- Description: description of the team
- Sync Membership via LDAP: allows membership synchronization from an LDAP group
- Active Directory responses: check if you want to let the team members perform active directory responses such as password invalidation
- Allow add to list: check if you want to let the team members to add indicators to lists
- Alert Source configuration: check if you want to let the team members configure new alert sources
- Allow custom responses: check if you want to let the team members to perform custom response actions
- Device configuration: check if you want to let the team members configure new devices
- Email Analysis: check if you want to let the team members analyse reported abuse messages
- Allow email quarantine: check if you want to let the team members to perform email quarantine actions
- Allow host isolation: check if you want to let the team members to perform host isolation actions
- Allow sample downloads: check if you want to let the team members to perform sample downloads actions
- Hit
Savebutton
Team-Based Permissions
As you can see in the configuration section above, Threat Response allows you to define and enforce team-based permission.
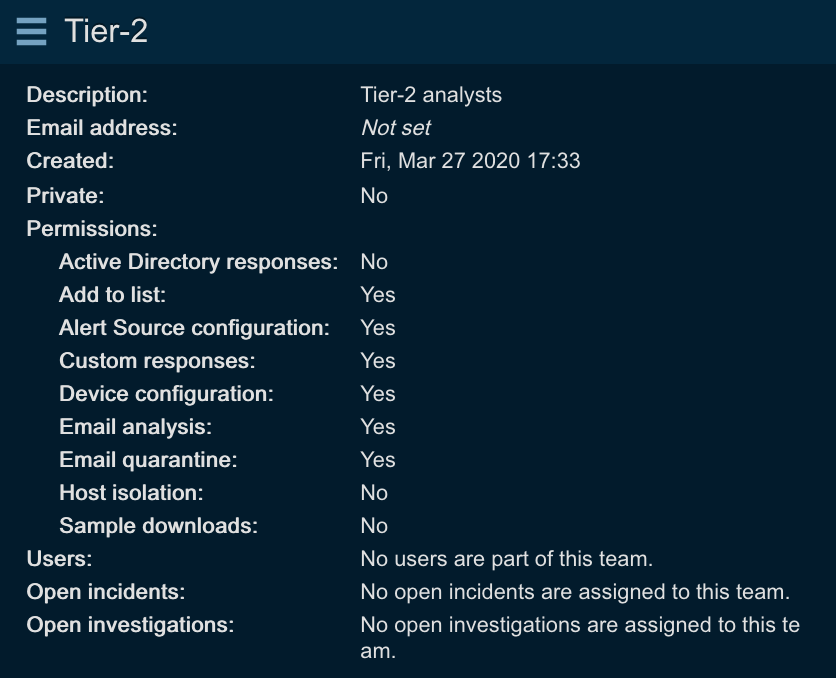
For example, Tier-1 analysts can investigate incidents, but will not be able to take any actions on them, whilst Tier-3 team analysts have full permissions. Threat Response comes pre-configured with teams and permissions out of the box.
Here is an example of what Tier-2 team is entitled to.
In order to configure team-based permissions, create or edit the team, and specify the following parameters:
- Active Directory responses: check if you want to let the team members perform active directory responses such as password invalidation
- Allow add to list: check if you want to let the team members to add indicators to lists
- Alert Source configuration: check if you want to let the team members configure new alert sources
- Allow custom responses: check if you want to let the team members to perform custom response actions
- Device configuration: check if you want to let the team members configure new devices
- Email Analysis: check if you want to let the team members analyse reported abuse messages
- Allow email quarantine: check if you want to let the team members to perform email quarantine actions
- Allow host isolation: check if you want to let the team members to perform host isolation actions
- Allow sample downloads: check if you want to let the team members to perform sample downloads actions
Creating a Default Team for Incidents
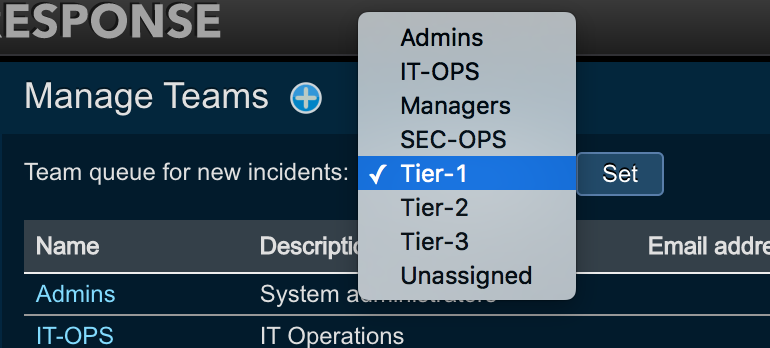
Threat Response users can create the default team queue where all unassigned incidents will land. To create the default queue, perform the following:
- Log in to Threat Response.
- Navigate to the
System Settings>User Management>Manage Teamspage. - Click on the dropdown list next to
Team queue for new incidents - Choose the default team
- Hit
Set
Assigning Users to Teams
Teams consist of users, and several users can be assigned to a team. In order to put the user into a team, perform the following:
- Log in to Threat Response.
- Navigate to the
System Settings>User Management>Manage Userspage. - Choose a
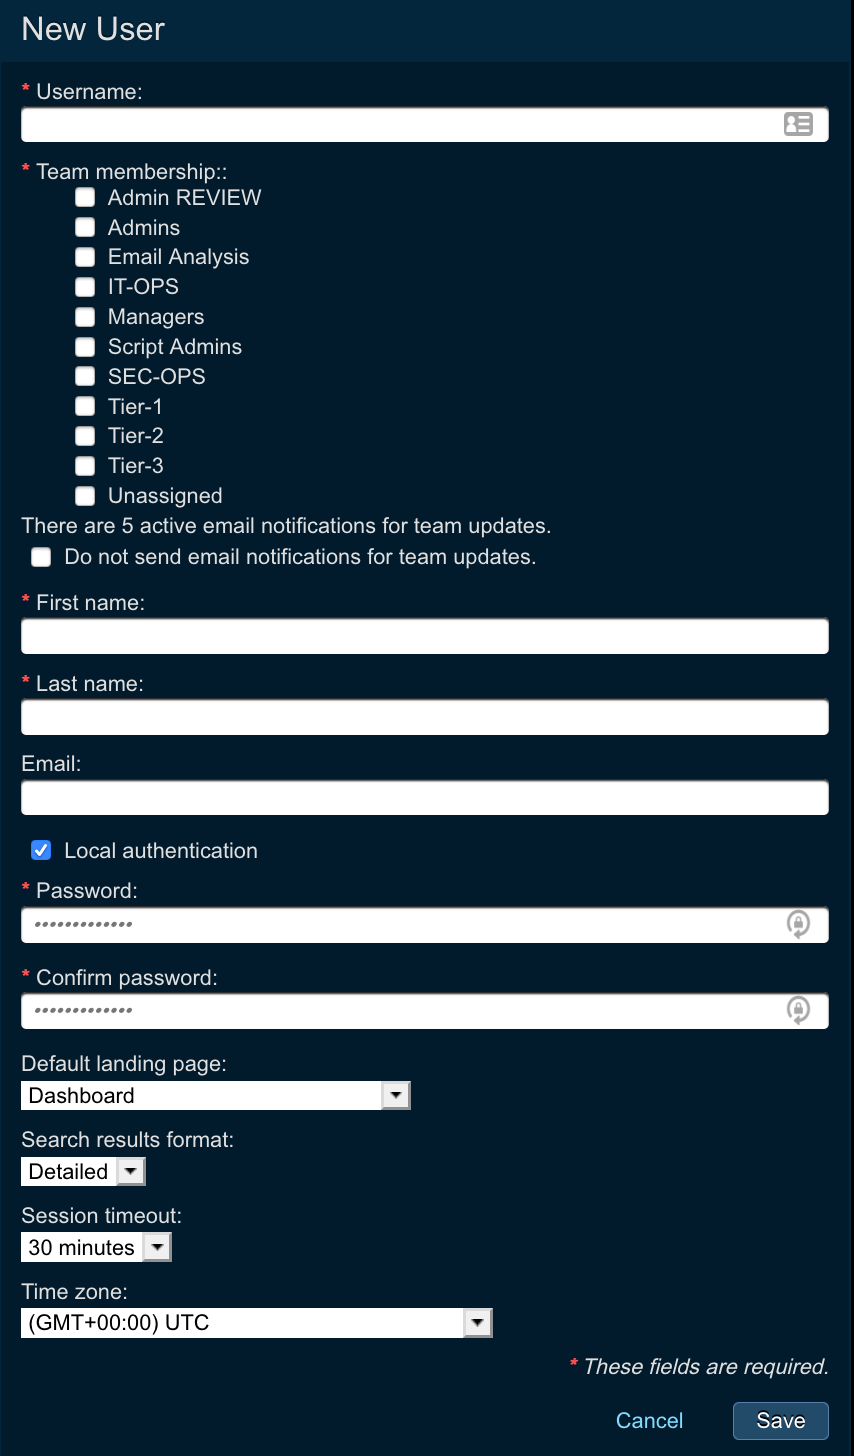
usernamethat you want to place to a team, or click on the Add (+) button to create a new user. - Click on the teams you want to assign the user to
- Enter
First Name,Last Nameand optionally theemail address - Assign a local
passwordto the user - Choose the
default landing pagethe user will see - Choose the
Search results format(should always be detailed) - Choose the
session timeoutfor the user - Choose the
timezonefor the user - Click
Save
