Threat Response Auto Pull (TRAP) - Troubleshooting guide
Troubleshooting guide is created for Threat Response Auto Pull (TRAP) administrators who need to troubleshoot various functionality of Threat Response Auto Pull. This document covers the information on how to find EWS URL, how to set permissions in Microsoft Exchange, how to configure throttling policy, as well as other miscellaneous topics.

Finding Exchange EWS URL
When configuring Threat Response Auto Pull, you need to specify the URL of Exchange Web Service (EWS) for your Exchange environment.
Microsoft Exchange 2010, 2013 and 2016
The URL can be composed using the following syntax: https://<EXCHANGE_SERVER_HOSTNAME>/EWS/Exchange.asmx
Microsoft Exchange Online / Office 365
Access your journaling mailbox account using Outlook Web App (OWA)
Click Options > See All Options > Account > My Account > Settings for POP, IMAP, and SMTP access
In the list of entries, locate the server name. The URL of exchange web service is the URL: https://outlook.office365.com/ews/exchange.asmx
Using Microsoft Exchange Management Shell
Exchange Management Shell and run the following command.
Get-WebServicesVirtualDirectory |Select name, *url* | fl
The output will be similar to the following:
Name                 : EWS (Default Web Site)
InternalNLBBypassUrl : https://server name/ews/exchange.asmx
InternalUrl          : https://server name/EWS/Exchange.asmx
ExternalUrl          : https://mail.domain.com/ews/exchange.asmx
Setting Quarantine Permissions in Exchange
Overview
The Exchange user account used for connecting to Exchange Web Services for running with TRAP quarantines needs read-only permission on targeted mailboxes in Exchange. There are two methods for granting the required access permission to this user account before you can perform quarantines:
- Setting up Application Impersonation Role (recommended): “Application Impersonation” is a pre-defined role in Exchange. It is very simple to grant this role to an Exchange user.
- Setting up Full Access Permission: This method is an easy one-line command that you can execute on Windows PowerShell and provide the needed access permission for running the quarantines.
Note
TRAP itself does not make any configuration changes to your Exchange environment.
Setting Up Application Impersonation Role
Here are the steps for setting Up Application Impersonation Role using Exchange Management Shell:
- If you don’t have a service account you want to use for Exchange, create one. Make sure it has an associated mailbox.
-
Check which accounts have Application Impersonation role at this point:
Get-ManagementRoleAssignment -Role ApplicationImpersonation -
After running the command above, if you already see user account that has this role, you can stop here. If not, proceed to the next step to create a role and add this user to that role.
-
Assign
ApplicationImpersonationrole to the user account by replacing the highlighted text:New-ManagementRoleAssignment -Name:UniqueNameForThisAssignment -Role:ApplicationImpersonation -user:Domain\ServiceAccount -
Run step 2 to make sure user was successfully added to this role.
Setting Up Full Access Permission
Exchange 2010, 2013 and 2016
To give full access to a user, run the command below in PowerShell:
> Get-User -resultsize unlimited | Add-MailboxPermission -User user@yourdomain.com -AccessRights fullaccess -InheritanceType all
“Get-User” is a pre-defined command that returns all the users and user@yourdomain.com is the user account you plan on using for quarantines.
Office 365
The cmdlet below will give all members of a user full access to all User Mailboxes.
> Get-Mailbox -ResultSize unlimited -Filter {(RecipientTypeDetails -eq 'UserMailbox')} | Add-MailboxPermission -User tenant_user@yourdomain.onmicrosoft.com -AccessRights FullAccess -InheritanceType alltenant_user@yourdomain.onmicrosoft.com is the Office 365 user account you plan on using for quarantines. Make sure you replace this with the correct user account for your environment.
Note
You will need to re-run the add permission cmdlet each time you add a new mailbox to the targeted listed of mailboxes to make sure that the permissions apply. If you want to remove these permissions, you do that by just replacing the second cmdlet from Add-MailboxPermission to Remove-MailboxPermission.
Configuring EWS Throttling Policy
The throttling policies in Exchange affect not only EWS, but also all client connections to the Exchange server, including the protocols used by Office Outlook, Outlook Web App, and Exchange ActiveSync. These Throttling policies are assigned per user, and the system has a default throttling policy out of the box.
To improve TRAP quarantine speed, we strongly recommend removing EWS Throttling policy for the user account you plan on using for email quarantines.
Important
Office 365 does not expose throttling policies. Office 365 subscribers should contact Microsoft with any throttling questions. These instructions only apply to on-premise Exchange deployments.
Throttling Settings for Application Impersonation role vs. Full Access
There are two options for the EWS Service Account configured for TRAP:
- TRAP EWS User has Full Access Permission: If you’re quarantining using a service account that has Full Access permissions, then just set a throttling policy with unlimited (or high number) EWS settings (as already described in the installation guide) for that account.
- TRAP EWS User has Application Impersonation role: If you’re quarantining with impersonation, you must create and assign a new throttling policy to quarantine-user, but you must also allow each individual account more head room. To do so, it’s likely that the best course of action is to update the default throttling policy on the network.
Settling Throttling Policy for TRAP EWS User
From the Exchange Management PowerShell (run on the CAS), you can see the existing policies by running:
> Get-throttlingpolicyTo create a new policy that has no EWS throttling and assign it to the quarantine user, do the following:
- Create a new policy:
> New-throttlingpolicy PFPT_ThreatScanner_ThrottlingPolicy- Set the EWS throttling portion of that new policy to “unlimited”:
For Exchange 2010, use the following:
> set-throttlingpolicy PFPT_ThreatScanner_ThrottlingPolicy -EWSMaxConcurrency $null -EWSPercentTimeInAD $null -EWSPercentTimeInCAS $null -EWSPercentTimeInMailboxRPC $nullFor Exchange 2013 and 2016:
> Set-ThrottlingPolicy PFPT_ThreatScanner_ThrottlingPolicy -EWSMaxConcurrency Unlimited -EWSMaxSubscriptions Unlimited -EwsCutoffBalance Unlimited -EwsMaxBurst Unlimited -EwsRechargeRate Unlimited- Assign the policy to the quarantine user:
> Set-ThrottlingPolicyAssociation -Identity Domain\TRAPService -ThrottlingPolicy PFPT_ThreatScanner_ThrottlingPolicyNote
Replace Domain\TRAPService with your service account
Updating User’s Default Throttling Policy
Spot Checking a User’s Throttling Policy
To spot check whether a user has a throttling policy or not, run this:
Get-ThrottlingPolicyAssociation SomeUserYou’ll see output like this:
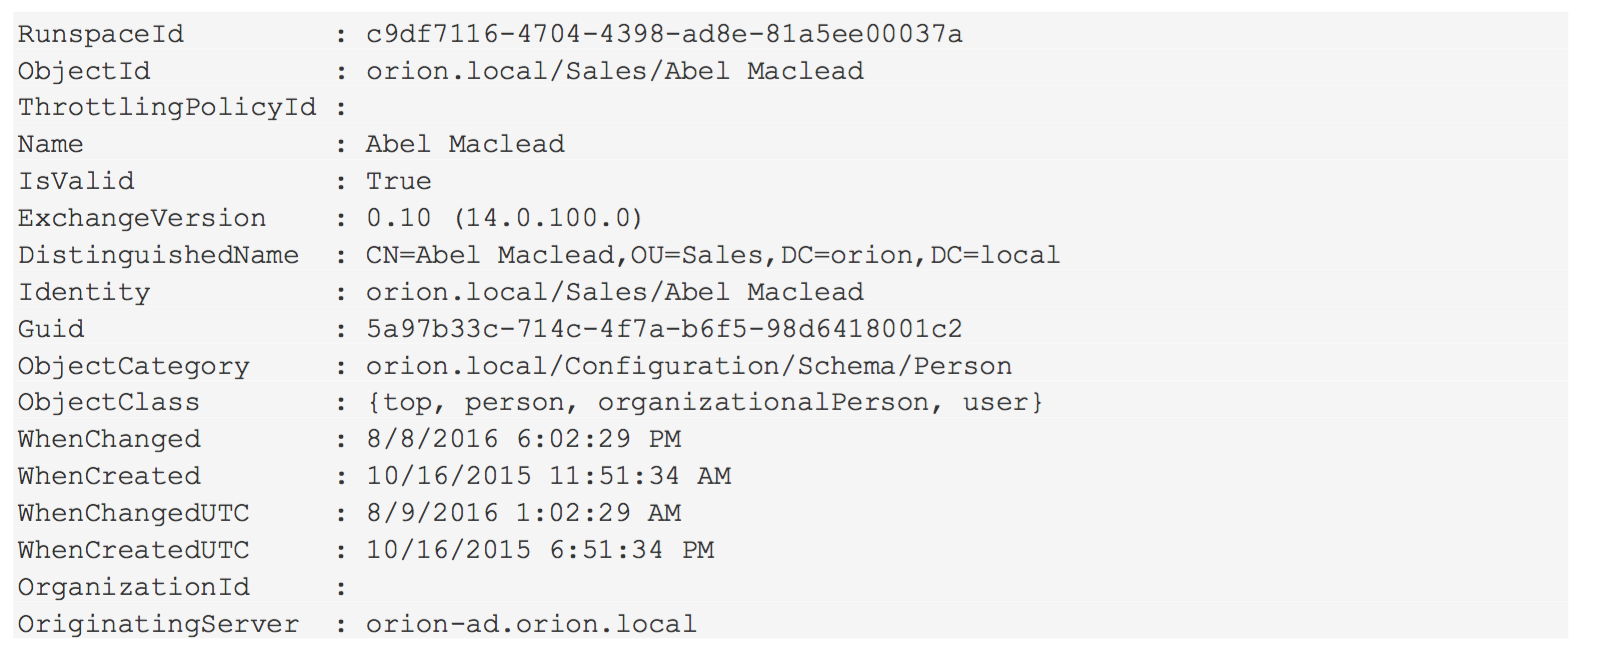
Note the absence of an entry in the field ThrottlingPolicyId. That means the user has no specific throttling policy assigned, and they therefore use the default. We expect this to be pretty common.
Updating Default User Policy
To find the default throttling policy, run this:
Get-ThrottlingPolicyAll of the throttling policies will be displayed, so it may be easier to pipe this to a file. Look for the policy with the value
IsDefault: TrueIt’ll likely have a name like this:

That’s the name we need. Before going forward, save a copy of the policy someplace, we’ll need these values to put them back after we’re done:

To change the default policy to allow the unlimited scanning we need for EWS, run this command:
Set-throttlingpolicy DefaultThrottlingPolicy_71fed85e-87a8-4078-8ce5-190832e2ae3c - EWSMaxConcurrency $null -EWSPercentTimeInAD $null -EWSPercentTimeInCAS $null - EWSPercentTimeInMailboxRPC $nullReplacing “DefaultThrottlingPolicy_71fed85e-87a8-4078-8ce5-190832e2ae3c” with the appropriate value. If the customer happens to have a global throttling policy assigned to all users, they can use the same command with the appropriate policy name to set the values as required by TRAP.
If you show the policy again after running this command, you’ll see:

Importing Self-Signed Exchange CAS Certificate
If you are using self-signed certificate on Exchange CAS server for EWS service, you will need to import the cert to TRAP certificate store. This section provides detailed steps for importing self-signed certificate to TRAP using the appliance management console.
Get the Intermediate and Root Certificates
- Download the server certificate from browser or the server itself.
- On windows OS, open the Certificate by double clicking on the certificate file and navigate to Certificate Path tab.
- Copy the Intermediate Certificate to text file:
- Double click on Intermediate cert (Middle in the tree)
- Navigate to “Details” tab
- Click “Copy to File…”
- Click Next and then, select “Base-64…”
- Click Next and save it to a file named “Intermediate”
- Hit “OK” to close the intermediate certificate
- Copy the Root Certificate to text file:
- Double click on Root cert (Top one in the list)
- Navigate to “Details” tab
- Click “Copy to File…”
- Click Next and then, select “Base-64…”
- Click Next and save it to a file named “Root”
- Open both the “Intermediate.cer” and “Root.cer” in a notepad.
Add the Local CA Certificate to TRAP
- Navigate to the TRAP appliance management console at https://{trap_host}:8080
- Scroll down to “Add New Certificate” section.
- Give a name for “Certificate Name”
- Copy paste the content from Intermediate.cer followed by Root.cer to the “Enter a certificate string in PEM format” box.
- Click “Add Certificate”
- Click “Save’ on top right corner to save the certificate to Appliance.
- Scroll down to “Default Supplemental CA Certificate List”.
- Select your newly added certificate and click “Add CA Certificate”
- Click “Save’ on top right corner to save the configuration to Appliance.
