Threat Response - Integrating With Closed Loop Email Analysis & Response (CLEAR)
Closed-Loop Email Analysis and Response streamlines end-user reporting and security response to email attacks, thus reducing the time needed to neutralize an active threat from days to minutes.
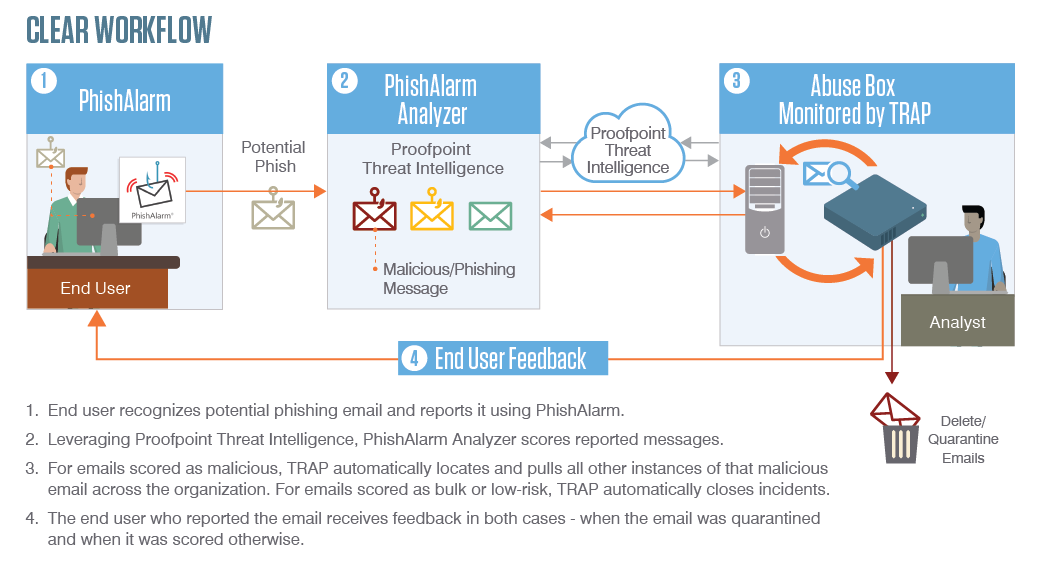
End users can report suspicious messages with a single click using PhishAlarm, and then the messages are forwarded automatically to PhishAlarm Analyzer to be dissected and analyzed against multiple intelligence and reputation systems. All URLs and attachments (within the messages) are detonated in a sandbox as part of the analysis, and then the messages are forwarded to an Abuse Mailbox monitored by Threat Response.
Messaging admins can initiate “manual” or “auto-pull” of malicious email messages from the sender’s mailbox using Threat Response. If a message was forwarded to other users, the initial removal follows, i.e. each forwarded message is quarantined as well. In addition, messaging admins can configure email templates to be sent to end users for the purpose of providing feedback on their respective submissions and for thanking them for promoting a safe organization.
Feature Overview
- The PhishAlarm email client add-in allows users to report suspicious messages to security teams via the Report Phish button.
- End-user reporting to the abuse mailbox is greatly simplified. A single click ensures that all relevant data is delivered directly to Threat Response to be analyzed.
- PhishAlarm Analyzer submits messages to Proofpoint Threat Intelligence for analysis and then forwards that information to Threat Response.
- Threat Response enables fast and simple prioritization of reported emails. Most messages can be resolved automatically by using rules that are available in Threat Response. Messaging admins can also initiate a “delete” or a “quarantine” action manually with a single click.
- Threat Response provides an opportunity to configure email templates to be sent to end users with feedback on their respective submissions and to thank end users for promoting a safe organization.
- Security analysts receive an auditable history of actions taken, including a message’s “read” status, lists of forwarded messages, and dashboards of key indicators about the remediation process.
Integrating CLEAR
The steps below describe the process of integrating CLEAR into Threat Response.
Important
Before configuring Threat Response, both PhishAlarm and PhishAlarm Analyzer must be configured. Refer to the PhishAlarm and PhishAlarm Analyzer Administrator Guide in your PhishAlarm “module” by following the navigation path highlighted directly below the PhishAlarm Add-in Installation Information heading under PhishAlarm > Install.
Creating a CLEAR Mailbox
Create a new mailbox in your mail environment for receipt of suspected phishing messages from PhishAlarm Analyzer exclusively.
This mailbox must be accessible using the service account configured in System Settings > Email Integration.
Configuring an Abuse Mailbox Event Source
Once the CLEAR mailbox has been created, you will need to create an Abuse Mailbox event source in Threat Response. Refer to the Abuse Mailbox Integration Guide for detailed instructions.
Configuring PhishAlarm and PhishAlarm Analyzer
- Log in to your Wombat Platform Account.
- Navigate to
Products>PhishAlarm>Settings -
Select
Send to the following TRAP email address.
-
Enter the email address of the abuse inbox monitored by TRAP.
-
Click on
Save.
Important
The email address applicable to Step 4 directly above must be the same as that which is configured in the Abuse Mailbox Monitor source of Threat Response. Further, this email address is not to be used in any of the Wombat Phish Analyzer settings.
Threat Response frequents the abuse mailbox regularly and creates incidents based on the messages it finds.
Incidents are assigned the following severities in Threat Response based on the abuse disposition assigned by Proofpoint Threat Intelligence:
| Abuse Disposition | Incident Severity Value |
|---|---|
| Unknown | Informational |
| Low Risk | Informational |
| Bulk | Informational |
| Suspicious | High |
| Spam | High |
| Malicious | Critical |
Abuse Dispositions
In brief, abuse dispositions are (generated) “verdicts” founded on an analysis of emails submitted to Proofpoint Threat Intelligence. Abuse dispositions are primarily based on
- a static analysis of email content,
- a comparison between third-party and proprietary signatures, and
- dynamic sandboxing of all attachments and URLs.
See the following for a list of available dispositions. Click on each disposition to see examples of the corresponding match conditions, responses and sample email templates for end-user notification.
| Abuse Disposition | Interpretation | Recommended Remediation |
|---|---|---|
| Malicious | It is more than likely that these emails contain threats such as malware or phish or impostor. |
|
| Spam | These emails are spam. |
|
| Suspicious | These emails are likely to be malicious in nature; it is recommended to quarantine these emails but review them to ensure that no legitimate email is lost. |
|
| Bulk | Such emails are of the low priority/promotional type. Thus they do not pose a threat. |
|
| Low Risk | Proofpoint Threat Intelligence found no indication of malicious content upon analyzing the emails. |
|
| Unknown | These emails do not present any malicious content (upon dynamic sandboxing by Proofpoint) and are therefore unlikely to pose a threat. However, prudence is urged. Review these emails manually. |
|
Match Conditions for Abuse Dispositions
Proofpoint Threat Response/TRAP uses match conditions, or “rules” that can trigger response actions based on incoming alerts that “match” a set of criteria. Match conditions for the abuse mailbox should trigger the value of the abuse disposition field. Such “rules” will cause responses to be executed automatically provided the criteria have been satisfied. Common response actions include quarantining emails and sending feedback emails, among other actions.
Setting Up Match Conditions
The process of creating and managing match conditions is initiated by accessing the Sources screen from the Threat Response navigation bar. It is from this screen that you can manage the CLEAR-related alert source (from which Threat Response receives abuse mailbox alerts) and set up Automatic Responses by creating match conditions. Once you have selected the CLEAR-related abuse mailbox source, the match conditions are in the right-hand column.
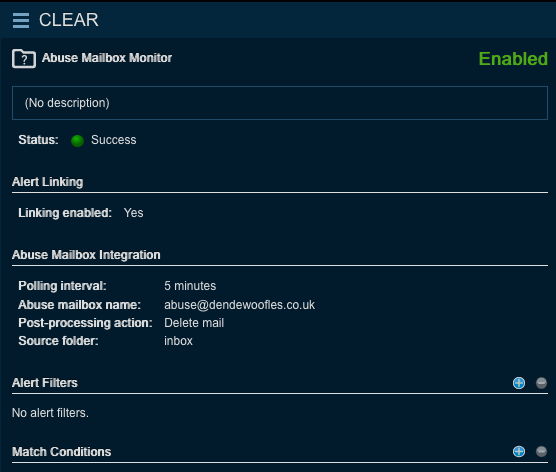
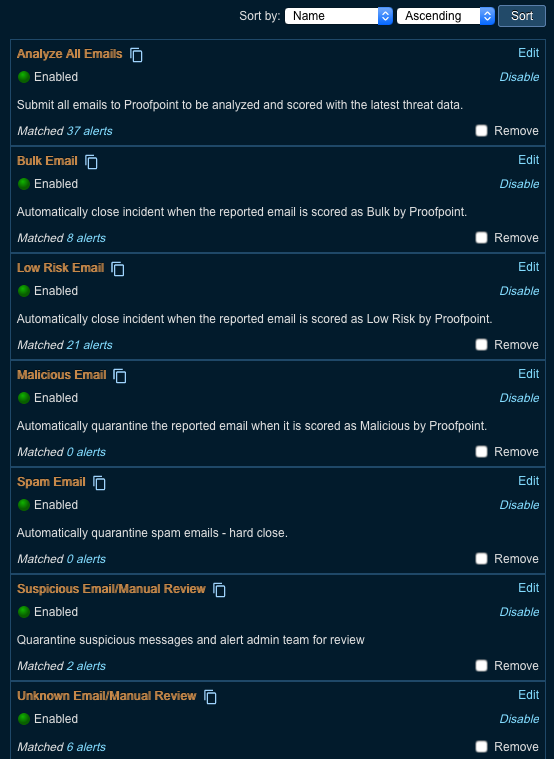
Example of a CLEAR Match Condition and Response
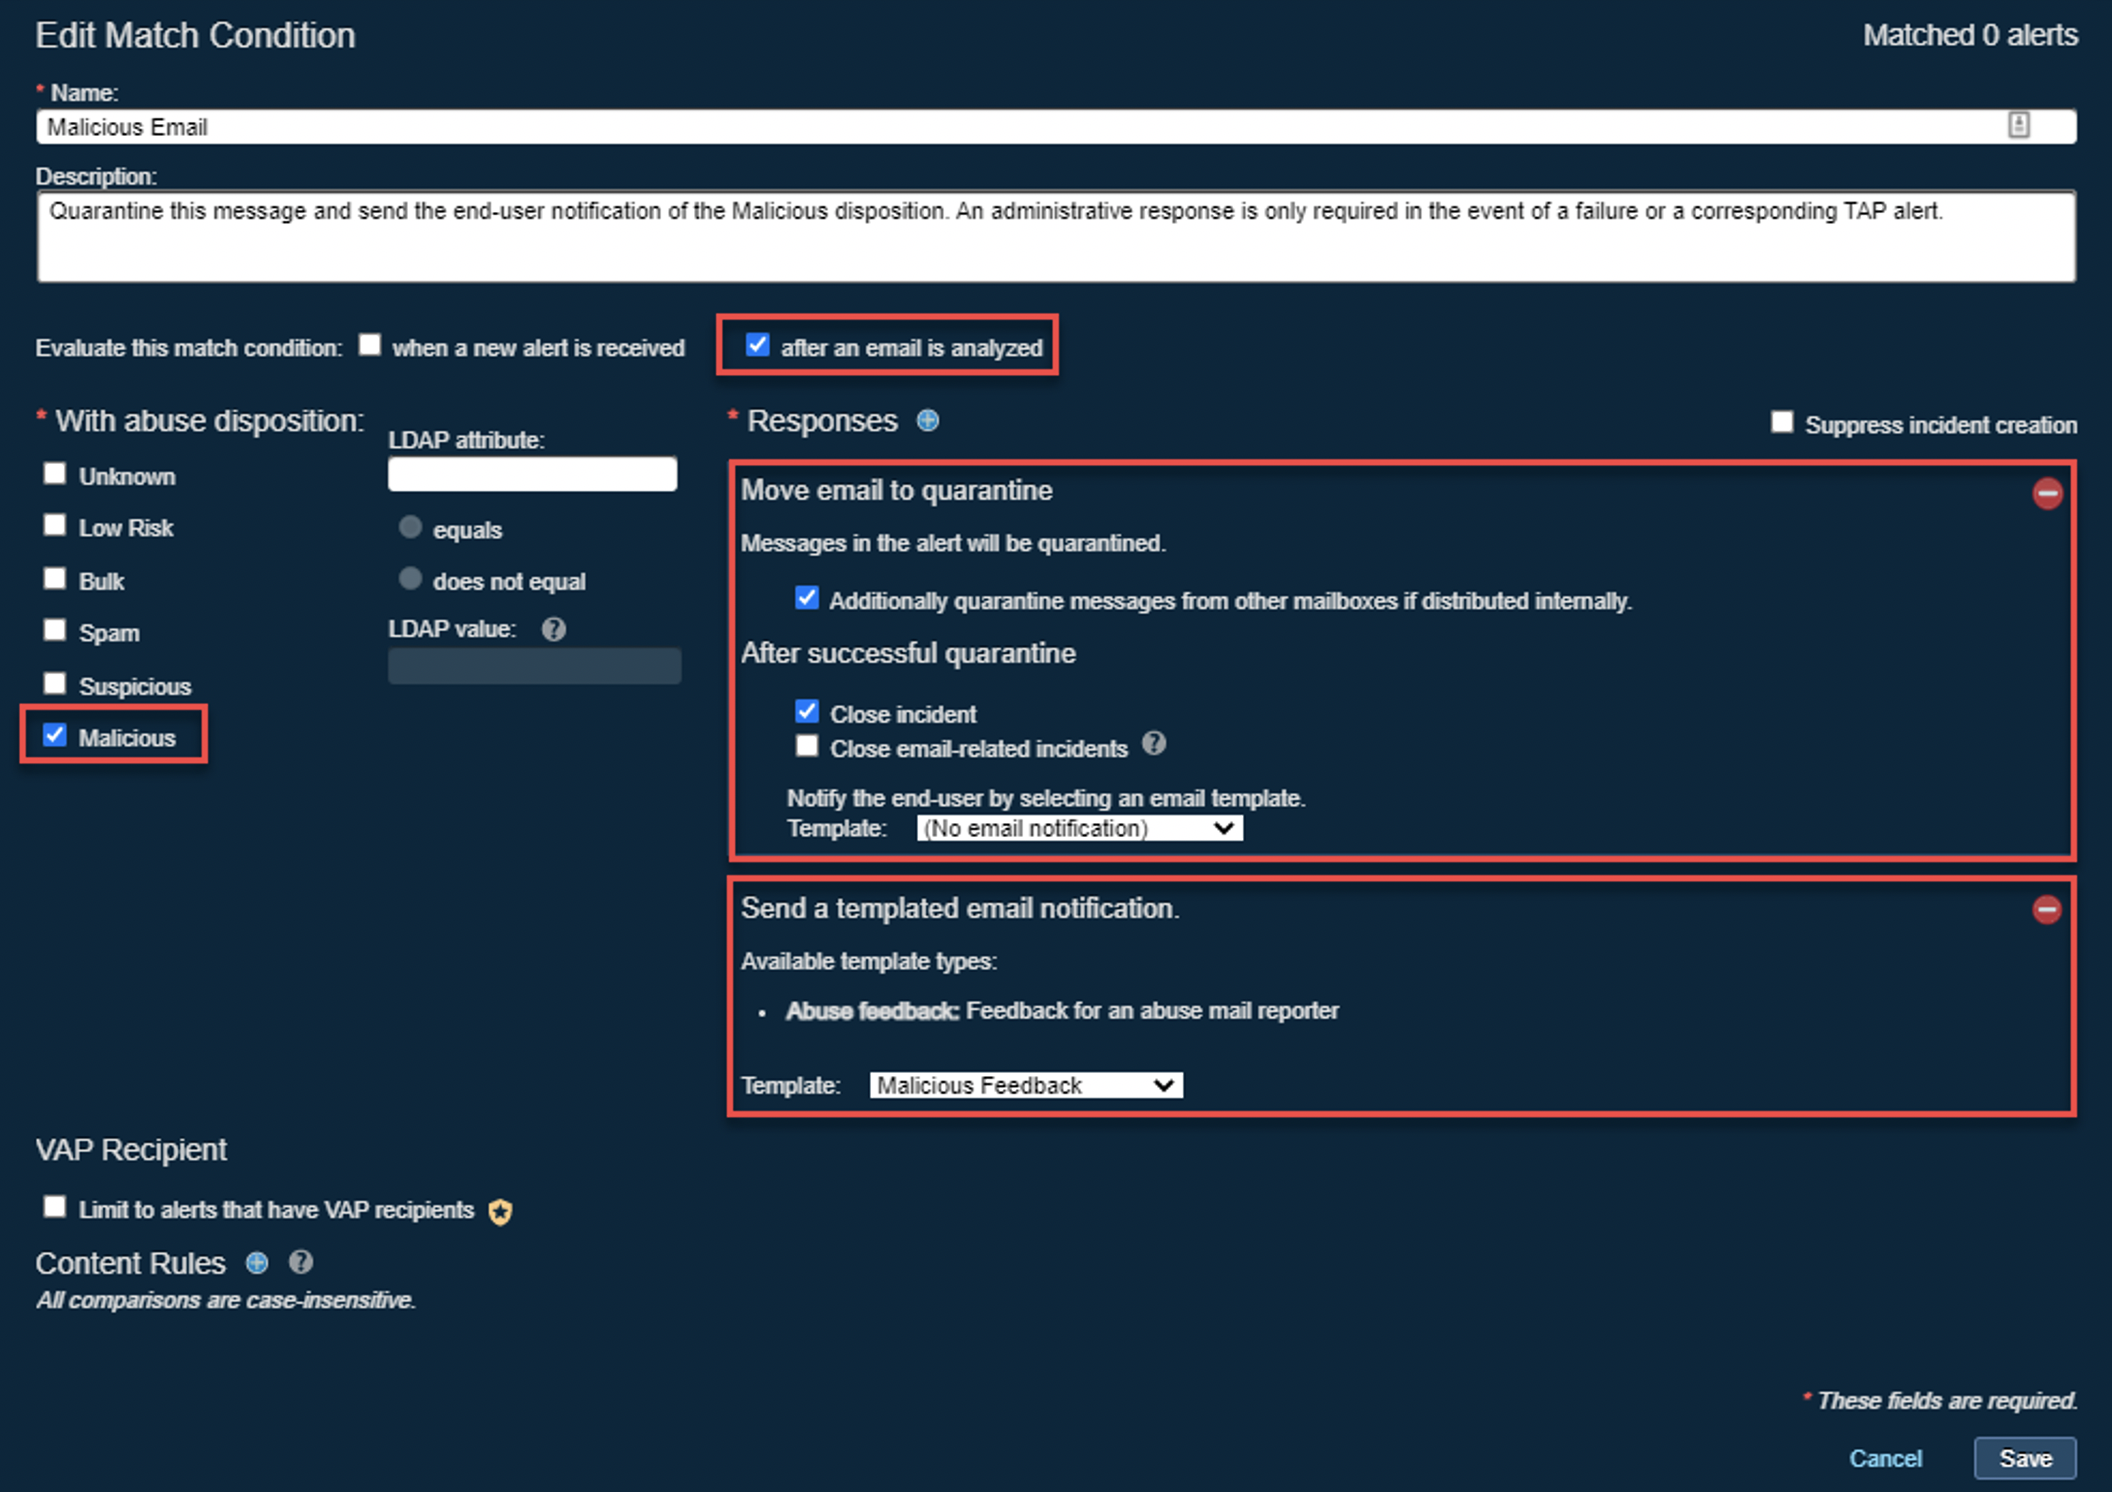
Three distinct elements of a match condition are integral to its ability to respond effectively. Use the example of a configured match condition for a “malicious” abuse disposition (above) as your point of reference with respect to the following information.
Sections Under a Match Condition
- When a match condition is evaluated: The single row directly below the “Description” field of a match condition represents the condition that determines when a match condition is evaluated. This condition should be triggered ‘after an email is analyzed’ and when an alert is received for all CLEAR-related match conditions (except for ‘Analyze All Emails’).
- The “conditions” in which a match condition is triggered: The section on the left-hand side of the dialog box, including the alert severities, abuse dispositions, and LDAP attributes, defines the criteria for a match condition. Note that all alert severities are usually marked with a tick but only a single abuse disposition is selected for CLEAR-related match conditions.
- What Response is taken: The response to be taken when a match condition is triggered is determined via Responses. Responses can be added and configured by clicking on the plus sign alongside the Responses heading.
Note that you have the option of informing an end user of the result of the response via automated email for all CLEAR-related match conditions.
Setting Up Email Templates
A second kind of notification can be sent to the end user when they report a specific email (of a given type). This automated notification is configured directly below the Responses section under Send a templated email notification.
Note that it is possible for you to customize email templates from the System Settings screen rather than use the default templates.
- Access the System Settings screen by means of the gear button in the top right-hand corner of the Sources screen.
- Click on Email Templates under Email Notifications.
- Click on the plus sign alongside the Email Templates heading to Add a new Email Template.
- Edit or Remove a preconfigured template by clicking on the hamburger button alongside the template heading.
- You can also add additional recipients such as your SOC team to an email template.
Note that each of the abuse dispositions has a preconfigured “feedback” template. (Further, an actual email always includes a screenshot of the feedback’s corresponding match condition as well.) The preconfigured templates can be viewed in the Recommended Match Conditions for Abuse Dispositions section below.
Recommended Match Conditions
Proofpoint’s recommended match conditions are prepopulated to reflect the key elements pertaining to the abuse dispositions.
Importantly, these match conditions are disabled by default. Therefore, you will have to enable them manually to receive the benefits of the CLEAR solution.
You have the capability to perform the following actions in this section.
- Click on Enable to activate a match condition.
- Click on the plus sign alongside the Match Conditions heading to create a new match condition.
- Click on Change to edit a match condition.
- Click on Disable to deactivate a match condition.
- Mark the box alongside a match condition with a tick to remove the match condition.
And lastly, you are reminded that it is possible to customize a match condition to suit your needs.
Recommended Match Conditions for Abuse Dispositions
Malicious

| Field | Value |
|---|---|
| Name | Malicious Email |
| Description | Quarantine the reported email automatically when it is scored as “malicious.” |
| Evaluate this match condition | after an email is analyzed. |
| For alerts of severity | Critical |
| With abuse disposition | Malicious |
| Send a templated email notification. | Template: “Malicious - V2” Feedback |
| Responses | Move email to quarantine |
| Messages in the alert will be quarantined. | Additionally, quarantine messages from other mailboxes if distributed internally. |
| After successful quarantine | Close incident |
| Notify the end user by selecting an email template. | Template: No email notification |
Malicious Feedback
Date and Time
Subject: Your reported message about “{{SUBJECT}}” from “{{SENDER}}”
Body: Thank you for your report! Automated threat analysis of the message “{{SUBJECT}}” from the “{{SENDER}}” deemed it necessary to have this email quarantined as it was “malicious.” Thank you for reporting this threat and keeping your organization safe.
Spam
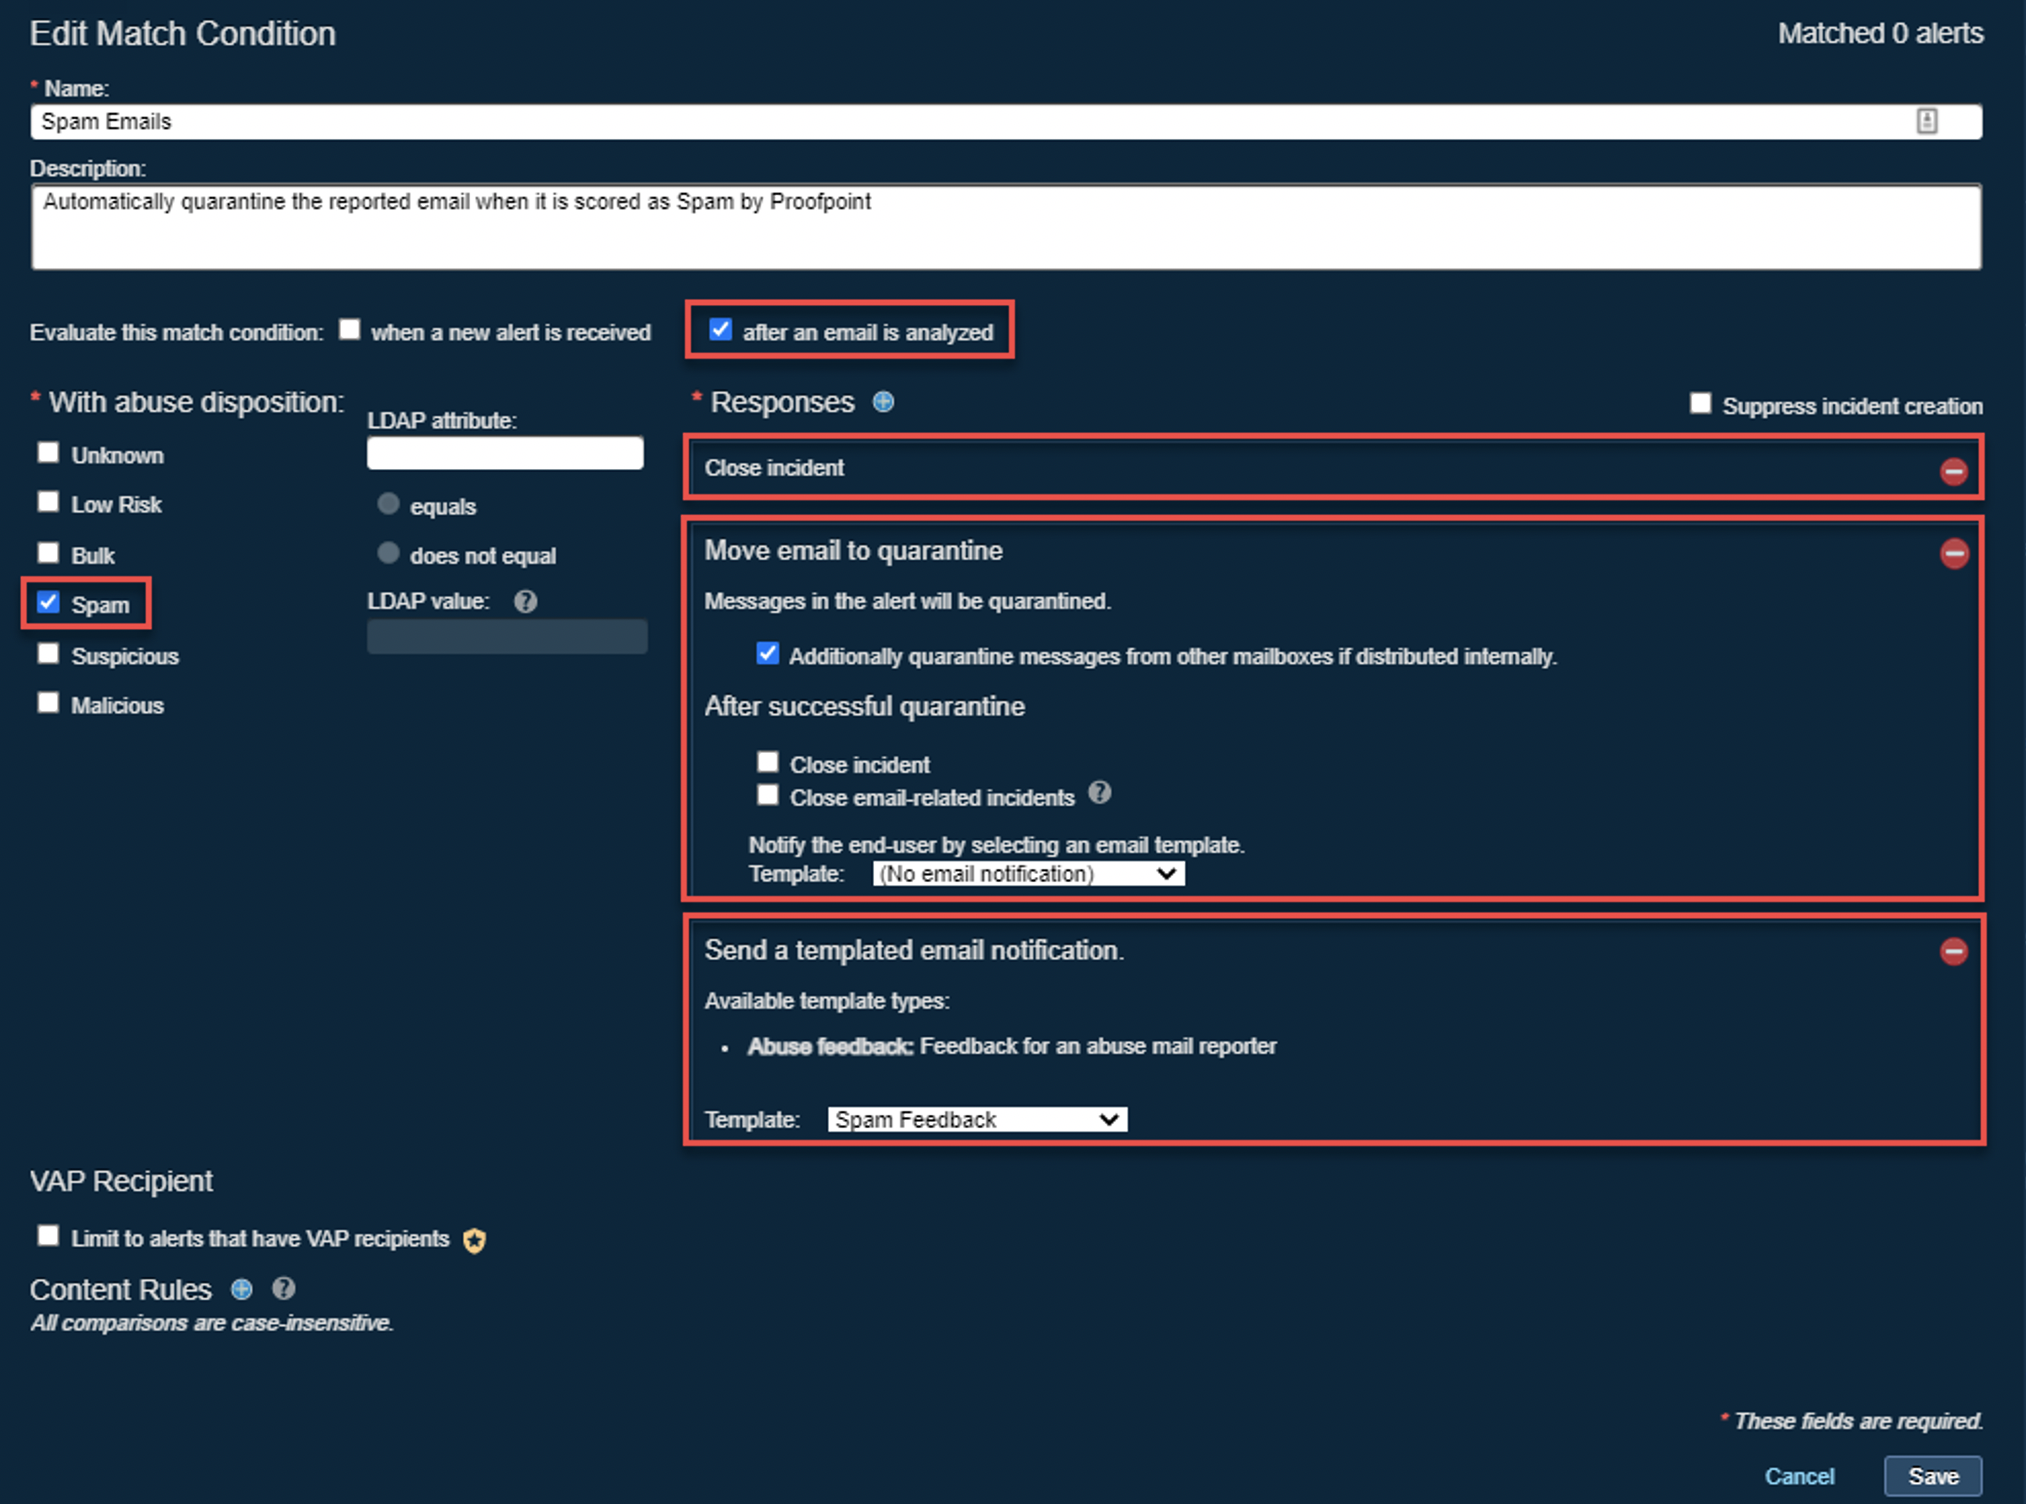
| Field | Value |
|---|---|
| Name | Spam Email |
| Description | Remove, close, and notify user |
| Evaluate this match condition | after an email is analyzed. |
| For alerts of severity | Major |
| With abuse disposition | Spam |
| Send a templated email notification. | Template: “Spam” Feedback |
| Responses | Close incident |
| Responses | Move email to quarantine |
| Messages in the alert will be quarantined. | Additionally, quarantine messages from other mailboxes if distributed internally. |
| After successful quarantine | Close email-related incidents |
| Notify the end user by selecting an email template. | Template: No email notification |
Spam Feedback
Date and Time
Subject: Your reported message about “{{SUBJECT}}” from “{{SENDER}}”
Body: Thank you for your report! Automated threat analysis deemed it necessary to classify the message “{{SUBJECT}}” as “spam.” The message will be removed from your mailbox. No further action is necessary. Thank you for making a concerted effort to keep your organization safe.
Suspicious
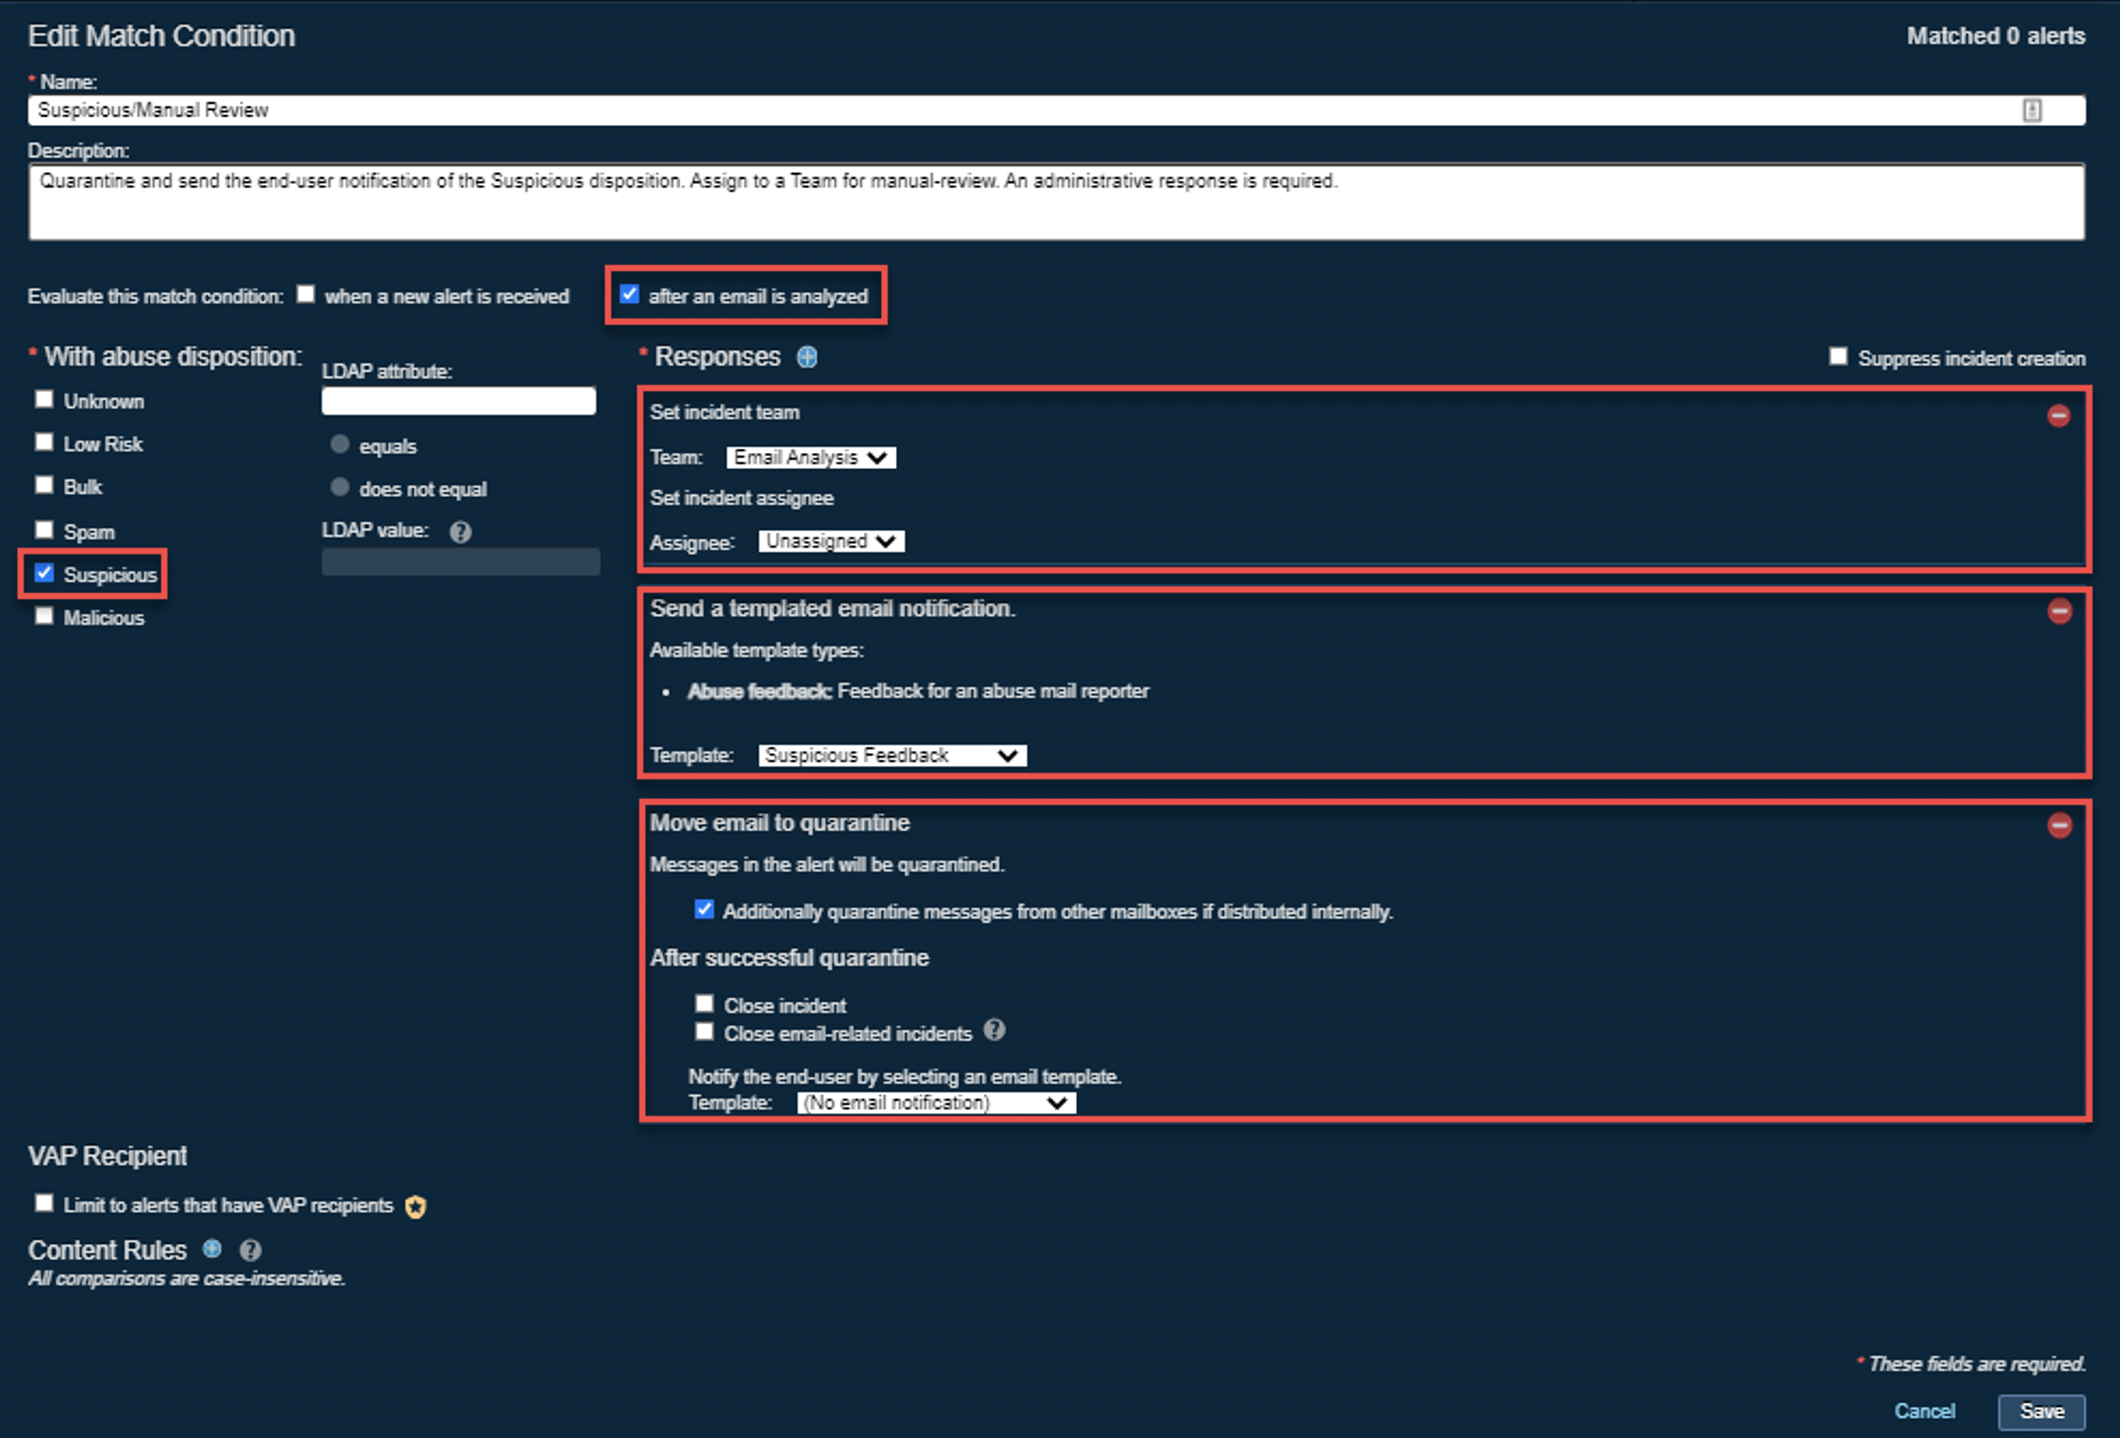
| Field | Value |
|---|---|
| Name | Suspicious Email |
| Evaluate this match condition | after an email is analyzed. |
| For alerts of severity | Critical, Major, Minor, Informational |
| With abuse disposition | Suspicious |
| Responses | Move email to quarantine |
| Messages in the alert will be quarantined. | Additionally, quarantine messages from other mailboxes if distributed internally. |
| Notify the end user by selecting an email template. | Template: No email notification |
| Send a templated email notification. | Template: Suspicious Email Acknowledgment |
Suspicious Feedback
Date and Time
Subject: Your reported message about “{{SUBJECT}}” from “{{SENDER}}”
Body: Thank you for your report! Automated threat analysis has classified the message “{{SUBJECT}}” as “suspicious” and this message will be removed from your inbox. The message will be reviewed by your IT security team and restored to your mailbox in the event that this email was found to be clean. Contact servicedesk@example.com for additional guidance. Thank you for making a concerted effort to keep your organization safe.
Bulk
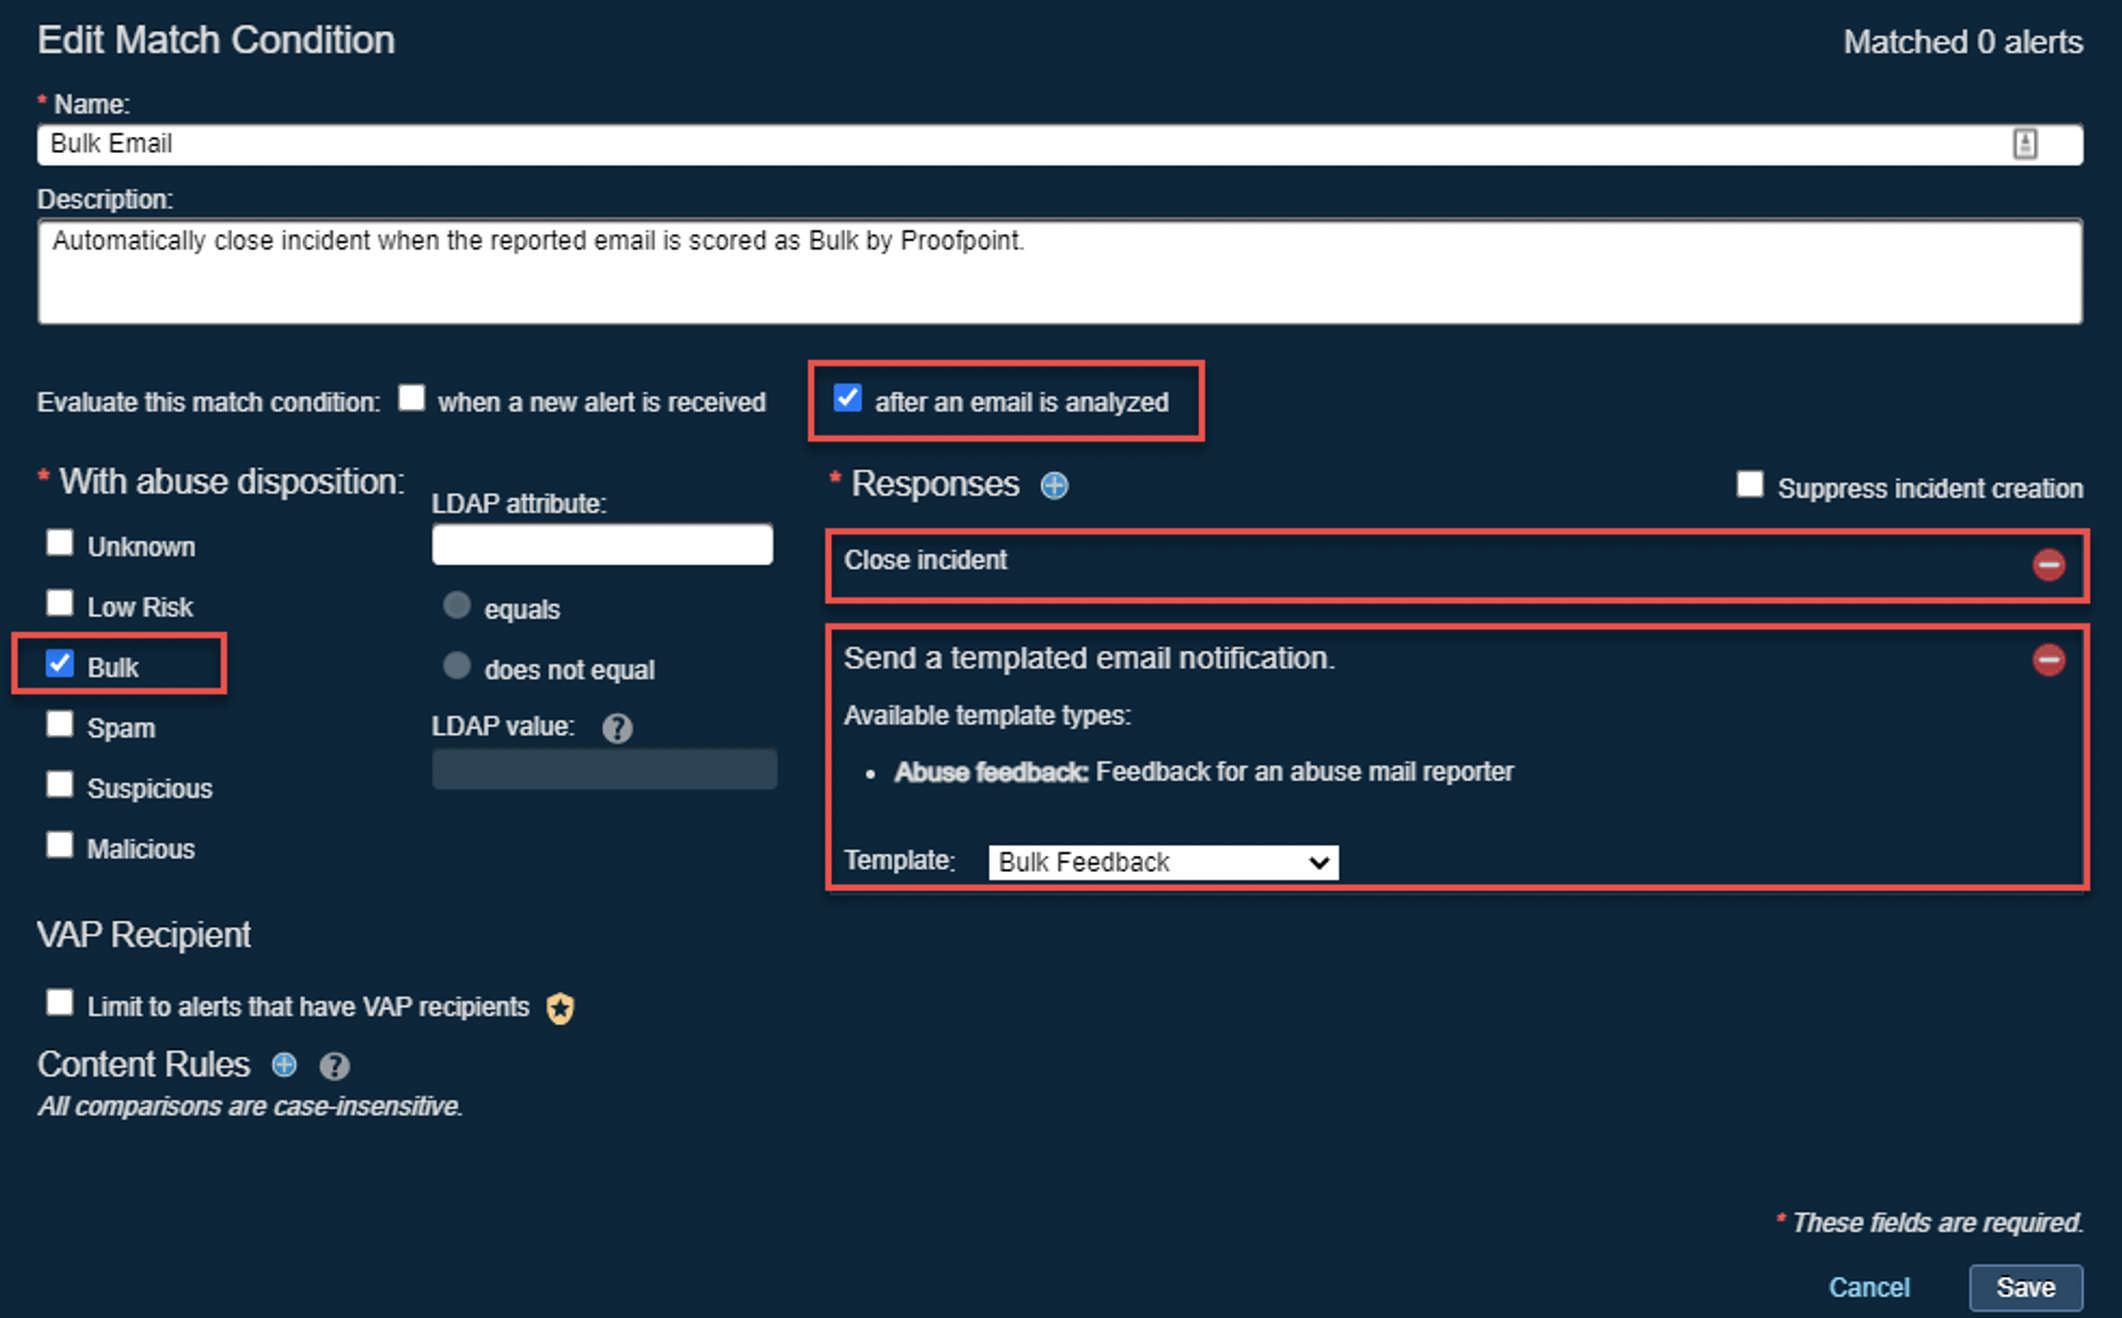
| Field | Value |
|---|---|
| Name | Bulk Email |
| Evaluate this match condition | after an email is analyzed. |
| For alerts of severity | Informational |
| With abuse disposition | Bulk |
| Send a templated email notification. | Template: “Bulk” Feedback |
| Responses | Close incident |
Bulk Feedback
Date and Time
Subject: Your reported message about “{{SUBJECT}}” from “{{SENDER}}”
Body: Thank you for your report! Automated threat analysis deemed it necessary to classify the message “{{SUBJECT}}” as “bulk”–perhaps it was widely distributed. You have the option of unsubscribing or blocking the sender altogether. Thank you for making a concerted effort to keep your organization safe.
Low Risk
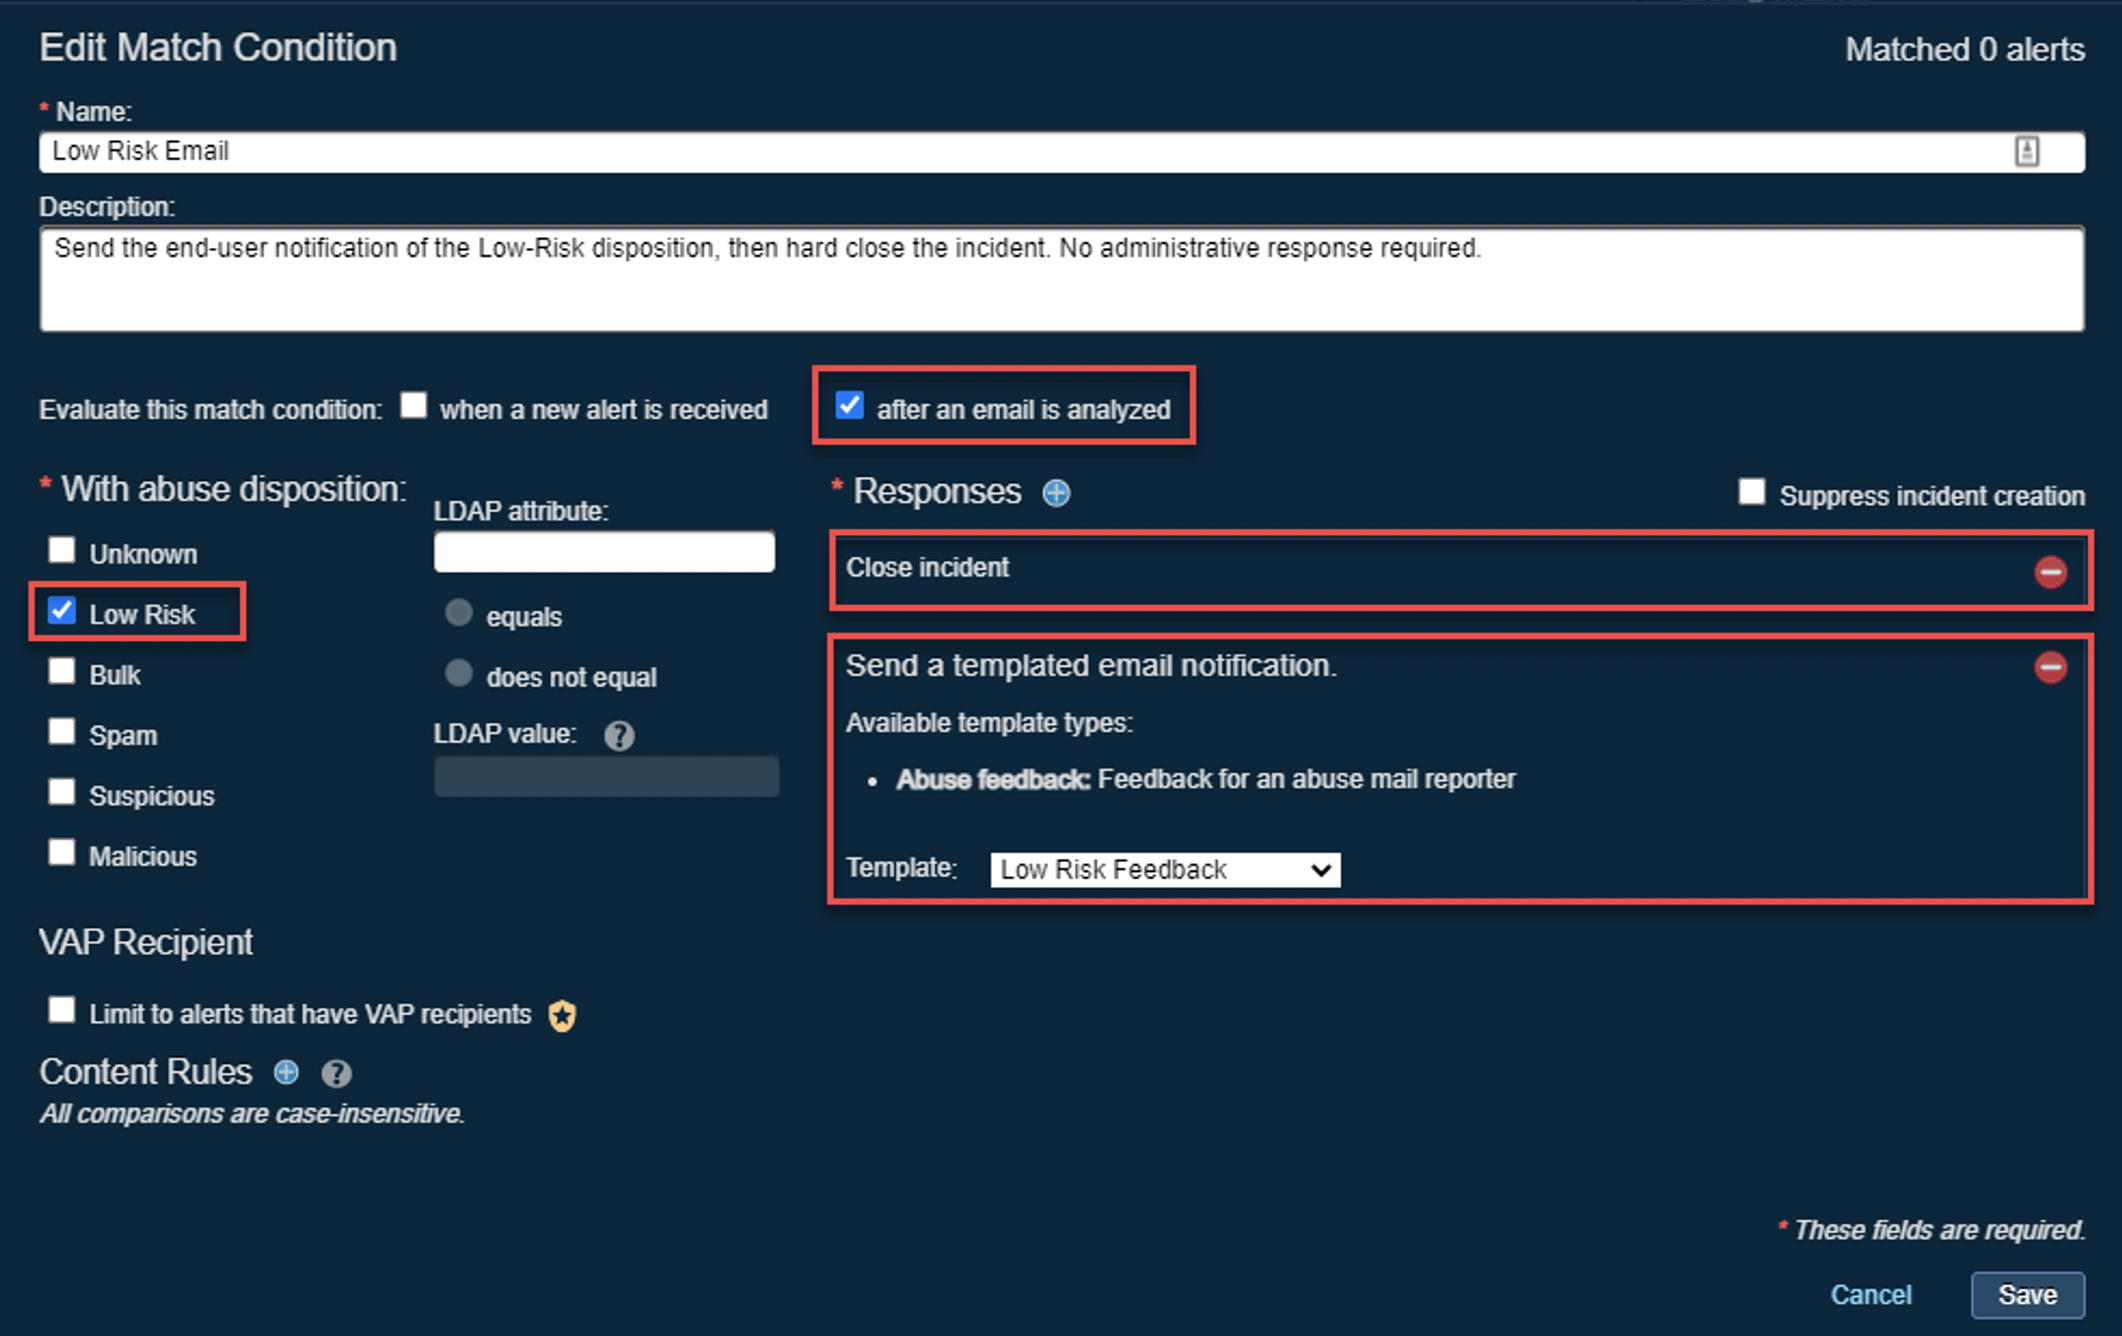
| Field | Value |
|---|---|
| Name | Low-Risk Email |
| Evaluate this match condition | after an email is analyzed. |
| For alerts of severity | Informational |
| With abuse disposition | Low Risk |
| Send a templated email notification. | Template: “Low Risk” Feedback |
| Responses | Close incident |
Low Risk Feedback
Date and Time
Subject: Your reported message about “{{SUBJECT}}” from “{{SENDER}}”
Body: Thank you for your report! Automated threat analysis deemed it necessary to classify the message “{{SUBJECT}}” from the “{{SENDER}}” as “low risk” because at the time of analysis, no threat was found. If there is any suspicious behavior be sure to report this message again.
Unknown
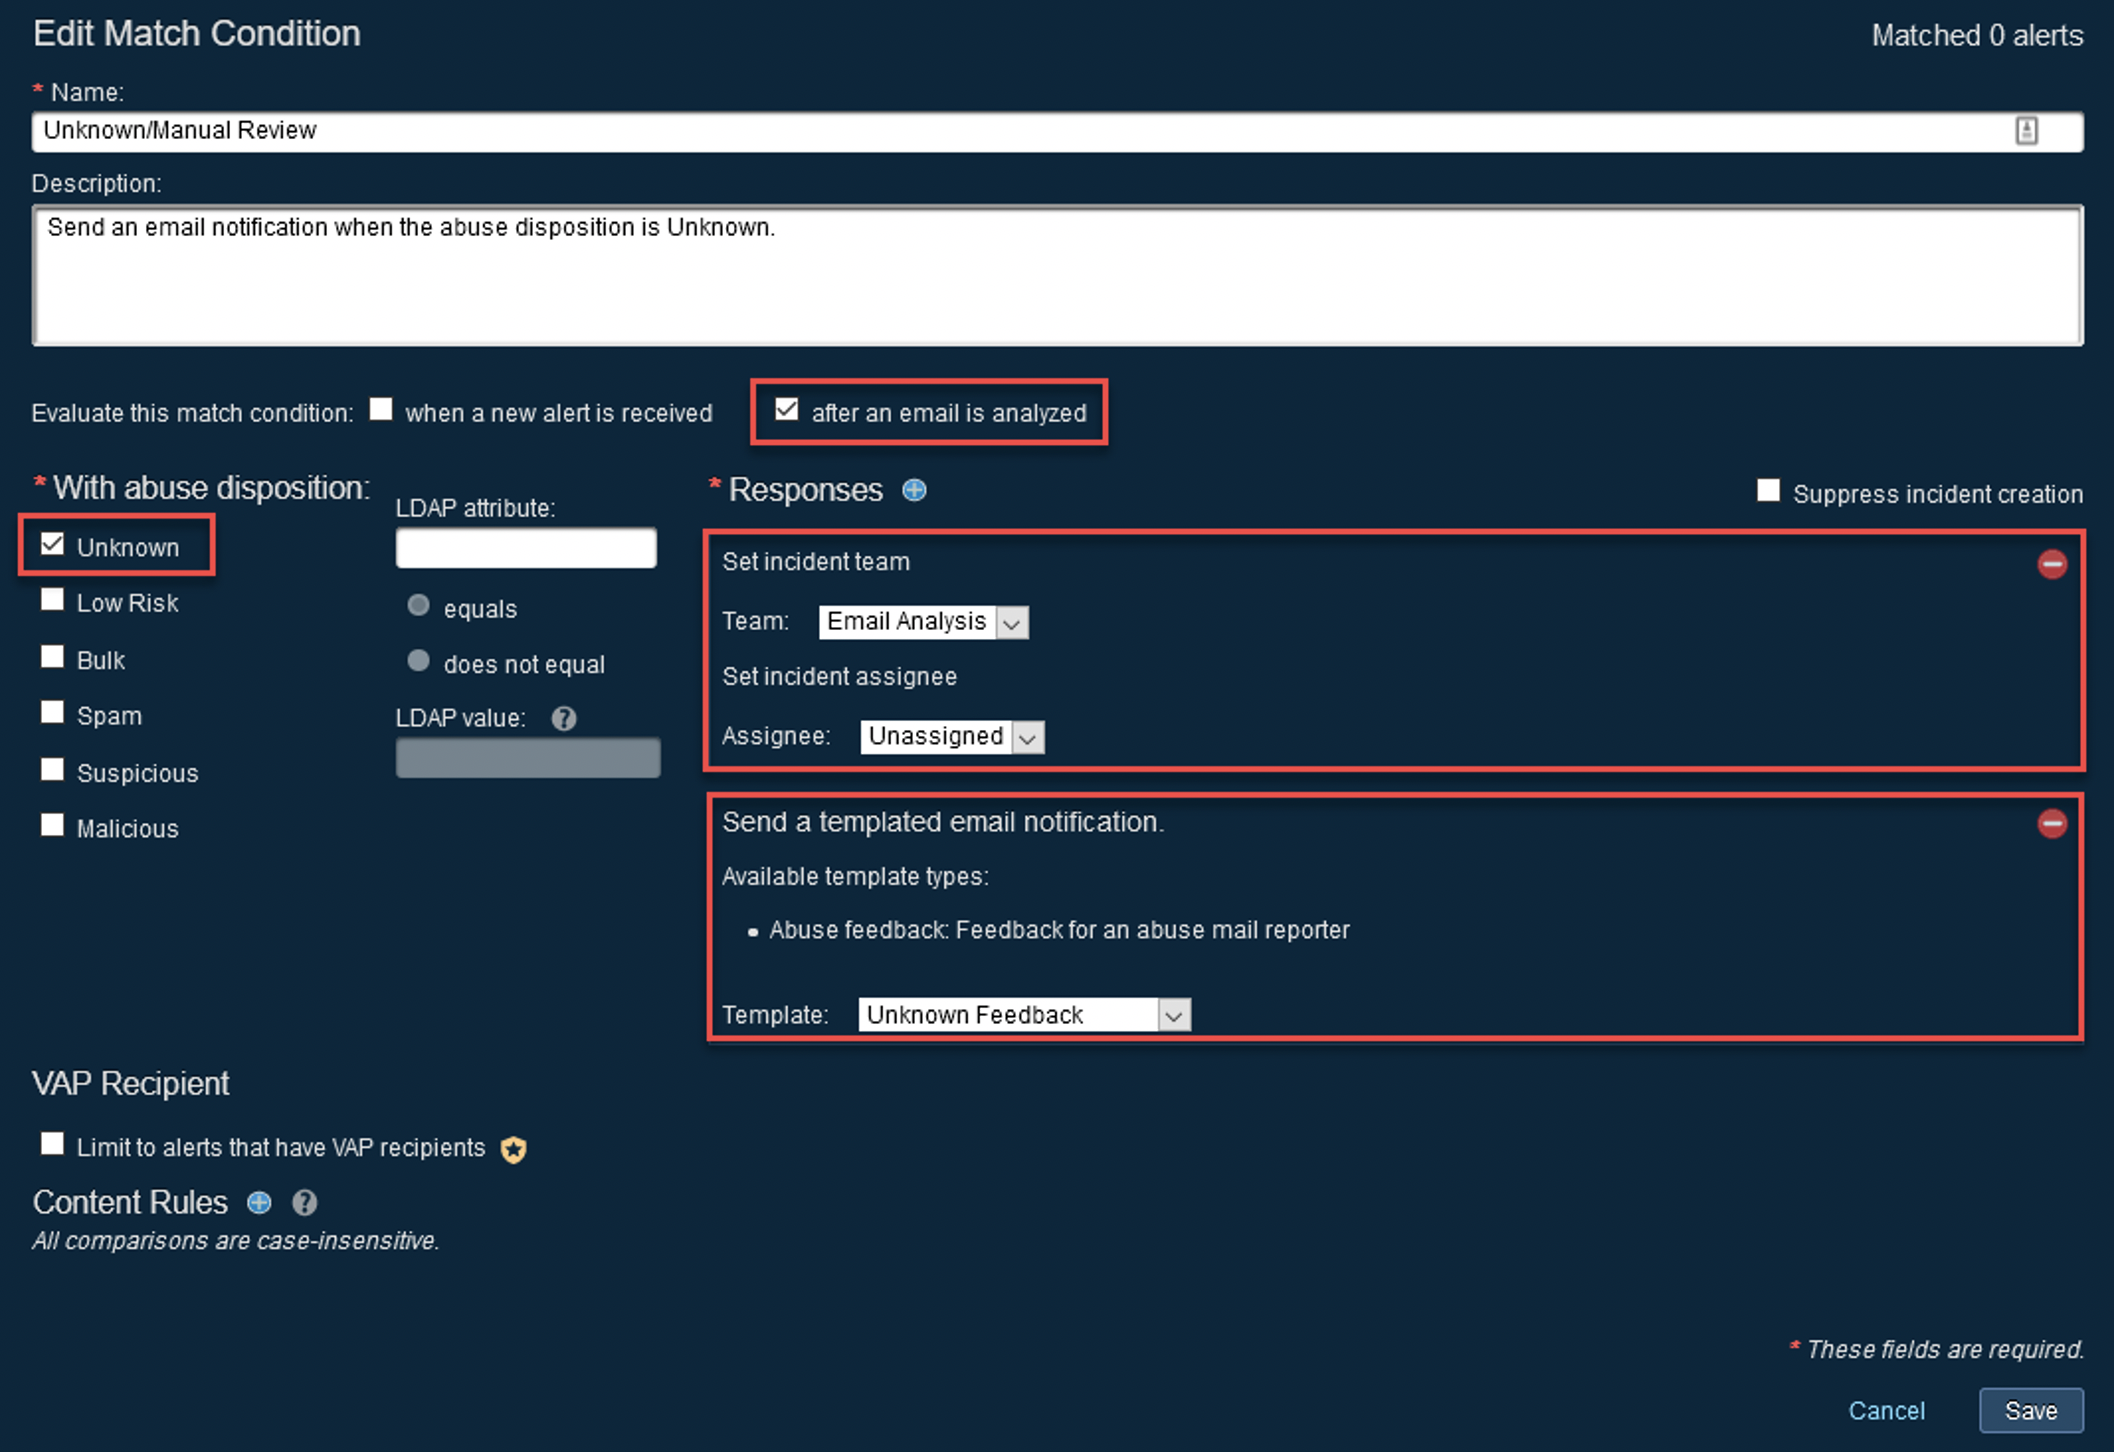
| Field | Value |
|---|---|
| Name | Unknown Email |
| Evaluate this match condition | after an email is analyzed. |
| For alerts of severity | Informational |
| With abuse disposition | Unknown |
| Send a templated email notification. | Template: “Unknown” Feedback |
Unknown Feedback
Date and Time
Subject: Your reported message about “{{SUBJECT}}” from “{{SENDER}}”
Body: Thank you for your report! Automated threat analysis was unable to render a verdict on the message “{{SUBJECT}}” and thus this message has been passed on to your IT security team for further review. Do not respond to the “{{SENDER}}” at this time. Contact servicedesk@example.com for additional guidance. Thank you for making a concerted effort to keep your organization safe.
Configuring Email Notifications for Abuse Incidents that Need Manual Review
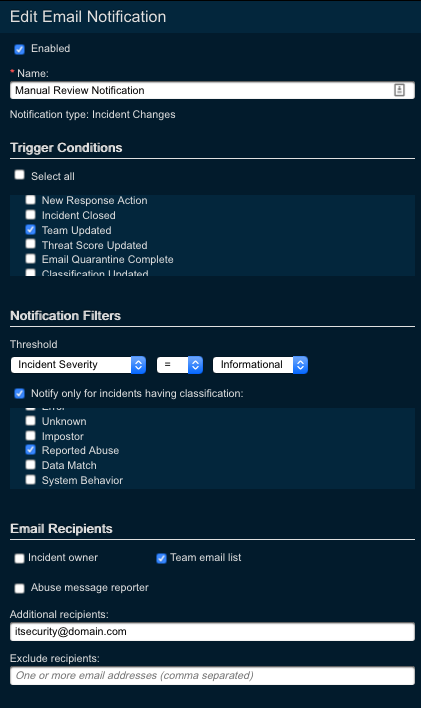
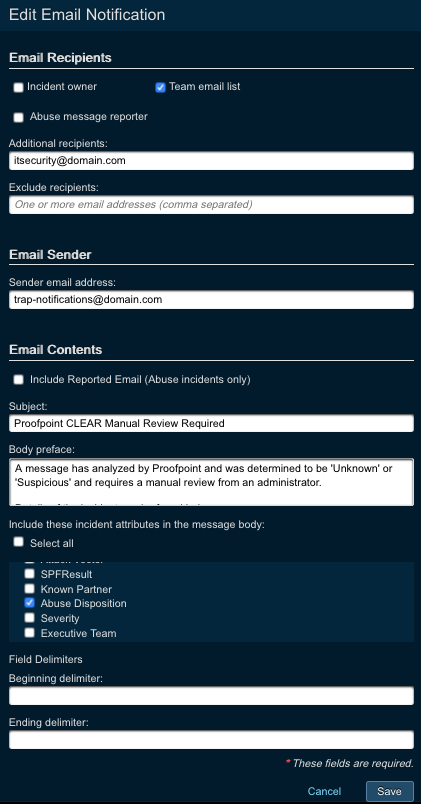
With PTR/TRAP 5.3, email notifications can be configured to trigger based on a team or incident field update for incidents that receive an ‘Unknown’ or ‘Suspicious’ abuse disposition implying that they need manual review. The configuration for these is two-step.
- An email notification needs to be configured under the System Settings > Email Notifications section. The Email notification should be of type ‘Incident Changes’ with the Condition Type of ‘Team Updated’. The Notification Filters threshold should be set to ‘Incident Severity >= Informational’. Other parameters on the notification can be configured as desired from the email.
Configuration under System Settings > Email Notifications > Add New (+)
- The Unknown/Suspicious match condition should trigger an email notification for manual review by the administrator team. Simply choose a response of “Set incident team” and choose the correct team that has an email address associated with it.
Settings under match conditions under the abuse mailbox monitor alert source

FAQs
Troubleshooting CLEAR
Problem: Once CLEAR is configured, TRAP processes every reported email twice and therefore skews the following data: reporter, attacker, and target (of the email in the incident/alert).
Effective Solution: Make certain that the email address entered into the “Forward to the following TRAP email address” field (on the PhishAlarm Analyzer settings page) is the address configured in the Abuse Mailbox Monitor source (Threat Response). Importantly, the email address should not be used in any of the PhishAlarm Analyzer settings. Lastly, verify that the TRAP Abuse Mailbox email address is not the same as the PAA/PA email address to which reports are sent.
Problem: TRAP identifies the reporter of a phishing email as an attacker and PhishAlarm Analyzer as the target.
Effective Solution: If PhishAlarm Analyzer receives an email via the PhishAlarm add-in that includes a TNEF attachment or a disclaimer, Analyzer is not capable of processing/scoring the reported email accurately. Therefore, Analyzer can artificially inflate the score and inhibit TRAP from “pulling” the email correctly from the distinct abuse mailbox to which it belongs. Additional information is available in the following guide: CLEAR and TNEF Attachments/Disclaimers.
Lastly, see the Abuse Mailbox Monitor integration guide for more information.